

As an Amazon Associate I earn from qualifying purchases.

coming up we're taking three basic
everyday items and upgrading them with BTS level style hey Armys! welcome to
the Sewing Report I'm Jen this channel is all about sewing crafts and DIY project
coming at you with yet another BTS themed edition we are focusing on
fashion I'm going to show three things I bought and transformed to show that I'm
a true kpop stan if you want to skip ahead to a specific project time stamps
are below but let's get started with this snazzy t-shirt this is a cotton
polyblend v-neck from jiffy shirts and I'm using Avery printable heat transfer
paper for dark fabrics it comes in a five pack and includes the tissue paper
to protect your iron you do need an inkjet printer no need to mirror the
image and I printed on normal not photo quality settings I found at the center
of the t-shirt hem and marked a line from the v-neck to the bottom to help
place the transfer then I marked horizontal lines using the underarm on
each side after removing the backing off the transfer I placed on the center at
the underarm seam checking with the roller to make sure it's centered to
permanently affixed the transfer it's pretty simple place the tissue paper
over it and press with the dry iron in sections using heat settings appropriate
for the fabric don't use an ironing board you want a hard surface like wood
with something like a pillowcase on top once the transfer cools carefully peel
off the paper but I'm not done yet I also wanted to paint something on the
back to protect the t-shirt I inserted a quilting ruler covered with plastic wrap
with an air soluble pen I wrote my text out BTS of course now the fun part
breaking out the white fabric paint unfortunately I had some recording
issues so most of the painting isn't documented but here's the last part I
tried to give it sort of a hand-lettered look I love how colorful the shirt is
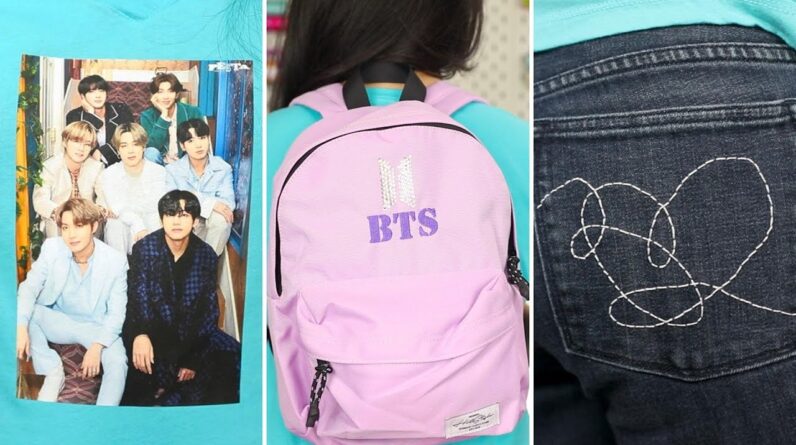
and this is one of my favorite photos of the guys next I took an old pair of
jeans and decided to customize one of the back pockets you probably have a
boring pair of plain jeans right how about adding a little BTS flair using
the love yourself answer album cover for inspiration I
freehand drew the artwork that looks like a heart with an air soluble pen
it's not perfect but I think it's close enough supplies are simple thick cotton
thread and embroidery needles a needle threader does come in handy though if
you have trouble with the threading the hand embroidery stitch I'm doing is
called the back stitch I nodded the end of the thread and went in between the
pocket and back fabric of the jeans be sure not to stitch through both layers
because you do want to be able to use the pockets the needle actually goes
back one stitch first and comes out one stitch ahead so the pattern will be back
one stitch on top forward two stitches underneath following the line I drew you're supposed to insert the needle
into the same hole where the thread emerged from previously but I could have
done better in this aspect when sewing through more than one layer a thimble
also helps save your thumb to finish off the embroidery I inserted the needle
through all layers to the inside of the jeans brought it up inside the pocket
then I tied a knot and cut if you ever decide you don't like the
design it's easy enough to remove later but I don't think I'll do that because
it looks super cute last one but it might be my favorite yes this is a
blinged-out BTS mini backpack this backpack is gonna go from basic to bang
tastic my expectations were low but the quality was better than I expected and
it has a lot of functionality in terms of pockets it even has a padded sleeve
for my iPad and a zippered pocket for your phone I thought it would be cool to
embroider BTS in an army style font and purple thread and do a rhinestone
crystal logo here's a look at the process using an embroidery machine and
I did a more in-depth how-to video if you want to watch the whole thing
you don't necessarily need the machine you could embroider by hand paint or
draw lettering instead here's how I did the bling first I printed out an image
and used an exacto knife to cut out the logo position the paper onto the
backpack where you want it and trace the outline with an air soluble pen to
protect the inside from glue I've placed a paper towel under the front but I
didn't end up having any issues so I guess this isn't really necessary I have
a crystal ninja crystal katana wax pick up tool and a lot of flat back
rhinestones crystals working in rows I applied small dots of gem tack glue in a
fine tip bottle and individually set each rhinestone don't be scared of the white glue it
does dry clear the glue doesn't set right away so you do have time to
reposition before they're permanently set in stone haha I can't believe how
good the backpack looks with the sparkly logo okay so clearly this BTS obsession
seems to be spilling out in all areas of my life and you know what I'm totally ok
with that anyways I hope you guys enjoyed this video as much as I did
making it I'm gonna go express my BTS fandom now
wherever I can and if you're interested in seeing other sewing or crafting
videos here on the channel I have plenty of them including one I did recently
with more BTS DIYs I'm Jen with the Sewing Report I'll see you guys again in
the next video

As an Amazon Associate I earn from qualifying purchases.


