

As an Amazon Associate I earn from qualifying purchases.

It’s a few days before my "office makeover" video goes live. During the move, our Ikea drawer units lost a few of their legs. I’m removing the remaining legs and scraping the glue off and adding wheels instead! I seem to have developed an addiction to adding wheels to furniture, haha. You can easily find inexpensive wheels (<1€) at hardware stores. One wheel done 🙂 It will be more convenient since we can easily move it around the room. I’m moving mine to my future DIY room, and Pat’s stays beside his desk. Whenever I’m working on a room, I make a digital checklist. Sometimes I use Notion, sometimes Apple Notes. On top, I have a general “grocery list” – things I need to purchase. My to-do list is grouped by the different areas of the room and broken down into smaller tasks. Having smaller tasks make it seem more accomplishable, and motivates me to continue checking things off the next day 🙂 Next, I’m going to DIY a door to hide my computer.
It should hide the computer, but also provide ventilation. To make the frame, I’m drilling dowel holes in four 13x19mm wood strips. Drill holes directly into the edges of two wood strips. Add wood glue and dowels into the holes. For the other two strips, drill dowel holes on the ends. Do a dry fit first, then attach the frame together with wood glue. Use 90 degree clamps to hold the frame in place while the glue dries. Reinforce with staples on the corners. I chose a loose-weave fabric that can hide the computer but still allow hot air to escape easily.
I’m not wrapping the fabric around as I want the frame to be seen, so I just lay it on the inside of my frame and staple to secure. This step seemed like it took forever, haha. Cut excess fabric. To match the rest of the doors, I’m painting the frame an oatmeal colour. To attach the door, I found inexpensive brass hinges at the hardware store. I also drilled holes at the edges of the cabinet to put magnets. I always enjoy reading your comments ^^ I’ve been working on other parts of the apartment and haven’t had time to organize the drawers yet. Before starting, I like to roughly plan out what I’m organizing. I do this by making a table to represent each drawer. Things that are used frequently will be prioritised into the higher drawers. The bottom drawers are for “random” things, miscellaneous things that are odd-shaped, or don’t have a specific category.
This is my favourite organizer from Ikea, which I’ve mentioned a lot. I realised I can fit 4 of them perfectly into the 80cm Platsa drawer. Organization is all about grouping things into categories so I like that this organizer already separates things into groups. Clip loose ribbons together for neater storage. Sometimes it also makes sense to put containers within containers. These ones are stackable and store loose items like tacks, paper clips, etc. The second drawer is for my art markers. My main art medium are markers, and I’ve collected many over the years.

I put my most used ones in the front of the drawer. These are Tombow ABT, which I use for bullet journalling. They are separated into cool and warm colours. Beside them are Posca paint markers. They are really great for bold, saturated drawings. I use the Windsor Promarker for most of my art commissions, I like how they can be layered to give interesting effects. All my other markers are organized into little bins. For my bigger craft supplies, I like to store them in clear bins and label each bin. Someone asked why I label the bins even though they’re transparent. The answer – so that I can process information as fast as possible! Without labels, I’ll take a moment to scan and process what is where. But with labels, I only need seconds to process and grab the supplies I need. We got a few plants to put outside our bedroom window. A lot of comments suggested to add plants, especially trailing ivy, but we’re not allowed to do that, since it’s a rental. Ivy is really invasive and can damage the property.
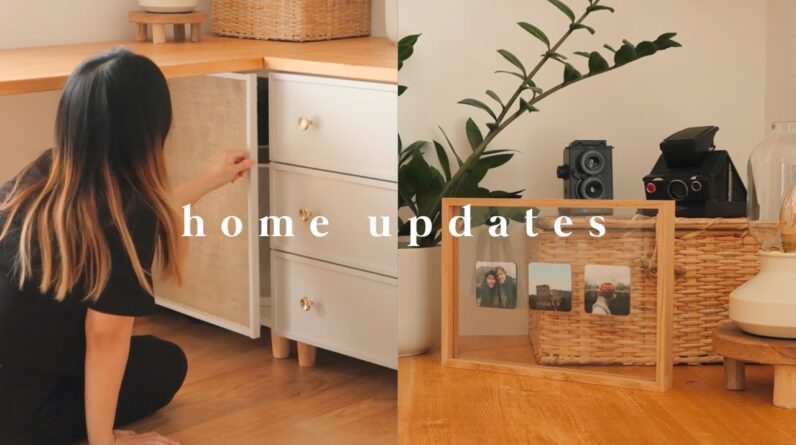
So instead, I got some succulents and palms. Since this is a north-facing ditch, I want to first see if they do well in these light conditions. “Oh” Hahaha Change of plans~ It’s a small start! I ordered some curtains for the dining room. We decided to get semisheer curtains to still allow plenty of light in. But these are a little too sheer… Just in case, I ordered another pair! I don’t like the weaving as much, but they have the right transparency! The only way to decide is to test them! Curtain number 1 Curtain number 2 What do you think? We also made a rare trip to the city centre! I got a pretty oak wood and plexiglass frame from Muji. Muji was having a sale on their PET products, so I got these 2 bottles. A simple “invisible” bookend. I found an interesting can of olive oil at Muji too. I really like the black and white design on the brass can and the retro opening on top. Since it was a rare trip to the city, I had to go to Zara Home too.
I got some things for other makeovers, like this brass rod. Can you guess where it’ll go? Another petite hanging rack with black metal and brass accents. And lastly, something small from H&M Home. A brass hook for somewhere in the kitchen~ It fits right in 🙂 Next, replacing ugly soap bottles! It’s the best feeling when you get a sticker completely off! I’m still undecided if I should add labels. I want to try framing some of these photo magnets. They were previously stuck onto our old fridge, and now need a new home. Trying to find a combination I like… I wonder if it’ll work..? LOL “Oh no,” she says :’) Trying it with fewer magnets this time and reinforcing it by sticking some other magnets on the back side. Moment of truth… It works!!!.
As an Amazon Associate I earn from qualifying purchases.


