

As an Amazon Associate I earn from qualifying purchases.

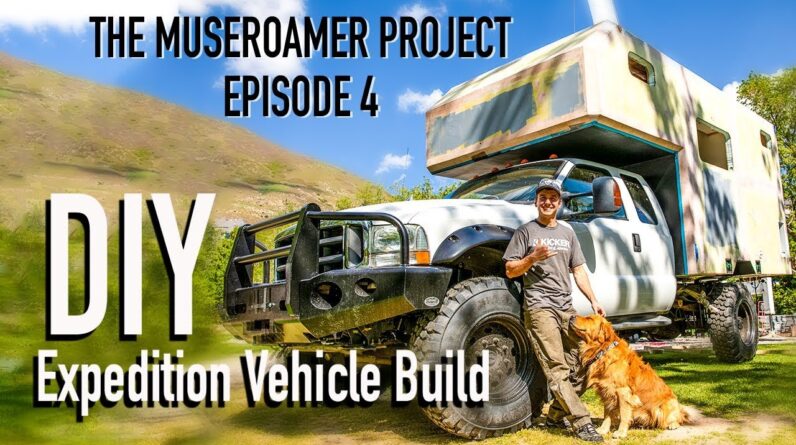
We set off to build the expedition vehicle of my dreams from the ground up with a thirty thousand dollar budget. We documented every aspect of the build from the design process to all the hardships along the way. To be honest, this was one of the most challenging projects of my entire life, but the final product exceeded my wildest dreams. Watch as we build an incredible vehicle for Season Three of the Tiny Home Adventure series. This is the MUSEROAMER Project. On the last episode we created shou sugi ban for the ceiling, installed our lights, insulation and wiring, we installed our custom water tanks, we modified the frame after realizing we made a big mistake, we fabricated our mounting knuckles, and Gary came back to help out with the cabinets.
George and I worked on putting together these cabinets. They're gonna go up here and up there. Got one ready to go, ready to mount. So let's wrestle this thing, get it up there! We started off by building our overhead storage and installing the base to our galley, wet bath, and fridge. We have gotten a ton done over the last couple days. We have our cabinets all set up, our wet bath is sort of becoming encapsulated. We going to have our refrigerator here with some slide-out dry food storage and some utility storage above. We've got our cabinets all in, lights in, painted. Looking super good, all the lights. This is gonna be a penetration for our ceiling fan.
We're about to cut a hole in the roof, get it ready for the AC unit, and then put the roof coating down. And then start putting in our ceiling fans, which is gonna be super exciting. So, let's see how this goes! We used a paint on silicone based sealant for the roof. We installed our Dometic Fantastic Roof Vents and a Penguin II Air Conditioner, which came together surprisingly easy. Now it's time to close up this box. I welded tabs to bolt the front onto. To be honest I haven't done much welding up until this project, but it's pretty fun when it comes out decent.
Best weld of my entire life right there! I think. We used riv nuts to bolt the panel to the frame and had some issues with them spinning. We added a small tack weld to each riv nut to keep it in place while we tighten the bolts. Once we got the front panel sorted, I finished it off with the chamfers. I think the dogs got a little bit jealous of me messing up, so they decided to get into some trouble of their own. So we just finished most of the fiberglass, while we were doing that… Kicker! What did you guys do?! He's fallen in love with this girl so much that he decided to cover himself black Good boy, what the hell…
Did you do? Yesterday after the dogs rolled in the mud or during the dogs rolling in the mud, we got the chamfer up, fiberglass on, so right now I'm in this supercool Tyvek suit, gonna sand the stuff down, get some bondo on it, get this thing ready to get mounted up by the end of the week. That's the plan. Everything takes longer than I ever hope and imagine so we'll see how it goes.
I tell you what though, rocking a Tyvex suit first thing in the morning dealing with fiberglass is not my favorite way to start the day. But, just getting it done. We primed the bottom of the box before adding several coats of Herculiner as a protective barrier. With the Ford 6.0 motor historically having some serious issues we brought it to Stroker Diesel to have it bullet-proofed before mounting the camper to the truck. I want to cut a path through from the main cab into the camper, which is just behind us. Everybody's told me it's a bad idea. All of my smarter friends that have helped me out on this project, all the people that are much smarter than I am think it's a terrible idea. But the original dream was to have it this way and we haven't digressed from the initial goal. In fact, we've only made it better and better and better as we've gone along. So we're not about to back off now.
So, here we go! We're going to try and pop this window out and see what it entails. Kicker is the only one that told me it was a good idea. Thank you. I appreciate your support. Not gonna lie, cutting out the back of the truck kind of felt like I was breaking the rules, which also felt great. So Josh just fabricated these aluminum plugs to fill the gap where the window was and then we're gonna also have an aluminum kind of skirt where this accordion boot is gonna go to mate the truck and the camper but look at those, that's sick dude good work! All right, so we've got all the condo stuff done, prepped, and ready to go.
We're gonna put a coat of primer on and put a coat of paint so when we get them mounted onto the truck, when we do the wrap, it's going to be harder for these guys to get back behind everything. Hopefully this will give them a nice surface to blend into or that will disappear behind the truck where the seam of the wrap ends. Yeah, I'm super excited. We have a crane coming tomorrow to mount this thing up. And yeah, it's getting there! So much freakin work though! The 1/1000 of an inch tolerance on the knuckle holes would have made it nearly impossible to line up with the crane so we attached the mounting bracket to the mounting knuckles before setting it on the truck. I can't believe it fits, it looks really good.
Feels amazing! Yeah, Kicker we did it! It's on the truck, it's on the truck! Here's a little closer look at the three-point mounting system we used. We used the existing holes on the truck frame to bolt our 3/4 inch plate steel bracket onto. This took a bit of finesse and engineering but seems to have done the trick. After thousands of measurements, hundreds of design evolutions, and countless hours just high-level thinking and creative problem solving, I was beyond relieved and grateful to see the camper mounted to the frame of the truck have everything actually fit. I was so discouraged a few months before. Now I'm feeling like we just might pull this thing off. On the next episode of the MUSEROAMER Project I attach the accordion boot to mate the truck to the box, we make our raw slab countertops, We install our windows, door, and solar panels, we get our custom boxes installed, and more.
Thank you so much for watching. If you want to keep up with our most recent adventures, make sure to follow us on Instagram. Massive thank you to the friends and brands who made this dream possible. If you have any questions, we would love to answer them. If you found this at all entertaining or informative, we would love it if you could please share and subscribe.
Thanks for watching!.
As an Amazon Associate I earn from qualifying purchases.


