

As an Amazon Associate I earn from qualifying purchases.

Earlier in the year i completed updating my home
office to accommodate what i thought would be a temporary working from home situation six months
later this situation has become a permanent one so i decided to make the most of it and do a
full makeover of the back half of my home office hello i'm matthew encina in this video i'll
give you a tour of my yet again transformed home office and take you through the process
of how i built all of this from scratch including this unique desk i
made with a secret compartment inside before i begin i want to give a shout
out to skillshare for sponsoring this video skillshare is an online learning community with
thousands of inspiring classes for creative and curious people take classes on graphic design film
and productivity and learn alongside millions of other creatives on real projects that help
you grow and stay inspired stick around till the end of the video where i'll share one
major organization tip i learned on skillshare kicking this project off my main goals in mind
were to create more flat surface to work on expand my storage and find a nice way to display
my collectibles i also missed my standing desk at work and wanted to make that a part of the setup
recently my wife belinda and i built out her art studio from scratch i really love the idea of
her long flowing desk so i wanted to incorporate that into the design of my space by creating
a wood desk that extended onto this ikea shelf that i already had in the room since i needed
extra storage i planned to add two long shelves that extended the width of the room i began
by prepping the work area taking down artwork shelves and getting rid of my plywood cabinet
don't worry it found a good home with my brother i then patched up all the holes in
the wall and put a fresh coat of paint the first part of the build were the long
shelves i wanted to install on my walls i took a trip to home depot and bought two
nine foot by one foot solid red oak boards belinda sanded these boards down with 220 grit
sandpaper and i coated them with my favorite oil wax finish to mount these shelves on the
wall i use these heavy duty steel brackets which i screwed into my studs with cabinet screws
these support a lot of weight in case i choose to load these with heavy books in the future the next
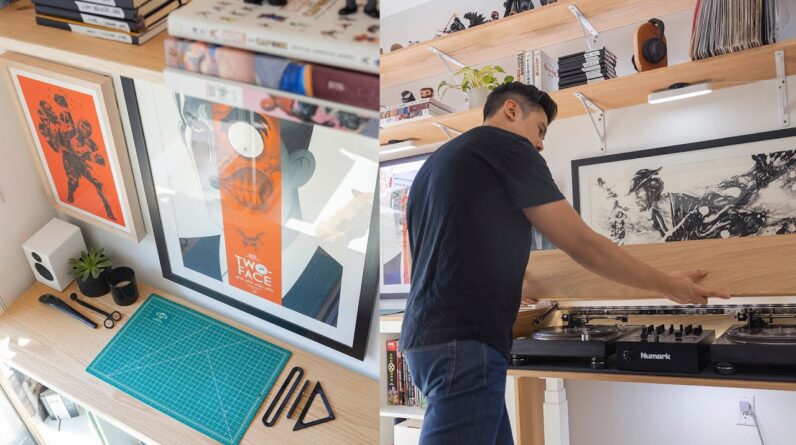
part of my build was making a custom standing desk one thing i brought home from work was my dj
gear which i stored at the office for whenever we had parties djing is a fun therapeutic
hobby of mine which i started back in 1999 and i wanted to incorporate it as a fun aspect
to my office so i designed something that would work as a variable standing desk and double
up as a dj booth to hold my turntables and mixer i ended up using white oak plywood for this
desk to match the rest of the wood in the space everything was going smoothly until i made a
huge mistake i was in the process of drilling dowel holes into the desk cover when i
accidentally drilled through it i was stressing out thinking i had to start over but
then i moved into problem solving mode to design around my mistake i decided to cut off the strip
of wood i messed up and redo the holes correctly this made a visible gap in the back of the desk
but i ended up liking the way it looked it was a happy accident i then moved on and installed
a continuous piano hinge and installed a soft closed support for the cover the problem was the
soft close didn't work it couldn't even hold the lid open after a day of researching better options
i found what's called a gastrut lid support which wasn't a soft close but a soft open luckily this
option worked to support the weight of my lid with the top of the desk built i moved on to
installing the legs because this was more narrow than a usual desk at 22 inches by 51 inches i
had to get legs that could support the smaller size and weight i ended up buying these motorized
legs by direction desk that fit my build perfectly i loaded all of my dj gear into the desk but i
wasn't satisfied with the aesthetic of the design something didn't look right to me then i came
up with this idea to include some kind of lining inside belinda and i went to a few fabric stores
to look at options and eventually ended up going with this gray wool felt that matched my grove
made desk pad on the other side of my office belinda upholstered this material to a thin sheet
of wood she cut out and glued it together using an adhesive sheet we found at the fabric store all
it took was a hot iron and some patience to apply we slid that lining inside the desk and put
a grommet to run wires through and it looked fantastic i went ahead and installed my techniques
which are classic dj turntables and my recently upgraded numark scratch mixer into the desk there
are a lot of cables needed to power and connect the devices so i spent some time organizing them
to hide them from side i used cable ties and channels to route my wires and i used the cable
box to store my surge protector and power bricks one key upgrade i wanted to do in this part of
my office was improve the lighting situation because i'm already in the philips hue ecosystem i
invested in a few light strips and play lights and i installed them on the shelves and inside the dj
booth so that at night everything looked well lit with the desk complete i moved on to customizing
this ikea bookshelf i had already owned i wanted it to feel like i had one long continuous
surface to work on i also wanted to match the long horizontal shelves above so with a
little bit of glue and a few pocket hole screws i created a wood wrap out of the same white oak
plywood as my desk i'll be honest my build for this was pretty flimsy because i didn't want
to glue it directly onto the ikea bookshelf commitment issues if you want something more
sturdy and permanent i'll leave a link to a great tutorial by modern builds in the description
with everything built the rest of my time was spent reorganizing my books collectibles and
tools i also made some room for a few plants because of sponsors like skillshare i'm able
to make content like this for you skillshare is a place dedicated to learning they're always
launching new premium classes and costs less than 10 a month with an annual subscription personally
i've enjoyed the productivity master class from thomas frank which taught me new tools and systems
to keep my projects and files organized one big tip i learned from that class was how to reduce my
physical documents by scanning them with my phone and storing them digitally this cleared up a lot
of space in my office the first thousand people to use the link in my description will get a
free trial of skillshare premium membership clicking the link is the easiest way to show
your support for me while unlocking your own creativity and productivity and that ends the tour
of my updated home office it's a place that i can work in during the day and relax in at night
when i want to spend some time with some music lately my wife and i have become addicted to home
improvement and diy builds so let me know if you'd like to see more of that stuff here in the future
for more frequent updates follow my instagram at mod musings if you have any questions drop them
in the comments and i'll do my best to answer them i've also left links to helpful resources
and the products i used to create this space all of that can be found in the description with
that out of the way it's time for some music you

As an Amazon Associate I earn from qualifying purchases.


