

As an Amazon Associate I earn from qualifying purchases.

Hey what's up you guys? My name is Emily
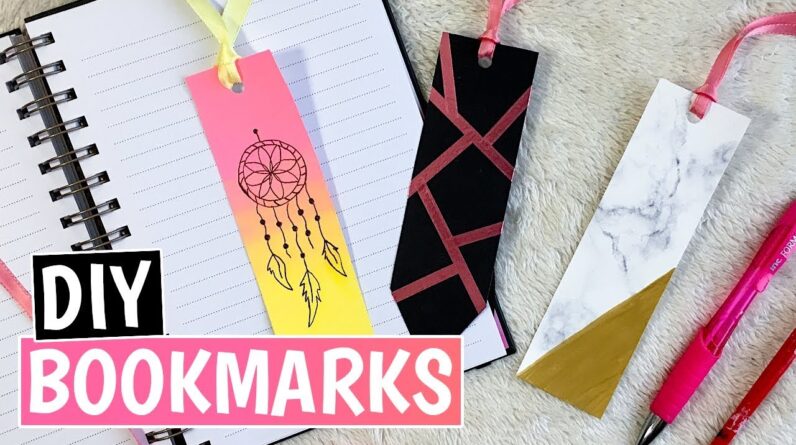
and in this video I'm going to show you how to make a bookmark
in three different ways. In the comments down below let
me know which one is your favorite. Let's get on with the video! The first bookmark I'm gonna show you
how to make is this geometric bookmark. The first thing you want to do is that you want to cut a
bookmark of any shape or size out of any color
cardstock paper. After you're done cutting the bookmark
out you want to take any color of washi tape and you want to place
a piece of washi tape in any direction that you
want on the bookmark. Then you'll want to take a
second piece of washi tape and you want to do the same thing
but you want to place the washi tape in a different spot and
in a different direction.
You want to repeat these steps until
you like how your bookmark looks but make sure you leave
a spot to leave a hole. Once you like how
your bookmark looks you can punch a hole into the
bookmark with a hole puncher. Then you can take a piece
of ribbon and fold it in half. Then you want to run the ends of the
ribbon through the back of the bookmark and then you want to pull the
ends of the ribbon through the loop. If the ribbon is too long you
can cut it to make it shorter and that's how you
make this bookmark. The next bookmark I'm
gonna show you how to make is this ombre bookmark
with a doodle on it.
The first thing you want to do is that
you want to cut your bookmark into any shape or size out
a white cardstock paper. Then you want to place the
bookmark on a scrap piece of paper. For the ombre part
of the bookmark you're going to need two colors of
acrylic paint and two paintbrushes. You want to start the ombre by taking
one of those colors of acrylic paint and you want to start painting
one end of the bookmark and you want to continue that color of
paint to the middle of the bookmark. Then you can take a second paintbrush
and the second color of acrylic paint and you want to paint the
other end of the bookmark and you want to continue that color of
paint to the middle of the bookmark. Once you get to the
middle of the bookmark you can quickly blend
the two colors together which will give you a third color in
the middle and an ombre effect.

You can blend the paint more easily by
adding some paint to the paintbrush and then you can
wipe some of it off and then you can blend what's left on the
paintbrush onto the middle of the bookmark. I found that this helped me
blend the colors more easily. Once you like how
your bookmark looks you want to pick
up your bookmark and move it to a different place
on the scrap piece of paper so it doesn't get
stuck to the paper and then you want
to wait for it to dry. When the paint is dry you can put a hole
into the bookmark with a hole puncher and then you can draw anything that
you want on your bookmark with a pencil. I decided to draw a dreamcatcher
but you control whatever you would like and I recommend drawing
on a scrap piece of paper. Before drawing
on your bookmark so you don't mess
the bookmark up. When you're done drawing on your
doodle you can go over it with a pen. If you're wanting to draw the
dreamcatcher you can watch me draw it to get an idea of
how to draw it or you can go find a
picture to go off of to draw it.
When you're done drawing it on you
can take a piece of ribbon, fold it in half and run the ends of the ribbon
through the back of the bookmark. Then you can pull the ends of the ribbon
through the loop and then you're all done. I love how this bookmark came out it's
my favorite out of all of the bookmarks. The last bookmark I'm gonna show you
how to make is this marbled bookmark. You want to print off a picture
marble onto white cardstock paper and then you want to cut out your
bookmark that's any shape or size Once you have your bookmark
cut out you want to take a ruler and find where the
middle of the bookmark is and then you want to draw a line from the edge of the
middle of the bookmark to a corner of the bookmark.
Then you can place the
bookmark on a scrap piece of paper and you can paint that part of the
bookmark in of any color of acrylic paint. I decided to paint that
part of the bookmark gold. When you're done painting the bookmark pull it off of the paper so it doesn't
get stuck to the paper when it's dry. When the paint is dry you want to put a
hole into the bookmark with the hole puncher and just like the other bookmarks you want
to get a piece of ribbon and fold it in half. Then you'll want to take
the ends of the ribbon and run them through
the back of the bookmark and then you want to pull the ends of the
ribbon through the loop and you're all done. and that's how you
make these bookmarks! in the comments down below let me
know what your bookmark is your favorite and if you liked this video
give this video a thumbs up and subscribe to see more DIYs. I will see you in the next video bye!.
As an Amazon Associate I earn from qualifying purchases.


