

As an Amazon Associate I earn from qualifying purchases.

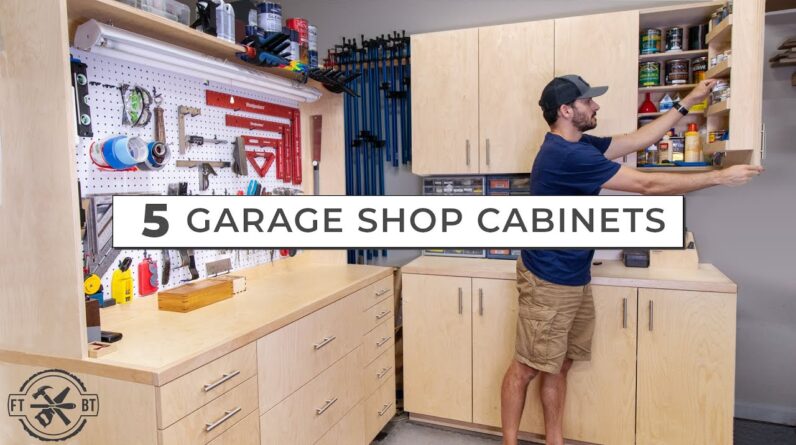
Welcome back to Fix This Build That I'm Brad And today we're gonna be looking at five different cabinets that you can make for the ultimate storage solution in your garage or workshop I've been working on this system over the past year and adding cabinets as I went to replace the store-bought cabinets that I had today I'm gonna be adding the final piece to the puzzle and showing you guys the whole modular layout that you can mix and match to Meet your own needs I'm also going to show you some sample layouts that might work for your specific application and ways that you can look to modify it on your own this whole journey started one day when I came out and one of my Wall cabinets that of a store bought had almost fallen completely off the wall After 15 years the particle board had just given into the weight and it just completely failed And so I knew I had to do something about it. I Wanted to build a similar style wall cabinet, but add a ton of extra storage nooks and options and to make them extremely sturdy So that they could last for decades just like my fashion sense Cargo shorts are still cool, right? Anyway my material of choice for all of these cabinets is 3/4 inch Baltic birch It's a premium plywood that has 11 or more plies And it's extremely stable with very few if any voids in it now all these cabinets I'll show you today are a frameless style and they're put together with pocket hole.
Joinery. This makes them quick to assemble and very strong Now for these wall cabinets, I wanted something more than just a couple for with adjustable shelves I made one cabinet to store my finishes in adhesives. I Had big cans small cans spray cans and a host of large and small bottles of accessories to store So I packed a ton of storage options into these cabinets.
I Split the cabinet in half with half depth adjustable shelves on each side and The right side was standard shelves that I'd used to put my quart cans of finish and on the left side It got custom spray kyun holders that can take five spray cans on each shelf. I Made both of these shelves half depth so that I could put storage cubbies right onto the doors and have access to everything all at once when I open the doors It's kind of like the Swiss Army knife of wall cabinets Except without that useless plastic toothpick that you lost the first week you had it Now on the right side, I made a door rack with four shelves that holds up to sixteen pint Kansa finish or stain and on the left side I made a deeper – shelf rack for small glues and accessories on the bottom and then on top of that I put a rack for six tubes of caulk Now for the other wall cabinet I went for larger storage I made a just about vertical cubbies on the bottom that used removable Dividers to configure this space how I need it and it can change with time On the top.
I did a more traditional full width shelf But again, I left it half depth so that I could put some storage on the doors there I stored my nitro gloves on one door and I left the other one open for future storage These wall cabinets would be a great first project for your shop You can put those on the wall and then push some of your mobile tools or workbenches right underneath them and wait to add more later now I have a full video that outlines the exact steps that I use to make these as Well as I have plans available for this in all of the projects, I'm going to show today I also have a bundle that I put together to get all them together at one time I'm gonna take a little bit more about that later now To complement the wall cabinets the next obvious choice with some base cabinets I made the base cabinets 30 inches wide just like the wall cabinets The cabinet assembly is very similar to the wall cabinets But one thing I did make sure to do was to keep these shallower than traditional cabinets Now the total depth of these base cabinets is just 20 inches I did this specifically to be used on the side walls of garages that still have cars parking in them So you have a little bit more room to park your car and get around Into those of you with cars and a working wood shop The promise of a nice dining table some built-ins or maybe a new bedroom furniture Might be just the peace-offering you need to get your better half parking outside Good luck my friends Now the big addition to the build for these base cabinets was adding pull out trays as an option This is another one of those accessibility options.

That really makes a big difference The construction of the trays is very simple and it makes accessing everything in the cabinet much easier Without having to dig things out and that is always a plus in my mind Now on the other cabinet I left the sliding trays out so that I could show a more traditional option But I did add in some door storage where I put my bottles of glue and then I added another rack for spray can storage as well I Also made a top here for these base cabinets and it's a layer of 3/4 inch ply That's wrapped with one-and-a-half inch hard wood trim It's also got some three-quarter inch blocking underneath to help attach it to the cabinets and make sure everything stays level Now making a run of three of these cameras would actually be a really great use of material as well Each of these are 30 inches.
So three of them together would be ninety inches, which is just under eight feet So then you can have an eight-foot piece of plywood Cut down for the top and use all that very efficiently If you want to set up a whole wall for a miter station and storage set up you could do a run of three cabinets have the miter saw in there and then another run of three cabinets and that's going to give you eight feet on either side of The miter saw for support for the wart, that would be a really awesome setup I have individual videos for the base cabinets as well as the next piece that I added in the garage workbench desk now for the workbench I wanted to have an option that could be a standalone workspace for the tightest of garages like a one car garage or a garage with the worst of all situations Kid toy takeover now I've managed to contain Ktt To a small corner of my garage shop over the years But if left unchecked it can grow like a virus and infect even the best of us If ktt is affecting you you are not alone go ahead and get subscribed and we can fight it together now Let me know in the comments on a scale of one to ten.
How bad your ktt is or If you've managed to somehow miraculously fit it off We can win this war together And the workbench starts with two 15-inch base cabinets that each have five drawers Now if you've never built drawers before this is a great project to start with and practice for adding them to furniture in the future The drawers can be sized any way that you'd like, but I went with too small to medium in one deep drawer It's turned out nicely and it gives me a variety of options which you know, I love Now I love doors and drawers to keep things neat and tidy But having some open hanging space for easy access to your most used tools is also great So I decided to recreate the pegboard hutch for my stock cabinets before Adding an integrated four foot shop light makes this a great spot to sit and do some planning work or work on electronics or other delicate tasks that you want to sit down for Now workbench like this could be used alone or integrated with other cabinets and the hutch could be removed and replaced with wall cabinets But the one thing that I found myself doing was storing more things underneath than I was really sitting there in doing planning So what I realized is I need the last piece of the puzzle, which is a three drawer cabinet to go in the well Where I was sitting for the workbench, let's take a look at that Another 30 inch base cabinet will fit perfectly in between those other two cabinets on the bottom And I won't have a dedicated video for this one So I'll show a few more of the steps here, but building the carcass is the same as the other 30 inch base cabinets The main difference here is making those large drawers which will replace any of the shelves that I had in the other ones Now this process is the same as the five drawer cabinets, but as the drawers get bigger You do need to make sure that they're sized right in that they are square and true during assembly And while I'm building and mounting these drawers let's talk about today's sponsor skill share a skill share is a learning community where you can take thousands of different courses in creative in different entrepreneurial skills a premium membership gives you access to all of these classes and you can use them to build your skill set or to just explore an area that you've been curious about I Found a class called fundamentals of photo editing by Justin bridges and that was a great one for me because personally I do a ton of photo editing being in content creation He does a great job walking through the editing process and also tells you what to think about before and during the shoot that helps Make editing easier I Learned a few new tricks in Lightroom that I didn't know before and I need to go back and watch it again to pull out A few more details that I didn't quite get the first time you can get an annual subscription to skill share for less than $10 a month and like I said that gives you access to all of the classes but as a viewer of my channel skill share is Gonna be offering a free two month trial There's a link down below in the description go check that out and then you can see if this is right for you.
Thanks, Skillshare Now with the drawers built and installed I remove them and drilled for the adjustable feet I use threaded inserts and carriage bolts to give adjustability to each corner of the cabinet You can also forget other toe kicks altogether and build the cabinet's three inches shorter Then use a 2×4 base that you could shim and level all as one piece for longer runs of cabinets This might be a little bit easier Now after I install the fronts and cabinet hardware, I moved the having it over for install You can see here how the modular nature works you can add and subtract from the set up fairly easily I did need to detach the far cabinet to get everything aligned just right and I screwed the cabinet's together once they were in place As I mentioned I have plans available for all these components You can buy them individually or you can get a discount for all of them I put together a bundle for 30% off and you'll be able to get the plans for everything that you see here Just check the link below in the description and to get your juices flowing here are a few examples setups using all the cabinets I'll be including these layouts and more in the modular garage cabinet bundle as well So whether you're a door guy or a drawer gal, you can find the exact setup for you That's going to best fit your needs and your style if you do want to check out the individual builds for these other projects I've got the playlist queued up for you right there and they're all in there so you can check them out if you want the Plans like I mentioned they are right down below check them out I'd really appreciate the support until next time guys get out there and build something awesome
As an Amazon Associate I earn from qualifying purchases.


