

As an Amazon Associate I earn from qualifying purchases.

This video is sponsored by squarespace, the
simplest way to make a professional looking website. When using a computer for any kind of serious
work, being able to hook up a secondary monitor can have some major advantages for multitasking
and overall productivity – it's one of those things that you can't do without once you
start using it. While this isn't a problem for desktops, as
another monitor can just be added, laptop users generally have to just stick with just
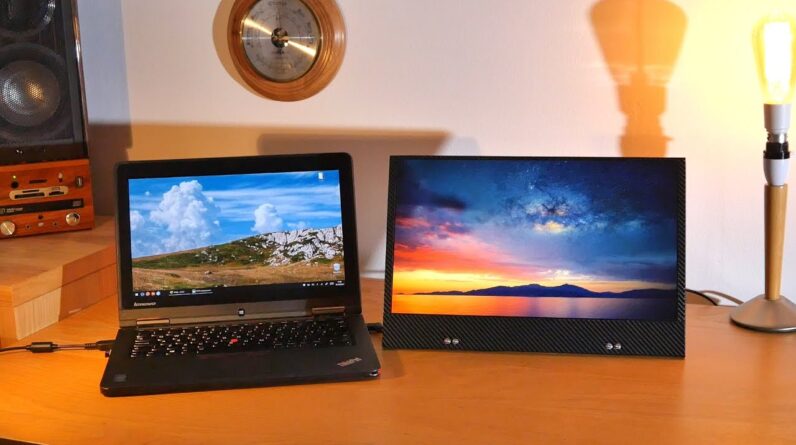
the single main screen, which can sometimes be frustrating depending on what you are doing. So in this video, we will be building a DIY
secondary monitor for laptops, using recycled parts to keep the cost low – perfect for anybody
on a budget. It’s very thin and light, which makes it
easy to take around with you, and it’s also remarkably sturdy – this thing really doesn’t
feel like something that’s been built at home, but instead feels like a piece of solid
industrial tech, and it really looks the part as well.
If you do make one of these, you will certainly
look like you mean business. To make it, the first thing we will need is
a screen from an old laptop. You can of course buy these separately as
a spare part, but as this is a budget build it makes sense to recycle one, particularly
if the laptop you're removing it from is dead.
To get it out is just a case of removing the
screen bezel, and then unscrewing the panel itself. Mine is pretty decent, as it’s not only
full 1080p HD, but also IPS, making for exceptional viewing angles and colours. Once you've got the panel, you need to look
at the back for the model number, and punch this into eBay with the phrase 'control board'
after it. This brings up a variety of results, so sort
it by price plus shipping lowest first to ensure you get the best deal. Now, I want mine to have an HDMI input, so
adding HDMI to the search results will narrow the search down even more, giving the perfect
board at the lowest price. By the way, if you want to support this channel,
purchasing a board through the affiliate link in the description will send me a few pence
at no cost to yourself, so many thanks if you do that.
This control board is the backbone of the
entire build, as it has all of the inputs you could want for your particular LCD screen,
allowing it to be used with pretty much any device. We can now start working on the casing – this
is very important as not only are the cables very delicate, but the screens are so thin
that they are flexible and need reinforcing. To do this, we can get some thin board – 6mm
MDF in my case – and cut it down to match the size of the monitor. As you can see, I’ve cut mine slightly taller
to allow room for the connector at the bottom. A little gap can now be made for this so that
it can later be routed through to the back. Now we can drill some mounting holes for the
control board. Keep in mind however that these holes need
to be countersunk on the front side so that the screw heads won’t be in the way of the
screen fitting flush later.
Now this being a DIY Perks project we want
it to look cool aftewards, so what we’ll be using to give it an industrial look is
some vinyl wrap. This stuff mimics carbon fibre, so its texture
changes depending on the angle you look at it from. It’s very cool stuff, and you can find links
to it in the description. This can now be stuck to the board, using
a hairdryer to soften the adheisive for a more secure fit. As this wrap covers the mounting holes, we
can use a sharp point to punch through it, and then insert the screws from the other
side. These can now be tightened on to some short
PCB standoff pillars. The control board should now fit nicely on
top of these, and to secure it in place we’ll need some more of them, this time much longer
with both ends being female. As you can see, the tops of these standoffs
sit above the components on the board itself. The button board too can be mounted, only
this time secured in place with some nuts.
We can now make a little cover for the main
PCB using a very thin piece of board, again wrapping it in vinyl, which can then be screwed
on top to protect the circuitry. The wire too can be protected by using some
cable sheathing, which also adds to the industrial look. Now, as this cable runs through to the front,
we can use some more thin board to build up a surround around it, so that later we can
encase it entirely underneath a piece of thin aluminium. With that done we can now mix some fast drying
epoxy and use it to stick the vinyl wrap down along the edges.
While the wrap’s adhesive is decent enough,
adding this epoxy will ensure that it will never peel away. Once it’s dried, the excess can be trimmed
off with a knife. Now it’s time to stick down the screen itself
with some more dabs of epoxy on the edges – it’s a good idea to add some underneath
the cable too as this will ensure that it can never become loose. Once this has all dried, we can add some masking
tape along the edges of the screen – this is because we’re going to again use some
epoxy to stick down some thin strips of vinyl along the edges and down the sides, and the
masking tape ensures that no epoxy will stray onto the screen itself.
Looking good. Now we can stick down that thin piece of aluminium
I mentioned earlier. As you can see, it has first been wrapped
in vinyl before being added. The excess wrap can again be folded over the
bottom edge and again stuck down with epoxy, finishing it off by again trimming it down
with a knife. The wire too can be glued in place on the
back. With that the screen is almost complete, but
as you can see it still needs some kind of support so that it can remain upright on its
own.
To do this we can recycle the hinges from
the laptop the monitor came from – these are quite stiff so are ideal for our needs. To mount them, we can simply drill some holes
through from the front, and then screw them in place. The monitor is complete! Now it can be plugged into the laptop. As the screen also needs 12v for power, we
need to hook it up to a power adapter as well, although there is a way you can power it from
the laptop itself which I’ll get to in just a minute. As the workspace is now expanded over two
screens it makes it much easier to get some serious work done – situations where I find
a screen like this useful are when I’m editing videos, working on graphics, or building websites…
which leads me nicely on to the sponsor of this video; Squarespace. Using their many templates you can quickly
build a website that looks professional, all from a browser, with no extra software required. For those who want to customise things more
deeply they have plenty of under the hood settings so you can fit it to your own personal
needs.
I am in fact building a DIY Perks website
with it and it's actually starting to look really nice. So if you'd like a free trial for yourself,
visit Squarespace.com/perks or sign up using the link in the description. Also, using the offer code 'PERKS' at checkout
will give you a 10% discount if you do decide to go with them. Now, to power the screen from the laptop itself
we'll need a little extender for the laptop's power supply, and a voltage step down board. The extender first needs to be chopped in
half to expose the internal wires, after which we can get the input side and solder it to
the input of the voltage regulator, with red being positive and black being negative. Now we need a wire with a connector on the
end that fits into the screen, which we can again solder to the regulator – only this
time to its output.
With that done they can be glued together
to keep it all secure. If we plug in the laptop's adapter and monitor
the voltage of this output with a multimeter, we can adjust it so that it outputs 12v by
turning its built in variable resistor. Once that's done the other connector can be
soldered to the input side of this board, which hooks it directly up to the first connector
we added.
As my wire was a little on the short side,
I extended it before wrapping the whole thing in some heatshrink, which can then be held
over a source of heat to shrink it. Now it can be plugged in between the laptop
and its adapter, allowing the DIY screen to be powered at the same time. Now although I did build this screen specifically
for its portability for use with my laptop, I’ve actually found it to be very useful
as a secondary screen on my main desktop too, as it is quite small, yet is still full HD,
making for a high DPI not usually seen on desktop screens. So I hope you’ve found this project interesting,
and if you do make one of these then why not send me a picture @DIYPerks, especially if
you use a different colour for the vinyl wrap, as I'd really like to see how that looks.
Now if you did enjoy this video then you might
enjoy this one too, where we convert some shattered, dead, destroyed laptop screens
into a fake window, which actually ended up looking pretty cool. Other than that, don't forget to give a like
on this video if you did enjoy it, and also consider subscribing if you haven't already. I'm Matt, and thank you very much for watching..
As an Amazon Associate I earn from qualifying purchases.


