

As an Amazon Associate I earn from qualifying purchases.

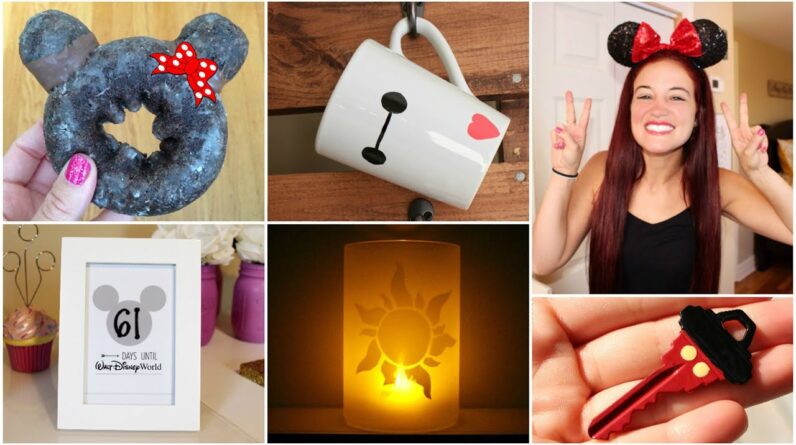
hey guys me Ali welcome back to my channel I hope they're all having a great start to your day I'm here today to show you seven DIY Disney crafts ideas that we're all inspired by Pinterest not only are these crafts super easy to me but are extremely inexpensive as well if you have any questions about the crafts that I'm making in this video just ask in the comments below and I'll be sure to get back to you as soon as possible and without further ado we're going to move right into this video for this tangled floating Lantern you will need to print out the lantern design I found mine on Google you'll also need a large square of crafting duct tape found at Joanne's fabrics take the printout and tape it on top of the duct tape square place it on top of a cutting board and very carefully carve out the design with an exacto knife you will be left with the same design cut out on your duct tape which you will later stick on to your jar again you will be left with the same print o design on your duct-tape square so when you're done cutting remove the printout paper peel away your design and start sticking the fiery Sun pieces onto your glass jar once you have all the pieces in place go to an open outdoor area I chose my garage and flip the jar upside down using frosted glass spray apply a generous layer to all visible areas of the jar allow this to dry for at least an hour when your glass jar has completely dried start peeling away the duct tape you will be left with a beautiful frosted floating Lantern finish this DIY craft by adding a fake candle at the bottom of your jar this will give the effect that your Lantern is being lit in the sky I bought my candle at Michaels you for this next craft preheat your oven to 400 degrees you'll then need a mug I got mine at the dollar store with a cotton ball dipped in rubbing alcohol wipe down the surface of your mug using an oil-based marker draw on your Disney design I chose a simple baymax design by drawing two colored and black circles with a dark line connecting the two as well as a small heart because he's so caring it is very important that you use an oil-based marker as regular markers will chip when you're satisfied with your design pop it into the oven for about 20 to 30 minutes use caution when placing the mug onto the oven racks use an oven mitt or some paper towel and carefully remove your mug from the oven allow it to cool for an additional thirty minutes and then you're done I would suggest gently hand washing this mug rather than putting it in the dishwasher to recreate this poison apple from Snow White you'll need green 3d puffy paint as well as a fake Apple both found at Walmart using the puffy paint draw on your skeleton face next mix a puppy paint with some craft and glue and pour or paint the green goop onto your Apple allow your Apple to dry for at least five hours I let mine dry overnight and it's as simple as that you now have a spooky snowy Apple to decorate your house I put mine on my bookshelf now on to my favorite craft the Dole Whip fun you'll need a mason jar as well as a printed out saying using Disney font again I chose Dole Whip Fund but you can use whatever you'd like I found my Disney font by typing in free Disney font on the Google search page a ton of sites popped up cut out your printout and then tape it to the inside of the jar using an oil-based paint marker trace over the letters onto your mason jar this next step is optional but I love the sparkle so I took the lid of my mason jar and added a layer of Mod Podge and a layer of gold glitter when the glitter was completely dried and stiff on my lid I added an additional layer of Mod Podge so it sealed the glitter in peel off the print of paper from the inside and then feed your Disney Bank I'm actually going back soon so I've been saving along the way this is a perfect way for me to decorate my room as well as save up for my trip you this DIY is so simple and really jazzes up a boring old house key use a piece of tape and section off the top now using black nail polish and a paint brush color in the top half of your key I needed to do two layers to make the color look solid peel off the tape before the polish has dried complete the same method on the bottom half or the bottom 3/4 using your red nail polish I also use two layers with the red use a dotting tool and draw on two yellow circles on the top of the red nail polish these will act as Mickey's buttons finally seal the deal by adding a generous layer of top coat to your entire key this will help your key from chipping allow it to dry for 10 to 20 minutes and then you're in business I've been using mine for over a week now and it's still completely intact two of my favorite words are Mickey and donuts you're going to need a plain chocolate doughnut as well as two donut holes you'll also need to melt some chocolate I have chopped up coconut oil into my chocolate while melting to keep it smooth when your chocolate has completely melted take your donut and start scraping away the top two corners these will act as small pockets for your donut holes dip your donut holes into the chocolate then place them chocolate side down into the pockets you just made hold each donut hole in place for about seven seconds put your dish into the refrigerator for about 10 minutes when you take the donut out the chocolate will have harden sealing the Mickey ears to a space these are perfect for a Disney themed kid's party and the final craft is a Disney World countdown I went online and went to Pinterest and typed in free Disney countdown there were a lot to choose from but the one I liked the most was for a blog called all things with the purpose calm I'll link her site in the description she had options for both Disney World and Disneyland I used her free download option then opened it an eye photo and printed it out after I cut it to size I placed it inside a plain white frame now using a dry erase marker I wrote on the number of days until I'll be at Disneyworld to change the day simply use a damp piece of paper towel and rub off the number use another piece of paper towel to dry the surface then you can write in your new number I just love the way this looks in my bedroom it's a great way to hype yourself up for your upcoming magical trip to the happiest place on earth you and that is it for this video I really hope you enjoyed it let me know in the comments below what your favorite craft of this video was and if you recreate any of these crafts make sure to tag me on Instagram or Twitter if you want to see more of these DIY Disney crafts ideas just let me know in the comments below I'll be sure to make another video I have a couple more that I really would like to film so just let me know if that's something you're interested in watching and as always I love you guys so much and I really appreciate you watching my videos I hope you're having an extremely magical day and I will talk to you soon bye
As an Amazon Associate I earn from qualifying purchases.


