

As an Amazon Associate I earn from qualifying purchases.

in the corner and lost for years if we
don't fix it I'm afraid we're gonna lose something more than a pizza loving Elmo we might actually lose a kid back there
but after removing all the clothes in the junk it was time to get these wire
shelves out you might want to just start ripping these out but don't do that if
you do that you're gonna leave big holes in the wall believe me I've done it
before but there's a simple trick to pulling these out that's gonna make it
go really smoothly and you'll just have a small hole to fill if your closet has
a vertical support like this one you'll need to remove that first by unscrewing
the clips now the shelves are attached to the wall my series of clips and
brackets start by removing the angled supports below and here's the trick for
easy removal use a pair of pliers to grip the nail head and pull it out and
then you can do the same thing to the wall anchor and since the nail isn't
there expanding it anymore it'll come out cleanly remove any clips that are
screwed into the stud and then you should just be left with the open J
style clips along the back and you can pop the wire shelving out of these clips
with a few quick pulls or with a mallet now these J clips are a little trickier
since you can't just grab the nail head so use a putty knife or a screwdriver to
pry the nail out of the recess first then you can go ahead and grab the nail
and remove the wall anchors just like before and this method works really well
and it just takes a little patching and sanding to get the wall prepped
afterwards and I didn't show the in brackets because those are very easy to
remove they're similar to the angled supports below with a blank slate I grab
some plywood from the store and I started building I'll talk more about
the plywood selection in just a bit though I broke down the large sheets to
make them more manageable using my track saw and some rigid foam insulation on
top of my table saw in the new outfeed table and you could continue making all
the cuts with a circular saw but using a table saw if you have one is going to be
way easier now the first piece that I'm building is
the base of the center unit which will have four drawers and be like a small
dresser I cut the parts for the carcass and then I took the sides of my bench
for some notches I made the layout lines for a toe kick
on the front of the dresser and instead of having to cut out and remove the
baseboards I'll cut a notch in the back to go around the baseboards at the
bottom the cabinet will rest right above both of these cutouts so won't have to
be modified a jig saw makes quick work of the toe kick one thing to note though
when you're cutting tight curves of the jigsaw it helps to have a nice thin
blade I started off with this larger blade and it couldn't make the turn on
that first notch I cut when I switched over to this thin one and it worked way
better I'll have a link to this as well as all the things that I used today down
below in the description the sides are joined by the bottom and four supports
which will also help to attach to the top and secure the cabinet to the wall
I cut the parts to size and then I went over to the bench for some more joinery
I'm using pocket holes for the cabinet for quick sturdy joints and I finally
upgraded my old K4 to this k5 jig it is definitely faster to use in more
convenient with that front lever versus the rear one I mentioned the new outfeed
table earlier and I got to take advantage of the extra width that I
built into it now assembling on my mobile workbench wouldn't work because
it was just too skinny but the new outfeed table worked great because of
the extra width I gave it I secured the bottom with pocket screws and then I
flipped the cabinet over and I secured the top supports as well using large
clamps to hold everything tight the back supports got attached to the sides and I
also put two screws through the top and the bottom to hold them in place as well
now this prevents any bowing and separation when I'm gonna be securing it
to the wall I pulled the carcass off the table and I started in on the drawers
for the cabinet and we decided to go with four medium sized drawers which
would be perfect for folded pants shorts or scooby-doo theme tighty whities which
were all my jam in the eighties but underoos were pretty sweet too
I cut the parts to size to account for the full extension drawer slides that
I'll be using I've got a whole video showing how I size and I make these
simple drawers if you want some more details on that
now the drawers go together with pocket screws which will hold well into the
three-quarter inch plywood these drawers here I wanted to show you
real quick the plywood that I'm using this is 3/4 inch radiata pine I was at
Home Depot and I was looking at the different types of plywood and you might
be confused when you're looking at those there's all the way up to like 55 bucks
and I think this one was close to 27 or 29 I'll have that right down here
dollars and basically you can get away with the cheaper stuff because I'm gonna
be painting this so if you're gonna be staining it you're gonna have to go up
higher on that scale of the plywood for this project I need three sheets of 3/4
inch plywood from mine and saving $20 a sheet is gonna save me 60 bucks overall
and that is a huge savings so remember that when you're buying plywood if
you're going to be painting it you can go more towards that cheaper option get
the same apply or even the radiata pine like I did look for some good sheets
that don't have a lot of warp to them or flat if you can find them you'll be
saving some money and you can invest that in drawer slides or other hardware
for the project after the boxes were together I cut four drawer bottoms from
quarter-inch plywood I glued and nailed the bottoms in place and this makes the
drawer even stronger as it locks everything together I finished out each
drawer by routing a 45 degree chamfer on the edges of the bottom this hides that
quarter-inch plywood bottom when viewed from the side and gives it a floating
panel look now before installing the drawers I went ahead and put a couple
coats of white paint on the first several inches of the inside of the
cabinet which is all you're ever gonna see when it's in use and after the paint
was dried I installed the full extension slides using a small spacer for the
bottom slide after that one was in I used an offcut of the drawer parts to
space the rest of the slides and I attached them up on both sides with the
slides in place I could put the drawers in and attach them to the slides right
there in the cabinet and I prefer this method of installing the drawers but you
could also use a drawer slide jig to put them in as well if you're more
comfortable with that but if you want all the measurements for these drawers
in the entire unit I do have plans available you can check the link down
below in the description and get custom cut diagrams parts lists and
step-by-step instructions to help you along the way next I cut the drawer
fronts to go on the outside of the boxes and the top for the cabinet I'm using a
plywood top with a solid wood trim on the front to give it a more custom look
I use the panel to mark the length of the trim and then I cut it to size to
fit I attach the trim with pocket screws but
you could also glue and nail it in place as well now before moving to the hutch I
put a coat of paint on the cabinet in the top so it could be drying why I
build the rest now the hutch is just under four feet tall so I cut a full
length section in half with my track saw then I rip the sides down hmm
hi yes table saws work much better with the blade above the table while I was
cutting the sides I also went ahead and rough cut the parts for the top the back
supports and the three adjustable shelves that will go in the hutch and
then I pulled out Fred to cut all the parts to final length
now since the sides are so long I couldn't use a stop block or the fence
on my table saw so instead I stacked them together and I flushed up the end
opposite of the blade now I could cut both parts at once based upon the mark
on the top panel and this gives me two identical pieces you could do the same
thing gang cutting with a circular saw as well I cut the top and the shelves to
final size as well and they ended up just longer than my sled so I had to
mark them and cut them as well instead of using the stop block the supports for
the back of the hutch are similar to the ones for the cabinet they'll be attached
with pocket holes along with the top piece these will be facing the top or
the back of the closet so you don't have to worry about plugging any of these
pocket holes since they won't be seen now you could make thick shells for the
hutch but I prefer adjustable shelves because you never know when you might
want to adjust that shelf just an inch and a quarter higher but honestly I'll
put these in place and then never move them again let me know in the comments
do you actually move adjustable shelves or you kind of like me and want the
flexibility for peace of mind but never use it now after drilling the Shelf pin
holes I painted the sides in the top before assembly and it's way easier to
roll the parts as panels versus working into brushing into corners and when they
were dry I clamped the top between the sides and I secured it with pocket
screws and because the paint wasn't fully cured just yet I used wax paper
between the sides and the clamp heads now this keeps the Klan's from sticking
to the sides under pressure or embedding any small wood chips into the soft
finish I added one back support to the top of the hutch securing it to the top
panel as well and I put another one right there at the
bottom you know the way to the hutch is gonna transfer to the base cabinet but
you still want to secure it tightly to the wall with these pieces and next I
wanted to add a little visual heft to the hutch so I grabbed some more of the
poplar trim that I had before to make some face frames I'm gonna be using this
inch and a half hardwood to finish off the front of the hutch it's really gonna
give it a nice feel it's gonna make it look more substantial and just really be
nice if you don't want to do that route you could also just edge band this or
paint right over it if you don't want to use any solid edge wood you can do that
too and it's gonna look fine I cut the top trim so it over hung on
each side then I attached it to the hutch with glue and some me nails and
then I used a long piece of trim and I marked it and cut it to length to fit
beside the hutch I used a combination square to measure
and set the distance between the top trim piece and the side panel then I
could use that set up to evenly spaced the trim all down the length of the
panel just put in the combination square and place on the side I repeated the
process on the other side attaching it again with glue and my nailer now the
nails do leave a little divot so I filled those with wood putty and then I
came back and painted the trim to match the hutch and next I switched back to
finishing up the cabinet now the top gets attached from underneath and then I
could mount the drawer fronts I drilled the holes for the hardware that I'll be
using and these holes will let me easily space and mount the fronts as well
typically I start from the bottom but since that top trim is flush I want to
make sure that I got the reveal line at the top right and then work down from
there I used an eighth of an inch spacer on the top of the drawer front and then
I screwed that front to the drawer box temporarily with some pocket screws now
with it held in place I could open the drawer without the front moving and then
permanently secure it from the inside through those holes that I drilled
earlier in the drawer box I had to finish it off I remove the front screws
drilled all the way through the drawer box and installed the drawer poles in
those holes this is by far my favorite method of installing drawer fronts and
lets you hone in on those perfect reveals without a lot of fuss and in
just a few minutes I had all the hardware attached in the cabinet was
done now the last part of the organizer system was the shelves and supports to
hold them as well as hold the closed rods
I cut the pieces to rough size and then got to painting all right before taking
this upstairs I put the hutch up here just to see how it looked and I realize
that I have a small issue that I didn't consider and that's this front here so
I'm gonna be attached to the wall in the back through these cleats but on the
bottom here there's no support to hold this from moving and I don't really have
a way to screw it in from underneath because of the sides so what I'm gonna
do is get a dowel and I'm going to drill into the top as well as into the bottom
of this upper side here and have that for just a reference pin basically so
that if it gets bumped it's not gonna move all around I flushed up the hutch
with the back and the side of the cabinet where it would be when it's
installed and then I put tape on each piece and I drew a line across these
pieces on each side this will help align the holes accurately and then I measured
in 3/8 of an inch and I drilled a hole for the dowel pin using a piece of blue
tape to let me know how deep to drill the key when drilling the holes and the
cabinet in the hutch is trying to get them as straight as possible and if they
are tilted in any direction then it'll throw off the alignment or possibly even
not make them fit at all I used a small square to check the progress of the hole
to make sure I was going true but if you do get off a bit you can always widen
the hole or worst case plug it and read drill it this worked really well though
and it gave the front of the hutch that support that it needed so it wouldn't
move around if it was ever bumped so I finally made my way upstairs to install
this inner console and while I'm anchoring it to the wall I'm gonna fix
this squeaky closet hinge that I found with the help of today's sponsor wd-40
alright so if you're like me if anything squeaks you to immediately go to wd-40
but wd-40 has been around for a long time this is what I grew up seeing my
granddad and my dad used to fix things around the house and this is a brand
that we are all familiar with but what you might not be familiar with is they
have a whole other line of products under their WD 40 specialist line this
is the dirt and dust resistant dry lube and actually this is one that I'm gonna
use on the hinges because not only does it repel dirt and dust but it stays on
longer so prevent the squeaks from happening and it's not gonna attract
dirt and dust like a greased wood if you try to put that in there if you wanna
check out more about the dub forty specialists line I'm gonna have a
link down below in the description so go check them out I think you're gonna find
something that you could use in your shop or household now the bass cabinet
went in fairly smoothly other than having two used wall anchors because
apparently 32 inch on center studs is the thing in this closet
but the hutch was a little bit of another story there was a sizable hump
in the wall right in the middle of the hutch on the right side
I used a compass to match the largest gap between the wall and the hutch and
then I ran it along the edge of the entire length of the side to show where
I needed to remove material then I took the hutch down to the shop when I sanded
to the line with my belt sander and when I brought it back upstairs it wasn't a
perfect fit but it was good enough to line up those down pinholes and be sure
it was flushed to the back wall after leveling the unit I secured the hutch to
the wall again using wall anchors and from there I could attach the upper and
lower shelves using a cleat on the hutch back wall and side wall I made the top
shelf flush with the top of the hutch for a continuous upper shelf for some
long-term storage I also went with two Bay's of short hanging on each side of
the hutch since my son doesn't need any long hanging right now but you could
easily remove the lower shelf on one side and use that side for upper long
hanging and have a shoe rack or just other shelves and bins below it I
installed some brackets to hold the metal rods and then I cut the metal rods
to size and put those in place after installing the center shelves Susan
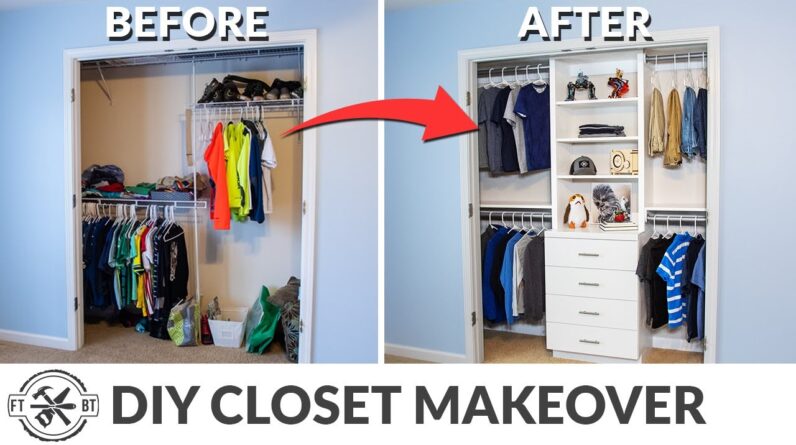
decorated it for some Beauty shots and we were in business this thing was
looking great this is the last time it's ever going to look this nice we're doing
it larger closet and renovation soon and the videos gonna be right there when it
goes live but if you want to build this one I do have plans available there's a
link down below in the description for you to check out and I'm gonna catch you
in the next video

As an Amazon Associate I earn from qualifying purchases.


