

As an Amazon Associate I earn from qualifying purchases.

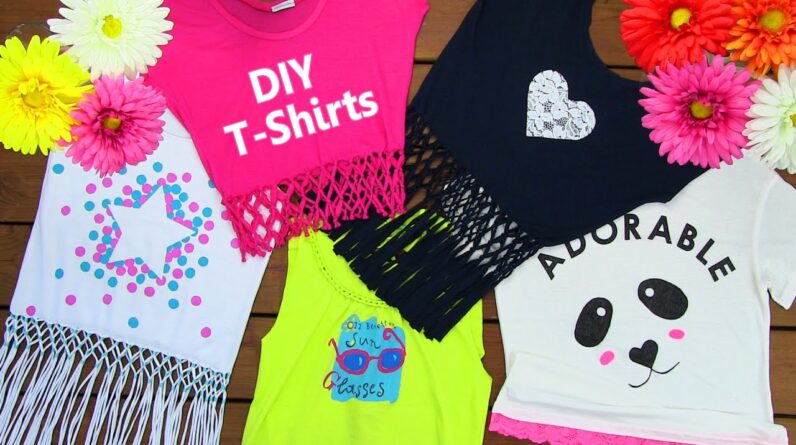
In this video I will show you five epic DIY
t-shirt ideas, which will help you upcycle your old shirts into amazing tops and get
you all ready for summer! Hello everybody! Summer is just around the
corner and I'm so looking forward to it. Long sunny days, swimming in the sea, short sleeves
– I miss that very much! But talking about short sleeves, you do need a lot of cute and
stylish clothes this summer. And don't worry if your closet is full of boring t-shirts
because I'm here to save you. In this tutorial, I'm going to show you how to transform plain
t-shirts into the cutest tops and shirts that you'll love. I came up with four, actually
five designs that I can't wait to share with you, so let's just get into it.
First we are making this adorable panda tee with lace out of a plain white t-shirt! Mine
happens to have the adorable word on, but no problem if yours doesn't.
For the lace
edge you will need a piece of lace and a fabric glue. I went for hot pink lace to add some
color to the shirt and we are just going to glue it along the bottom edge. Flip your shirt
inside out and place a piece of cardboard between the back and the front of the shirt,
to prevent them sticking together while gluing the lace. Apply some glue along the inside
edge of your shirt and place on your lace, that's how simple this is! This DIY literally
takes 2 minutes and adds so much to a plain t-shirt! One side is done so turn the shirt
around and keep adding more lace until the entire bottom edge is nice and lacey. There
we go! Now just leave the glue to dry for about 20 minutes and you can flip the shirt
around again to see the beautiful result.
My shirt still has a lot of blank space so
I decided to draw a panda design on as well. Here I am just sketching the panda's eyes,
nose and mouth. For the eyes we need two large oval patches, a cute little heart for the
nose and we are also going to add little pink cheeks to this sweet buddy. Inside the black
patches we need to leave two white circles for the eyes. So I am just sticking a circled
piece of masking tape there. Place a piece of cardboard inside the shirt.
This will make it easier to draw but will also prevent the color to transfer on the
back of your shirt. And now we are all ready to start coloring our lovely panda bear. With
this technique you can also make other cute animal tops, like a cat or a mouse. These
are just so easy to make and they look absolutely adorable! Nose is done, now on to the mouth.
I am using black and pink fabric markers to match the lace.
Lastly I am drawing two pink
ovals below our panda's eyes. This makes him look even cuter but also connects the lace
and the panda design together into the prettiest shirt ever. This shirt really went from nothing
special to most adorable shirt I have in my closet. I am so happy with the result, I kinda
want to draw such Kawaii animal faces to all of the shirts I own. Keeping the rest of my
outfit simple I paired it with black denim shorts and some white lacey sneakers. Oh Yeah! Time to transform this long shirt into a gorgeous
lace heart fringe top. You'll need a shirt, some lace, a heart stencil, self adhesive
paper, fabric glue, scissors or an exacto knife. Cut a heart out of your stencil. Place
it on the self adhesive piece of paper, outline with a pencil and cut it out.
Place the cardboard inside your shirt to make sure that you will only be cutting the back
layer of the shirt.
Take your exacto knife and trace the shape of the heart to cut your
heart out. There you go you are left with a pretty heart silhouette window. Flip the
shirt inside out and take a piece of lace fabric. All we have to do is stick the lace
on the shirt. I like to dot a small amount of glue all around the edge and then press
the lace on as I go. Let the glue dry completely, mine takes about 20 minutes and then you can
flip the shirt around again to reveal the awesome lace heart that we have just created!
Cut away the excess lace and we're done! I think it looks so beautiful and I love how
easy this is to make. Ok, first half of our shirt transformation
is complete, but we still have to make a knotted fringe bottom to give this shirt a summery
and flirty vibe! I am sticking a piece of masking tape on as a guide up to where I want
my fringe to go.
My shirt is very long so I also want to cut away some of the length.
If your shirt is shorter to begin with you can just skip this step. Star cutting the
tassels up to the leading piece of a masking tape. For a simple fringe top you can just
leave it like this – it already looks super cool, but I will show a bit more special fringe
design by knotting the fringe pairs together. Before that, let's give our strands a little
tuck so that they won't look as freshly cut.
Place a piece of a cardboard between the front
and the back layer of your shirt and we are ready to start knotting! Knot together the
tassels all along the shirt, making the knots as high as possible. Just like that… the
front is finished. Now we have to repeat the same steps on the back. Knot together two
fringe strands and move on to the next pair until you have knots all around your shirt.
Next row of knots needs to be bit lower, so I am sticking on a piece of a masking tape
as a guide.
Now you have to take one fringe string of the first pair and one of the second
pair and knot them together, making a knot below the masking tape. Take the remaining
string from the pair two and one string from the pair three and make a knot. And so on
until you reach the end of the row. I will knot the back later so here I am proceeding
with the row three. Grab a string from the pair one and string from the pair two and
tie a knot about half an inch below the row 2. take the remaining string from the pair
2 and string from the pair three and make a knot. Continue until the third row is finished.
I decided to make four rows of knots, so this is my last one. I love how you get this pretty
crochet detailing with knotting the tassels. If you want your crochet part to be wider,
go ahead and make more knotted rows. I think four is just enough for me. I also knotted
the back strings and this is how pretty the top looks in the end. I love how the tassels
give so much movement to the outfit and make it look so interesting and full.
I am so pleased
with the result!! If you want you can cut away the excess fringe but a – a, I decided
to keep mine because I love the t-shirt to pieces already. I paired my top with some
light washed skinny jeans and sneakers that have blue stars all over. Some brown sandals
or wedges would go perfectly with this outfit too for a more romantic, bohemian look. Here I am going to show you how the shirt
looks if you decide to cut away the excess fringe strings. I happen to have an exact
same shirt only that this one is pink, and I am going to repeat all the steps as before
with the blue one. Here is a little stop motion movie of the process.
Actually I get a lot
of questions how I do the stop motion for my videos. It is really simple, all you have
to do is take pictures or a second clips of the process. So I make one knot, film for
a second, then I make another knot, film for a sec, make a third knot, film for a sec and
so on. When you put all of that footage together you get a stop motion movie. So here we have
finished our knotting and it's time to cut away the excess tassels! Just make a horizontal
cut below the fourth row of knots. Voila, we got ourselves a beautiful cropped croche
top, which I think looks gorgeous. See how you can get a completely different top with
just one simple step, in this case cutting off the fringe.
Since this top is shorter
I like wearing it with more high – waisted bottoms, like this skirt. This t-shirt is probably 10 years old but
I love the color, the graphic so I never wanted to get rid of it. However the fit is … horrible.
So let's pimp this baby into a cool shirt full of interesting cut-outs! We need a shirt,
scissors or an exacto knife a thread and a needle for a couple of stitches, ruler and
a masking tape. First we are making a braided detail along the neckline. So trace with your
pencil, sketching where you want your braid to be. I will be using my exacto knife for
the cuts so a piece of cardboard inside the shirt is a must.

Now start making one to two
inch cuts crossing our sketched line. You can totally use scissors for this if you don't
have an exacto knife. Continue making these cuts all along the neckline. Now what you
want to do is take the first two strands and tuck the second one under the first one. Pull
the second strand up, take the third strand and tuck it under the second strand, pull
the third strand and take the fourth strand under it and so on all along the collar. I
actually saw this design in a shop not long ago and I thought "hey" I could do this myself,
but I've also seen a lot of other cutting designs recently and such unique tops are
always so expensive. I just have two strands left and my braid is finished. Now we have
to secure our braid. Thread the needle and make two to three stitches so our braid is
locked and it ain't going nowhere.
I also decided to make a couple of stitches on the
right side just so that the opening won't be as big. But that is totally optional. Also
if you'd like you can cut away the collar of your shirt, but I decided to keep it, because
it kind of looks a bit retro and old school. Let's now make a cool triangular cut out all
along the back too! Don't forget to put a piece of cardboard or other material inside
the shirt, especially if you'll be using an exacto knife. When I see things like this
in shops I always take a picture and then I can film a video and me and you guys can
rock this cool shirts for way cheaper. High five! For the guide I like to stick two masking
tape pieces in a V shape like so. Now we have to cut horizontal cuts between both masking
tape pieces.
I am using a knife, but scissors work great too. OK, once all the cuts are
made, remove the masking tape pieces and start braiding in the same way as before. Take the
first two strands and tuck the second one under the first one, pull the second strand
up, take the third strand and tuck it under the second strand. Pull the third strand and
take the fourth strand under and so on. In the beginning this is a bit more difficult
because the strands are so short but it gets a lot easier when moving up. Here is my braid
all finished so all that's left for me to do are a couple of stitches to secure it!
Try to use the thread in the same color as your shirt so that stitches won't be visible.
Yay! We're done with this cool back cut-out! We're not completely done yet, though! I decided
to snip away the sleeves to get a nice sleeveless top.
I'll also make it a bit more cropped
by snipping away about two inches from the bottom. Now… I'm happy with it – my top
is all done so let's quickly put it on! I paired it with some distressed light washed
jeans, blue sneakers and cool glasses for a real tough girl look, haha! I really love
how after ten years I can again wear this pretty shirt. This is the whole point of upcycling
clothes, giving life to pieces you totally forgot you have.
Last, but definitely not least, let's transform
this plain white long cami into a cool graphic top with tassels and beads. For this DIY you
will need a longer white top or a T-shirt, a star shape print out, self adhesive paper,
scissors, fabric paint, plastic container to put the paint on, sponge applicators, beads
and a pencil. Start by cutting a star shape from your print
out. Place it on the piece of self adhesive paper and trace the silhouette using a pencil.
We are doing the same thing as we did with the heart top, remember? Cut the star out
of your self adhesive paper and here's your stencil for the shirt! Stick your shape on
the center of your top, like this.
Time for the exciting part – fabric paint!
I decided to go for two colors, a blue and pink. Start off with the blue one. Dip a rounded
sponge applicator in the fabric paint and start making big dots on the edge of the star.
The purpose is to cover the edge almost completely and then make gradually fewer and fewer dots
as you move away from the star. Let's now add some pretty pink dots on the empty spaces.
Also, as you can see, the dots on the edge should kind off go a little bit over the star,
so that when you remove the sticker it will look like there's an explosion of colorful
dots behind the star silhouette.
Time to remove our star stencil and reveal our cool design!
I can tell that it will look absolutely amazing! See, I told you!
But we are not done with this top yet. We still need to make a beaded fringed bottom!
Cut away the bottom hum and then start cutting thin vertical stripes up to the masking tape.
I am cutting my front and back fabric together to save me some time. Now this already looks
pretty awesome if you ask me, but we still have to add beads for an even more amazing
detail to our top. Before proceeding, give your fringe a nice tuck to get rid of the
freshly cut look. This part is basically similar to the lace heart top, but the fringe will
be different, because we'll be using beads instead of knotting the tassels together.
Take your hama beads or other beads of your choice and cut them using scissors.
This will
make it easy to thread them on the fringe as you can open the bead like so. Take two fringe strands and slide a bead on.
I am using scissors to help me open the hama bead and slide the bead on the tassels. Continue
making these beaded pairs of tassels along the entire row until all of your front fringe
is grouped in pairs. For the second row, you have to take one tassel from the first pair
and one tassel from the second pair, add a bead, and slide it a half of an inch lower
than the first row of beads.
Continue doing this along the entire row. Make the third
row using the same technique. Take one fringe string from the first pair and one from the
second pair, bind them together by sliding on a bead. Then combine the remaining tassel
from the pair two with one tassel of the pair three and so on until you end up your third
row. Repeat these steps on the back of your shirt and you are all done! See how absolutely
out of this world awesome this tasselled design looks. I am so happy with this top I can't
even explain it! So I'm just going to shut up.
No, I'm not, haha. Fringe is a huge trend
this season, I have seen it all over the shops, but I don't even care what's in and what not,
because I love fringe every summer! Fringe tops just look so fun, happy and flirty. Perfect
for the hot summer days. Here I simply paired mine with some yellow shorts and white sneakers,
because with a top like this you don't really need much more. With all of these beautiful shirts and tops
we're now all ready for the warm summer days. Hope you'll try them out and if you do so,
please send me pictures on my Facebook, Twitter or Instagram. Also don't forget to check out
my DIY shirts and shorts tutorials from last year for more summer clothes ideas. Let me
know in the comments, which today's short was your favorite and also what videos you
would like to see next. That it is for today, thank you so much for
watching, I love you to the moon and back. Bye! Take a look at the back of your closet, I
am sure you will find old shirts that can be pimped into beautiful unique pieces, which
you will love to wear for years to come.
As an Amazon Associate I earn from qualifying purchases.


