

As an Amazon Associate I earn from qualifying purchases.

– [Instructor] Ready racers? On your mark. Get set. Go! (upbeat music) Today, I'll be showing
you some really cool DIY crafts to go along with
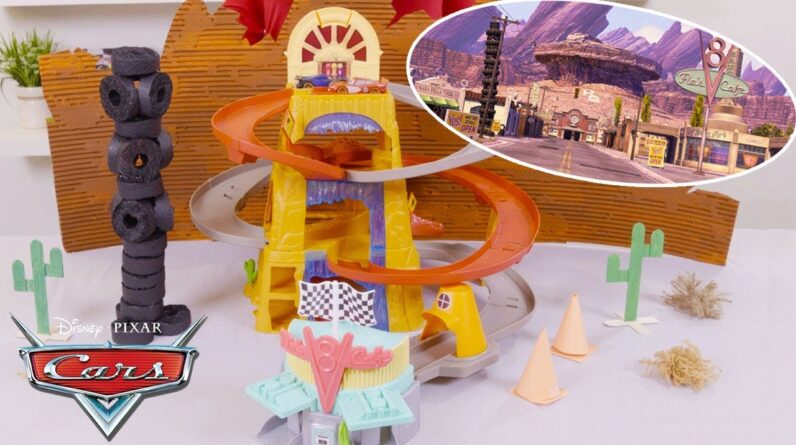
your Pixar cars play set, and they'll all be Radiator Springs themed to go along with our Mountain Speedway. (whoosh) We're going to use simple items you can find around the house to expand the world of Radiator Springs and make this scenic
route even more scenic. There's going to be a lot
of cutting and painting, so please, ask an adult
if you need any help. First, we'll be making: Luigi's Leaning Tower of Tires. (whoosh) For this craft, you're going to need black
paint and a paintbrush, school glue, a ruler, and a marker, a plastic knife, some toothpicks, and a pool noodle.
First thing you're going to do
is use your ruler and marker to draw 20 lines on your noodle. Each mark should be one inch apart. Once you've made your marks, use your plastic knife to
cut out all of your tires, be sure to ask your parents
for help with any cutting. Awesome! Now you have your tires, except I'm pretty sure
most tires are black. So you're probably going
to want to paint them.
This can get a little messy, so be sure to lay down some paper and don't forget to ask
your parents for help. (upbeat music) (tick-tock tick-tock) Once all those tires are nice and dry, take a bit of glue and
put three of them together so they look like a clover. This is going to be
the base of your tower. (upbeat music) Now take three tires, but this time glue them
together at the edges so they make this cool little pyramid.
And if you want, you can use toothpicks to hold them together
while the glue dries. (upbeat jazzy music) You're going to do this three times with three sets of tires. Finally, it's time to
put your tower together. Start by gluing five tires
stacked on top of each other. Then, alternate your three tire pyramids with single tires until you reach the top. This is a leaning tower
of tires after all, but it may want to lean too much as you stack the tires upwards. Be sure to balance the
pieces as you build, so your tower doesn't fall over.
Keep an eye on it as it dries, too. (tick-tock tick-tock) Perfecto! This beautiful tower would
bring a tear to Luigi's eyes. (whoosh) Let's make another iconic
Radiator Spring stop: the Cozy Cones from
Sally's Cozy Cone Motel. (whoosh) For this craft, you're going to need orange construction
paper, some scotch tape, a plastic bowl, a pencil, a ruler and safety scissors. First, take that bowl and use it to trace a nice big circle on the paper. (upbeat music) Now, take your safety scissors
and cut that circle out. (upbeat music) Next, fold that circle in
half and cut along the fold. (upbeat music) This will give you two
half circles like this. These are going to be your actual cones. All you have to do is curl it
into a cone shape, like this, and tack it down with
a little bit of tape. (upbeat music) Perfect. For the base of the
cone, cut out a two by two inch square on the remaining
construction paper.
(upbeat music) Put two more pieces of tape
on the inside of the cone to secure it to the base. And there you have it, a Cozy Cone. Sally would love this! (whoosh) What would a charming desert town be without some tumbleweeds? (whoosh) All you're going to need
for this next craft is: some twine or colored yarn,
your trusty safety scissors, toothpicks, and a ruler. (whoosh) First, measure out a piece of
yarn about six inches long. (upbeat Western-themed music) Now for the fun part, take a bunch of yarn and just
wrap it around the biggest part of your hand 10 times,
kind of like a bracelet. Once you've done that, slide it off your hand and
pinch it together in the center, so it looks like a bow tie. Then, you're going to take
that string we cut before and tie it down the
middle, just like this. (upbeat Western-themed music) Cut the loops on each end (upbeat Western-themed music) and start to unfurl the
individual strings of yarn with a toothpick. (upbeat Western-themed music) (whoosh) We need some cacti.
You're going to need a
bunch of craft sticks, green paint and a paintbrush, craft glue, a brown colored pencil or crayon, safety scissors, and a plastic cup. First, take one craft stick and just cut off the top end like this. (upbeat rock music) Then, take a different craft stick and cut that into four pieces. Now you have all the
branches of your cactus. After that, take one more
craft stick and cut it in half. Those will be for our base. (whoosh) Next, arrange the shorter
sticks around the cactus trunk however you like. Be sure to glue them on as you go. (upbeat rock music) Once your cactus looks good, glue the two remaining sticks
together in a cross shape. (upbeat rock music) (tick-tock tick-tock) Once your glue is dry, break out some of that green paint and make them look like a real cactus.
Don't forget the other side. As it's drying, you can use that colored
pencil to draw on some barbs. It's looking like a real cactus now! Last but not least, go
ahead and put a little glue in the middle of the base we made earlier. Then, place your cactus on top. If it wants to fall over while
it's drying, don't worry. That's what the plastic cup is for. (tick-tock tick-tock) Once it's dry, voila! You've got yourself a cactus. (whoosh) Time to move on to our
final and biggest build: Cadillac Range. (whoosh) For this you'll need a
big piece of cardboard, brown and orange paint, a paintbrush, a pencil or marker, some tape, and something long and
thin like a chopstick. (whoosh) First, go ahead and draw
the image on the cardboard. This mountain range is pretty iconic, so make sure to use a reference picture to help you get the look just right.
Here's the one I used. (whoosh) Once you've done that, use a remaining corner of the cardboard to trace out a triangle. This will be used later as a kickstand to hold up our masterpiece. Have a parent or guardian
cut out the canyon for you. The end result should
look something like this. It's looking awesome so far!
Let's work on the texture. Remember when I said you
needed something thin, like a chopstick? You're
going to use that to peel away the top layer of the cardboard like this.
You'll want to do this
across the whole canyon. See how all the squiggly stuff inside makes it look more rocky?
Pretty cool, right? (whoosh) Now, use all that brown and orange paint to make it look even more like a mountain. Be sure to lay down some paper
so you don't make a mess. (upbeat music) All that hard work paid off. Now you've got yourself
a great looking mountain. (tick-tock tick-tock) Once the paint is dry, place
the mountains face down and tape your triangle
kickstand to the back. (upbeat music) Once it's secure, prop it up
and just take in the view. (whoosh) Once you've completed all your DIY pieces, set up your scene in any way you'd like. Beautiful! Our play set
is really starting to feel like radiator Springs. Now
it's time to have some fun! (intense Western music) (music fades then crescendos) (music fades) Hope you had fun today
checking out this Cars play set and making all those cool crafts.
See you down the road, racers. Ka-Chow!.
As an Amazon Associate I earn from qualifying purchases.


