

As an Amazon Associate I earn from qualifying purchases.

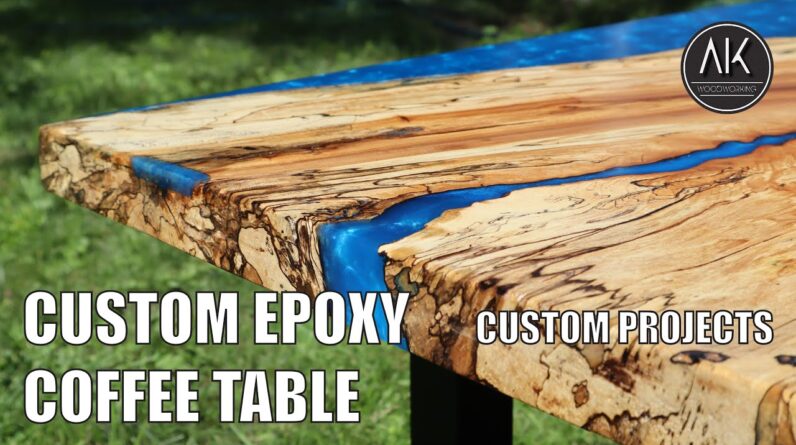
this week i'll show you how i made this
blue epoxy and spalted maple coffee table i started over on my router jig flattening the
bottom of the slab before cutting it to the final dimensions next i made a mold out of melamine in order
to pour the epoxy around the spalted maple i'll leave a video on how to make
one of these in the description below i cleaned off any loose material on
the slab using my chisel and my orbital sander i used two three gallon kits
of epoxy from rusty design i poured these back to back but probably should
have poured them one at a time letting them dry in between as you'll see the reaction
when exothermic causing some cracks on one side after removing the sides of the molds i left the
bottom of the mold on to have a flat reference and use my router slide to flatten the top i then removed the table from the bottom of the mold and cleaned up any stuck on
mold using my router slit again after trimming the sides of the table
with my circular saw the final dimension i taped the bottom using tuck tape and flipped it
over so that i could repair the cracks on the top while the epoxy was drying i decided to
paint these steel legs from rusty design i did this by applying two coats of
primer and two coats of satin black using a heat gun i heated up any excess epoxy
and removed it with a chisel i then went back and sanded the entire tabletop to 60 grit before
taking my time to fill any small cracks i had left i place the legs seven inches
from each end of the table and center punch location of each hole using a
guide on the end of my drill bit i drilled all the holes to secure the legs taking extra time
drilling into the epoxy to avoid any cracking i use these threaded inserts in order
to secure the legs to the tabletop this allows the legs to be removed from the
tabletop multiple times without damaging the wood now that the touch of epoxy on the top was
dry i used 60 grit sandpaper to sand this flat i then use six sandpapers from 100
grit to 320 grit to sand the top i repeat the same process for each grit making
multiple passes over the entire table top using a microfiber towel to keep the surface clean and
using a vacuum whenever i need it to suck up any debris on my sandpaper after saying the entire
tabletop to 100 grit i had a round over with my router this ensures that any scratches made by
the router are cleaned up in the sanding following the finish that i used for this coffee
table was osmo's polyx 3043 i first apply this to the bottom before immediately
flipping it over and applying it to the top on the sides i applied it directly using
this 3m white pad whereas on the top i first spread it out using a credit card before
buffing it in with the same 3m white pad after buffing for a while
using my random orbital sander i flipped the pad to the clean side and
continued buffing until there was no residue left i applied one more coat using the exact same
technique sanding with 600 grit in between coats i hope you really enjoyed watching me build this
epoxy coffee table i'll have many more projects coming up with the pocky so if you enjoyed
watching it please subscribe to see more you

As an Amazon Associate I earn from qualifying purchases.


