

As an Amazon Associate I earn from qualifying purchases.

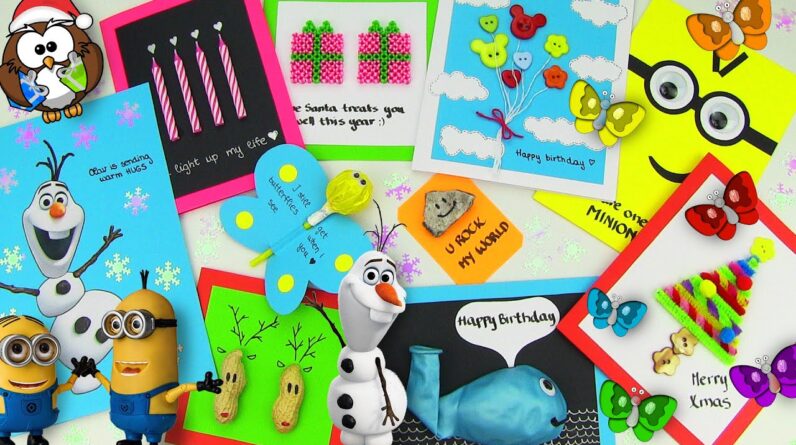
In this tutorial I’ll show you 10 DIY cards
ideas, which you can make for your boyfriend, girlfriend, friends and family to show how
much you love them. Hey loves, we finally arrived into the holiday
season, which is my favorite time of the year. It's time when we send our good wishes to
our friends and loved ones. But this year, instead of buying a bunch of
greeting cards, I decided why not making them ourselves. So here I'll be showing you ten DIY greeting
cards ideas, not only for the holiday season, but also for Valentine's, which is coming
soon, birthdays, or just any kind of day when you want to remind your friends and family
that you care for them. You don't have to wait for the international
day of love to let them know how much they mean to you. Do it today, I'm sure you'll make them very
happy.
OK, enough talking. Let's get down to work! Let’s kick off with this cuteness overload
whale card! You’ll need some cardboard paper, blue balloon,
googly eyes, tissue and a few bits like pen, ruler, glue and scissors. Cut two rectangle pieces one bigger and one
smaller. I like to take a pointy object and run it
across the middle of the bigger rectangle. This will make it easy to perfectly fold the
paper along the line. There you go, that’s how you easily get
a plain card from a big piece of cardboard paper.
But of course we still need to decorate it! To transform a balloon into a whale draw on
his mouth and stick on a googly eye. Every whale also has a blowhole on top of
the head for breathing. Ok, our whale is ready but he can wait a little,
because we need to draw the ocean for him – draw some silver waves on the black rectangle. To assure the whale will keep the desired
form, scrunch a napkin and glue it on the back. Now we can finally put this buddy in the ocean
so he can swim. Fold his tail upward and glue it in place.
When whale breathes he blows the air out through
the blowhole, which may look like a fountain since he’s in the water. Make a white cloud where you can write a message
like happy birthday, I love you, congrats – whatever the occasion, and stick it on the
card. I really love how creative and unique this
card is. And also the fact that you can use it for
so many different occasions. Next we are making this adorable Minion card! These are the things you need.
Googly eyes are optional but they add a bit
of texture and 3D feel to the card. For the minion’s glasses start off by cutting
a thin black paper strap. Then cut 2 black and 2 smaller white circles. I used a tape roll and a glue lid for a stencil
to outline the perfect circles. We must not forget our minion’s hair! And lastly we need to give our yellow monster
a cute smile. With a help of a tape roll I am sketching
a shape of crescent moon and cutting it out. Now we have all the parts ready and we can
assemble our minion. Put the glasses together by gluing black circles
on the black strap and the white circles on top. Fold a rectangle piece of yellow cardboard
paper in half to get a card and stick the glasses on the upper part like that. Add the hair and the mouth. For the pupils you can simply use two small
black circles or a pair of googly eyes like me. How flipping adorable does this little monster
look like! But we are not completely done yet, we have
to write a little quote on: You are one in a MINION, like million but Minion.
Get it? I think this card is so versatile, perfect
for a birthday, valentines or just any day really. You can give it to your love, friend or a
family member and you’ll make them very happy for sure! Let’s continue with this pretty candle card. We are going to need similar things as before
but also four birthday candles. I like to sketch where I want to place each
candle so I am drawing four lines on the black piece of cardboard. You can use any cardboard color for this card,
but I specifically went for a black background because I wanted it to look like candles burning
in the dark.
Since the candles are rounded they can be
a bit difficult to stick on a flat surface. Therefore I decided to scrap one side with
scissors like so. You will get a flat side which will be much
easier to glue in place. For the flames I am drawing little silver
hearts above each candle. I think this card is so beautiful. It’s perfect for Valentines or just any
day and you can give it to your significant other or a friend. In the caption I'm writing a note "You light
up my life"! I just want to virtually give this card to
all of you watching this, because you guys light up my life every day, you need to know
that. Next is a lovely Christmasy card! Besides the usual, you will need some pipe
cleaners, little colored cotton balls and three buttons. Sketch a triangle shape on a rectangle piece
of paper and stick it on the red card to get a nice framed front. Take your pipe cleaners and start cutting
shorter and shorter pieces so you can cover the entire sketched triangle with them. I like to use a variety of different colored
pipe cleaners but as you can see, I focus a bit more on the green.
Green represents the tree, while other colors
stand for the Christmas tree decorations. For even more texture and dimension I decided
to stick three colored cotton balls on as ornaments. The tree would not be complete without a star
on top. You can draw it, cut it from a yellow paper,
but I decided to use a yellow button instead. To finish of I am also gluing down two brown
buttons for a stem. You can leave the card like this or you can
add a little Merry Xmas caption next to the tree. And that’s it! What a cute little card for this magical time
of the year. Next we are making a super cute and sweet
butterfly lollipop gift. This time we use a lollipop and a pair of
tiny googly eyes on top of the normal necessities. Take a piece of cardboard and fold it in half.
Outline a shape of a half of butterfly’s
wings like that. Cut the wings out making sure that you are
cutting both the upper and the lower sides of paper. Unfold the paper and there you have a perfect
pair of symmetrical wings. If you want you can decorate them, I usually
cut four small circles from a yellow paper and glue them on. It’s time to write on a little note, which
can be anything depending on who you are giving the butterfly to. If that’s a boyfriend you can write something
like I still get butterflies when I see you. If it’s a friend you can write something
simple like have a sweet day. Make two short cuts on the folded side and
slide a lollipop through that opening – you get the perfect butterfly, see? If you want you can add a pair of tiny googly
eyes, but either way, this cutie is absolutely adorable and such a nice little gift to anyone.

It’s amazing how a little detail like this
can make someone very happy. You really don’t have to spend a lot of
money to make a person smile. Let's now learn how to make this beautiful
card with balloons in the sky. You mostly need similar things as for the
other projects, but you also need some buttons and some thread. By the way guys, I'm really sorry for my very
weird voice today – I'm a little bit sick, but I still wanted to put this video on as
soon as possible so I hope it's OK. Then cut out a bigger rectangle and fold it
in half. For the framed front, cut out a smaller blue
rectangle and stick it on the white one.
We need to decorate the sky with some puffy
white clouds so cut them out from a white paper and glue them on the card. Try to place the clouds more on the sides
to leave some space for balloons, which are coming in a second. If you want to achieve that stitched effect
you can draw short gray lines along the edge of the clouds. See how the card gets that cartoony feel? Cut some white thread pieces, place the first
one on the card, add some glue on the upper end and put on a button. I have these cute buttons in forms of Mickey
Mouse, flower and a heart, but normal rounded buttons would look just as pretty. Collect the threads, tie them together by
making a red bow and cut away the excess. Customize the little note depending on the
occasion, I wrote Happy Birthday, which I am soon having on Christmas day, woohoo!! This card is also perfect for other celebration
occasions for example graduation or getting a driving license. Next idea is again perfect for the Christmas
season.
We are making this pretty card with 3d presents. Besides the usual stuff you’ll need a bunch
of colorful tube beads. Fold the cardboard in half to get a greeting
card and if you want stick on a square piece of some different colored paper. I am sketching two crosses where I want my
two presents to be and now we can start gluing the beads! All you need to do is grab a bead with tweezers,
dip it in glue and place it on the card. I went for pink and green ones. The green beads will represent the ribbon
and pink ones the package itself. I am putting the green ones on the sketched
cross and pink ones around to form a square. Lastly I also made a bow using green beads
on top of each pack. Below the presents you can write a little
note, I wrote I hope Santa treats you well this year. I think this is such a lovely idea, sleek
but with so much texture and dimension.
Yep I do hope Santa makes all your wishes
come true this Christmas. Because you guys deserve it! Now let’s make something super quick and
easy but still very adorable! For this project the most important thing
you need is a stone. Yes you heard me right – so go outside and
find a stone you like. Then cut a little rectangle piece of cardboard,
I decided to snip away the edges to make it a bit more special. Give a pair of eyes and a big smile to your
stone and glue it on the cardboard piece. How quick and epic is this idea, right? The only thing left to do is to write you
rock my world or simply you rock below the stone. I simply adore this one. It is literally made in a minute and could
be such a lovely present to your friend and loved ones. Let’s continue with the most famous snowman
out there – Olaf.
I printed out the stencil from the internet
and I also decided to decorate the card with some pretty snowflakes. Start by cutting all the pieces out of the
stencil. By the way, I found this one by just googling
Olaf stencil. For this greeting card I decided to use blue
cardboard. Fold it in half and we are ready to start
gluing. Here come his legs, body, head and in the
end sticks for his hair and arms. Before we let the snow cover this cute card,
let’s write down a short note. I am going for Olaf is sending warm hugs. Another one of his quotes goes like this "some
people are worth melting for". Which would also work great here. To finish off let’s sprinkle this wintery
card with a bunch of snowflakes. I got these for less than a dollar in a craft
store but you can totally cut them out from a white paper and they don’t even need to
have this snowflake shape.
This card is just so adorable and it’s perfect
for this time of the year. You can also use it as a birthday card for
friends with birthdays during winter months. Last but not least I have another Christmas
card idea with Santa’s reindeers. Besides the usual you will need two halves
of a peanut shell and a napkin. I decided to make a framed card front so I
am just gluing a smaller green square on a red plain card.
Draw a pair of black eyes and a red nose to
each of the two Rudolf reindeers. Then put some glue on the inner side of the
shell, scrunch a piece of napkin and put it in. This will make it much easier to glue the
shell on the card. I love using stuff in a non-conventional way,
like balloon, candles and pipe cleaners. I think it’s so cool finding an alternative
way of using things, you just need to think a bit outside the box. All that’s left to do is to draw a pair
of raindeer ears and horns to each of them.
This card is super easy to make and looks
so adorable! I also think it’s so nice using peanut shells
which would otherwise be thrown to waste. I hope you enjoyed watching this tutorial,
let me know in the comments which card idea is your favorite. I think they are all so cute, so it's really
hard to decide, which one I like best. I wish you all an amazing holiday season with
the people you love. Sending you a big warm hug! I love you and I'll see you soon. Instead of going to the crowded mall to buy
cards for your friends and loved ones, make them yourself. The time and the creativity you will invest
along the way, will surely reflect on that persons’ smile when they receive it.
As an Amazon Associate I earn from qualifying purchases.


