

As an Amazon Associate I earn from qualifying purchases.

Welcome to mother daughter projects. I'm
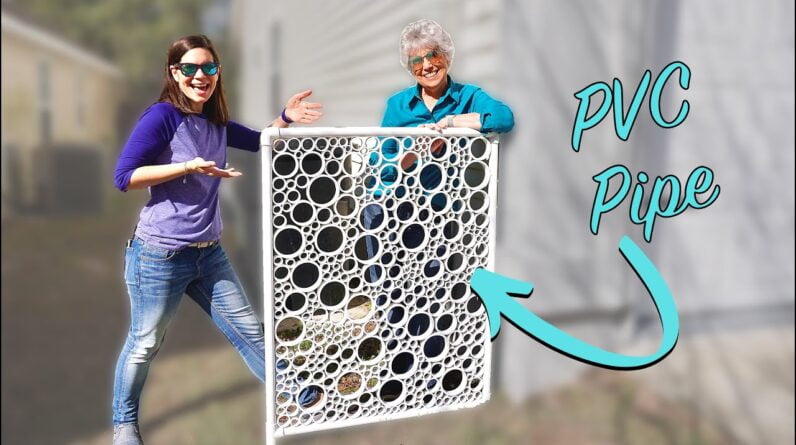
Steph. I'm Vicki and today we're going to show you how we made this outdoor PVC
privacy screen. Come join us! Prior to assembling all the PVC, I sanded
everything to give it a little bit of tooth. And I used this really kind of fun
hack. I used an orbital battery-powered sander. I turned it upside down and
clamped it to my workspace and that way I was able to use the sander hands-free.
Next we made a PVC frame for the slices to fit into.
We made the height 45 inches
by 35 inches wide. I used the miter saw to cut the one-inch pipe to length. We use
two elbows and two tees to attach it all together. Next we moved on to cutting a ton
of various sizes of PVC pipe. We clamped a piece of wood to the left side to act as
a stop block so all the rounds were the same thickness.
We cut the PVC pipe on our miter saw and we quickly realized that the cut pieces
were unpredictable. Some of them flew away from miter saw. Some of them stayed
in place. So if you're going to do this, make sure you use all safety precautions.
don't have anything behind your miter saw. We also did some research afterwards
and found that a higher tooth count on a blade can work a little bit better. Ours
is only a 60 count so something a little bit higher could have done a better job.
Also, it's probably going to ruin your blade so keep that in mind.
Don't use a super
expensive blade to cut your PVC. I wasn't comfortable cutting the shorter pieces
on the miter saw so I used our portable bandsaw to get a few more rounds cut
from these pieces. And with a higher tooth count on the blade it made nice
safe cuts but there was a little bit more to clean up which we did on the
orbital sander. We placed our first round of cut slices.
We laid the frame on a piece of insulation foam so it could be easily
moved around. We realized pretty quickly that we are going to need a lot more PVC
rounds so we purchase more pipe and made the cuts off-camera.
Cutting and sanding
PVC is really really messy it's really important protect your eyes and your
nose and it's important to protect your environment.
Don't just sweep that into the environment. Use a vacuum to clean it all
up. With all our slices placed, we opened a tube of construction adhesive, placed
it in our battery-powered caulk gun and started to glue the pieces. We had all our PVC laid out ready to go
and it was time to glue. So here we are starting the gluing process and the
first thing we realized was "it's a slow process!" So it took probably about four
hours to get the whole thing done. We had some music planing so we were doing okay.
But what we did is we drew a little line where the pipes connected then
we glued using construction adhesive and we just kept that process going.
And
quickly we realized that it was better if we both did our own thing and we we
were able to complete it a little bit faster when we did that. We got our last
piece in place in a quick high-five for a job well done! We waited 24 hours and then lifted it up
to see if it would hold. Success! Here you can see we're spray-painting PVC white.
And we're doing that because PVC can yellow over time and we're hoping that
this will keep it from doing that.

Back at my house we remove the old screen and
brought in the new one. We're using two-foot-long rebar to secure it to the
ground. It fit nicely but we had two issues. One it was leaning, and two, the
ground was uneven so it's not level. No matter we cut a two and a half inch
piece of PVC and added it to the left side so the structure would be level.
Then we got two more pieces of rebar and that added a lot more structural support
and allowed it to stand up straight. And here it is all finished. We love the
look it adds to my curb appeal and if you look closely you can find a hidden
Mickey. "What we learned." When we finished this I looked at it and I said "you know
this looks like a piece of art." I really love the look of it and we've even
talked about putting some air plants in the bigger holes just to add a little
bit more more flavor to it because it looks like art.
I've actually had a couple
ideas of using this design similar to this inside my living room so stay tuned
we might do that in the future. You're probably wondering why we didn't use
PVC glue. But we knew we were going to have to do a lot of gluing and PVC glue is
really very toxic and very smelly and we really didn't want to deal with that so that's why we use the outdoor construction adhesive.
And your biggest
question might be how is it going to hold up because that's our biggest question.
And we really have no idea. We wanted to try to make it as strong as possible so
we'll see if it holds up. We'll keep you updated on our weekly show Workshop
Wednesday. We'll let you know if we have any issues with it. We do have
extreme hot, sometimes cold and rainy, temperatures here in Florida so it'll be
interesting to see the progress of it.
So if you liked this project and want to
see more from us please visit us at MotherDaughterProjects.com and
subscribe right here on YouTube. Click the bell and you'll be alerted to all our new
projects. Blooper: Should we say hi to the neighbors? Hi Noah and Jacob… .
As an Amazon Associate I earn from qualifying purchases.


