

As an Amazon Associate I earn from qualifying purchases.

Hello and welcome. Thank you for your interest and the many
comments and questions about my air conditioning installation video. If you haven't seen the video yet,
you can find the link in the video description or on my channel. This follow-up video aims to answer
some questions and comments. I will also go into detail about
the opening of the valves and I will add a WLAN control and integrate the
air conditioner into my house WLAN. The main question from the spectators was whether the system
is still running well and reliably today.
And I can say that the air conditioning has
been doing its job without incident for over a year and a half now . Both heating in winter and
cooling in summer always worked very well. I would like to respond to a few other
comments below. For example, there was the question: Could
n't you just shorten the copper pipes or what is the point of them being about 3m long? The air conditioner was supplied as a complete kit
and was pre-charged with the correct amount of refrigerant for the
3 meter pipe supplied. Maybe they could have been shortened a bit
, but I didn't think of it because it has to be done correctly
with a crimping tool, etc., and I wanted to save myself the effort. Now something about the insulation of the lines.
The lines both have different temperatures during operation
. In retrospect, I would insulate each line
individually rather than both together. In the comments, it was also criticized
that the screwed connection of the indoor unit is now inside the wall after installation,
making maintenance of this connection difficult. First of all, I would like to say that I have
never disassembled the device since the first use , as there was no reason to do so. Nevertheless, next time I would probably lay the connection lines of
the indoor unit along behind the indoor unit to the other one, just to be on the
safe side. The hole would then be drilled on the other side
behind the indoor unit. This is quite possible due to the structure of the indoor unit
and if the cable length is not missing on the outside, that is certainly
not wrong, so thank you for this tip. There were of course comments that criticized the
hand pump for evacuation. I can understand that, but I just wanted
to know if it works and the system runs really well and quietly.
Since I followed the torque specifications of
the screw connections exactly, I am sure that the connections are tight. Next time I install an air conditioning system
, I will get an electric vacuum pump to be on the safe side, or
hire a specialist company to do it. Some comments indicated that
the procedure for vacuuming and the subsequent opening of the valves was not
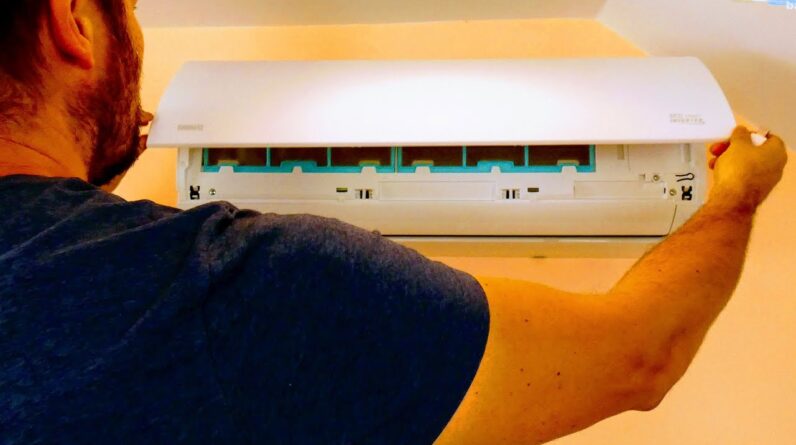
entirely clear in the video. So I'll show you that in detail now. Both lines are already connected here
and connected to the indoor unit. Here we have the low-pressure valve
at the top and the high-pressure valve at the bottom. The service connection
through which I create the vacuum is on the upper valve. The service port is equipped with a Schrader
valve, which only opens the valve when this pin in the middle is pressed. The vacuum is automatically created
in both lines and the indoor unit via this connection. Only then are the
valves to the outdoor unit opened at both connections and the connection to the compressor established.
To do this, first remove the screwed-on protective cap
. Then you can use an Allen key to first open the high-pressure valve, i.e. at the
bottom. The refrigerant flows into the lines
that were previously provided with the vacuum. Now the upper low-pressure valve can also be
opened and only now is the circuit completely open. Pressure and leak tests should of
course be carried out before filling with refrigerant. If longer coolant lines have been installed
, additional coolant may have to be filled in via the service connection
. Then there were a few more comments,
such as: Super video, but I would advise not to use an HT tube because it is not UV-
resistant. Well the outer wall is to the north and gets
relatively little direct sunlight and I expect the pipes will last a very
long time. I'm not worried about that, but of course you could
also use PVC pipes, which are more UV-resistant. next question: do you
have to supply the outdoor unit with power or is it only possible via the indoor unit? I'm sorry if that wasn't clear in the
video, but I just connected the outdoor unit to a power cable.
This is also intended by the manufacturer of this
system. The
internal unit is then also supplied with power via the internal connection line supplied. So you don't need a separate power source
for the indoor unit. Next comment: NYY-J must be laid outdoors, NYM
is not permitted there. That's right, I didn't do that
correctly. Next time I would use a different power
cord for outdoor use. Until then I will put an additional protective hose
around the line. There were still some questions about the installation time. Overall, I spent several days installing it
. It has to be said that most of the time was spent on
film work, thinking and missing material and getting tools.
I would estimate the pure installation time, when all the materials
and tools are there, to be one working day, as some spectators have also
confirmed. Then there were questions about how the system
could be controlled via smartphone. I didn't really intend
to use this feature. But then I got in touch with the Simando company and they kindly provided me with
the right WiFi USB module for this
video. Many thanks at this point and in the
following we will use and test it briefly. To do this, I open the front flap of the indoor unit. This screw can be loosened here on the back of the display
. Then the display is only held with a couple of
plastic clips. And then we can insert the WLAN stick into
the USB slot provided for this purpose. Then I click the display back
into the holder. Put the screw back in and hang up the cable
neatly.
That's already done and now
the next step is to install the appropriate app on the smartphone . The app is called Nethome plus and you have to
create a user account here. Then after opening the app I go to
Add device. Here I choose split type air conditioner. switch on the system. Now press the LED button on the remote control seven times
. The USB stick quickly builds its own
WiFi network to which the smartphone should now connect. I now enter my house WLAN and password. All information is then automatically transmitted to the
air conditioning system and the smartphone connection is changed back to my house WLAN. Now I can assign the air conditioner to a room
, for example guest room. Now the added air conditioner appears
here in the overview.
If I go up there, the operating options
are displayed, which are similar to the remote control. But in addition, for example, the
outside and inside temperature is shown live at the top. You can also use the app to set schedules
and some other settings. The air conditioning can now also be integrated into Alexa
and Google Home. As an example, you
simply have to set up a new device in Google Home, then select the NetHome Plus app
and then enter the user data here and the system will then be linked to the home. Now you can turn the air conditioning on
or off with Google Assistant, for example. This is useful when you are out and
have accidentally left the air conditioning on or you want to run it ahead of time because
you will be receiving guests later, for example. Overall, I find the WLAN integration very
practical. The connection also runs reliably if
you assign a fixed IP address to the air conditioner. In the Fritzbox under home network, then I go
to edit our added air conditioning in the connected devices .
In the next window you can assign an individual
name and check the box to keep the IP address. Anyone who uses the UniFi Network can
find the device under Clients and under Configuration and Network, activate the fixed IP address
and also enter a desired IP. According to the manufacturer, a fixed IP improves
communication, also because the connection is probably rarely used and does
not have to be maintained permanently. I hope this video was able to
answer most of the questions and suggestions. Overall, I'm still very satisfied with the installation of
the air conditioner. Of course, I advise everyone to hire a specialist company
for the commissioning, but you can save a lot of money just by installing it
. In the video description you will find the appropriate
links to this video. Thank you for watching and I look
forward to plenty of comments again.
I wish you every success with your projects, see you
soon, your Carl der Landschaftsbauer..
As an Amazon Associate I earn from qualifying purchases.


