

As an Amazon Associate I earn from qualifying purchases.

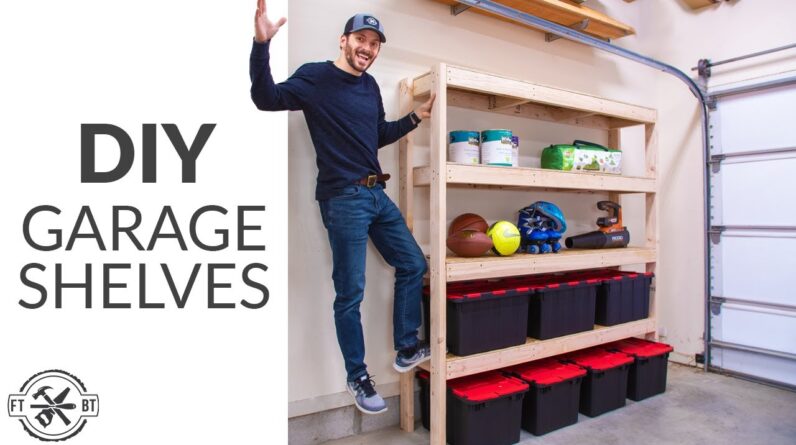
Today we're going to build garage
storage shelves that are cheaper and stronger than what you can get at the
store this project only takes 12 two by fours and a sheet of OSB which together
should be about 60 bucks depending upon your location you can scale these to the
length and depth that you need to fit your space I started with a stack of
eight two by fours for the shelves and I marked them to size and this set up is
going to be six feet long and 16 inches deep which gives you the most shelving
for the lowest cost I used some scrap wood to elevate the boards off of the
stack and support them during the cutting I clamped together two two by
fours and I cut them at the same time to speed things up using a carpenter square
as a guide for the circular saw helps you cut straight along your line but it
won't prevent kickback yes my first cut of the project I already ran into an
issue but this is gonna be a good teaching moment because you could run
into this as well everything was going fine and I didn't tilt or move this all
off of square but it grabbed the wood and kicked back like an angry mule
anyway that's a scary thing when it happens just immediately let your finger
off the trigger and keep hold of the saw I moved the first piece away and I
finished the cut on that second board.
When I looked at it I noticed that the
one that had bound up had a decent twist in it and the support blocks were a
little too far apart and I think that let the board Rock while I was cutting
it which likely caused it to pinch in that caused the kickback so for the rest
of the cuts I move those supports in a lot closer and I didn't have any more
issues if you've got any good tips for reducing kickback go ahead and share
them below in the comments for everyone to read you can cut your two by fours to
size with the circular saw just like I showed though you might run into a
little bit of binding issues at times so just be careful with that but a much
better option is the miter saw so if you've been thinking about upgrading to
a miter saw I would highly recommend it so when you're cutting these smaller
13-inch boards it really comes in handy also the finish on it is gonna be a lot
better than on your circular saw now the long shelf boards are connected with
13-inch bracing and this is a perfect place to use a stop block I set the stop
block at 23 inches and I used a tinge spacer to get it down to 13 because my
stop block is limited to 15 inches due to the miter saw fence
I cut braces for each shelf and then I moved on to cutting the material
for the top of the shelves I actually had some similar shelves that I made out
of 2×3 material but they were too long and they sagged a little under heavy
weight so I unloaded them and gave them to a neighbor to make room for this new
set here's a little project that I forgotten about and it is nice and rusty
now we'll take care of that later the next I brought over the sheet material
and I set it on the two by fours which I'll be using for the legs and this
makes a great support base for cutting things down for the actual surface of
the shelves I'm gonna be using this oriented strand board this is 7/16 thick
this sheet is only about ten bucks so it's very inexpensive and it's gonna
hold up just fine because the distance on the top shelf is gonna be very narrow
it doesn't need a lot of support I cut 16 inch strips from the sheet and if
you're a pro with a circular saw and you can cut a straight eight-foot line by
freehand then you got me beat I need a little help and you can use something
like this Craig rip cut as a guide but you really don't even need that you
don't have to have a fancy jig or guide to make this cut just measure the
distance between the edge of your circular saw and the blade.
Mine here is
an inch and a half on the short side and then you can find a straight 2×4. Let me
rephrase that if you can find a straight 2×4 which somehow I was able to then you
can clamp it down an inch and a half in from the cut line that you want and then
ride the saw against that board for a straight cut. And making the shelves 16
inches deep let me get three eight-foot strips out of the four by eight sheet
and next I cut each strip down in length to match the two by fours that had cut
earlier for the shelves there were 69" I used some of the bracing parts
to support the offcut and another one clamped down as a guide here and yes I
realized that I should probably be able to cut a 16 inch line straight by hand
but I'm still a recovering engineer and I have a straightedge to run against it
just makes me feel warm and all mathematical inside and also after this
I could use the offcuts to get three 23 inch pieces to cover the fourth shelf
and that means the only ways from this full sheet of OSB are these tiny pieces
that I'm throwing off here to the side and that really makes me happy so next
up I could start in on assembly now when you're assembling the shelves you're
probably gonna have to do it on your garage floor my benches are not big
enough to do these shelves if you do make sure you're looking for a
flat spot in your garage the floors and garages are notorious for being nice and
wavy so if you look at mine I have actually a big dip right here and I know
that that happens but if I move it back towards my cabinet it's a lot flatter so
I'm actually gonna assemble back here in the back if you find a flat part or a
flattish part of your garage assemblies gonna go a lot smoother I laid out the
long shelf boards and I marked in 23" from each side to locate the
inner braces I decided to use for braces on each shelf which is honestly overkill
but these things will not sag it all for sure I'm using two and a half inch
number-10 screws here to attach everything and the screws that I'm using
are self tapping so you don't need to drill pilot holes but if you do want to
play it safe or if you're using regular screws then make sure you do pre-drill
at least the ends so that they won't split then I centered the inner braces
on the marks that I had made and I screwed them in place as well and moved
on to the next show one thing to look for on these is you want to check the
crown the crown is basically which way the board is humping if it's gonna be up
on top or on the bottom and so this one it kind of curves this way so I'm gonna
put this facing up just make sure that each of them have the same it going the
same way because if one board is humping up and the other one is humping down
it's gonna be kind of weird to get it assembled now I got to putting together
the other shelves but I had a little side project going with the help of
today's sponsor WD-40 so here's a part from that mortiser that I had under the
shelves and it is nice and rusty it's been sitting there for a lot of years so
while I'm doing the build I'm gonna put this in a little cup of rust remover I'm
gonna use the WD-40 specialist rust remover soak and see how much of this
rust it takes off but to finish up the shelves I added the OSB sheathing to the
tops I started with the upper shelf and I laid out the three small panels that I
cut and I attached them to the two by fours with some me nails but if your
name isn't Brad you could also use screws and when I switched over to the
long pieces I seemed a little less clever.

Alright minor issue here I
actually was trying to get a little too precise when I cut these tops and
there's an overhang on the end it's about a sixteenth of an inch but it's
gonna hold off the leg because the legs go on the ends when you're cutting these
tops cut them slightly undersized so you're not going to run
this issue because a little gap to the edges doesn't really matter because you
had a round over on the end anyway don't be like me don't try to fit it too tight
just give yourself a little bit of wiggle room And while I'm cutting these
ends off let's check out how that WD-40 rust removers soap worked now after just
an hour and had taken off all that surface rust with no scrubbing at all
I've got to say I am impressed it's non-toxic and it's biodegradable which
makes it easy to work with – I checked the link below for socially distant
purchase options for Walmart including delivery as well as contact free
checkout and pick up so you can stay safe and healthy during these times
thanks wd-40 after I got all the shelves put together I moved on to the legs
I cut the left side legs down to seventy five and a half inches and then I
checked the slope of my garage floor for the length of the right legs if you're
gonna be installing this at the back of your garage you won't have to go through
this step but if you are going on a side wall you need to account for the slope
you can always shim it but it's easier just to cut the legs this side that you
need in the first place so I'm gonna use this 2×4 which is seventy five and a
half inches to tell me how much slope I have across that distance I'm using some
quarter inch plywood just as shims to shim it up until the bubble gets level
and it ended up being just under a half inch drop over that distance so I cut
the right side legs to just under seventy six inches and then I started
assembling the unit now since the top shelf is flush with the legs it's
easiest to assemble the shelves upside down starting from the top I squared up
the left side legs making sure that I kept the orientation of the shelving
unit in mind and I put the short legs on the correct end and then I secured each
leg with three screws and I did the same on the other end you're still gonna be
able to adjust these quite a bit before attaching the next shelf so don't worry
if they're slightly off here now to space the shelves consistently and
making one person assembly a bit easier I cut 15 inch spacers from the offcuts
of the legs I put a spacer on each corner and I brought over the next shelf
and I could lay that right down on those spacer blocks and support everything now
at this point I spend a little time getting everything lined up square and
flush so checking the distance between where I did the first shelf and this one
make sure that everything was nice and square and that if anything was out I
could change it then and after putting one screw in each leg and getting ever
in place I went back and I added two more screws for three screws in every
corner now the other two shelves go in just like this one and one thing to look
for here though is if you have any twisted shelves where a corner stands up
versus the others just make sure that you're pulling down each corner flush to
those spacer blocks before you secure them in place if you want to build this
I do have free plans available with the Cutlass it's gonna make it nice and easy
for you just check the link down below in the description and after attaching
that last shelf I got in my daily workout by lifting this beast up and
admiring the storage I enlisted to help from my wife Susan and we walk the unit
into place over on the wall but there was one more thing to deal with before
attaching it a lot of garages are gonna have this curve that sticks out past the
drywall and you're gonna have from the effect so what I'm gonna do is take the
back leg and I'm going to cut it down so that it will fit right on top of this
curb and if you have a curb that goes the whole way you can do that on both of
the back legs the curb actually stops right before the end of the garage
shelves over here so I don't need to cut that back one on the other side so I'm
just going to mark it then flip it over cut it and then we can put it in place
and attach it to the studs we turn the shelving around and we flipped it over
to cut the back leg and moving this thing and looking at each other face to
face seemed like some kind of couple's game show challenge but I cut off the
back leg with my circular saw which was a little bit awkward but it worked out
then before standing it back up I used a magnet to find the screws in
the drywall and this showed me where the studs are gonna be.
Then I marked it with
blue tape so I could attach the shelves there now we move the shelves into place
and I put that back leg on top of the curb and then I secured the shelving
into the studs with 3-inch screws and as any experience parent knows I thought
about what I didn't want my kids to be doing and I did that to make sure it
wouldn't fall over we've reorganized the items on the shelves we got some new
bins that would be putting labels on later to make it easy to identify them
and the nice thing is you can fit three bins here on the low profile and nothing
will be sticking out but you don't mind them sticking over the edge a little bit
you can actually fit four of them wide and this gives you a lot of storage
options I've got some more garage organization ideas like how I built
these cabinets I've got a video right over there and I'll show you exactly how
I did that so I'll see you over there we're gonna build something awesome
As an Amazon Associate I earn from qualifying purchases.


