

As an Amazon Associate I earn from qualifying purchases.

Welcome back to Fix This Build That today I'm going to show you six different gifts that you can make for that special lady in your life Today's video is sponsored by Audible I'm going to show you an easy way in a harder version for each of these Projects and sprinkling in a bunch of tips and tricks along the way and some epoxy. So let's get started with this easy wineglass caddy The DIY caddy is very simple you only need a small 1 by 4 to make it I started off by grabbing a typical bottle of wine that my wife and I might drink Unfortunately Boone's Farm was out of stock, but this will do Make sure your largest wine glasses will fit and for me that meant a 12 inch wide caddy.
I Cut the 1 by 4 down to size. Then I came back to the bench to fancy it up a little bit I made marks 1/2 inch in from each side and the caddy is gonna curve in from the center of the long edge on each side To these marks an easy way to make a nice consistent curve is to use a metal ruler as a bow. I eyeballed the curve that I needed and then I ran tape between the two ends of the ruler as it was bent to hold that Curve in place.
It was a little too shallow So I took the tape off and adjusted it to dial it in right where I needed. I traced the curve of the ruler with a pencil to lay out my art Then I spun the 1 by 4 round and repeated it for the other side now Jigsaw is a perfect DIY tool for cutting curves. I followed the lines on each side and I had my shape blank next I made marks for the holes that will hold the wine bottle and the glasses I Put the glasses 1 in 3/4 of an inch in from the ends and centered the hole for the bottle Then I drilled a 1 and 1/4 inch hole in the center followed by 3/4 inch holes for the wine glasses I used a Forstner bit here, but a spade bit will work just as well.
I Marked each end for some notch cutouts to let the wine glasses slide in and The notches flared out from 1/2 inch at the hole to 3/4 of an inch at the end of the caddy After the layout I cut these lines with my jigsaw as well. I Used a random orbital sander to smooth the outer edges of the caddy for the next step Now to round over the side of the edges I used my router I used a quarter inch roundover bit for the holes and the notches Then I used an eighth of an inch roundover bit on the outer edges And the smaller round over on the edges gives the caddy a lighter feel by the larger helps hold the glasses better And that's it for construction from there.
I just sanded everything smooth and then I applied some dark stain with a rag After the stain was dry. I applied several coats of a satin lacquer to give it a nice Sheen and some protection So in just an hour so you can have a nice little gift to pair with a bottle of wine and some glasses for display or travel Now if you want to get a little bit fancier and have a few more tools than this wine caddy can be upgraded Instead of using select pine and stain you can use some nice hardwoods for color and beauty I've got some mahogany walnut and maple here and Using my jointer and table saw I can get a flat edge on each strip and then rip them to size.
I made the walnut in mahogany one inch thick in the maple accents one quarter inch thick and those built up to the three and a half inches just like the one by for The boards can be glued up in any style you want so you can mix and match as you please Just some regular wood glue here in some clamps After the glue up is dry. I sent it through the planer to flatten everything out Then you've just left this attractive blank and it's quite a bit more refined than that DIY version And if you're making one you may as well make several of these because they're so easy to make So the first caddy can also be used as a template for the other blanks now Using a drill press and a bandsaw make short work of drilling the holes and making the profile on the catch But it did still cut the notches with a jigsaw the clean cut blades that I use give a much smoother finish than the bandsaw and they barely need any sanding I applied two coats of maker brands simple finish to pop the grain and protect the caddy and it was looking great and Hey, if you like what you're seeing so far and you haven't already go ahead and get subscribed And for the second project I'm making two versions of jewelry holders for your special gals favorite bracelets necklaces in earrings The DIY version of the jewelry holder.
We'll start with another 1 by 4 for the base I cut the piece to 16 inches and I use my curved ruler trick to layout a similar curve like the wine caddy. I Cut the curves again with my jigsaw and then I sanded the sides flat with a sanding sponge the next I laid out some marks 2 inches in from each end and in the center of the board and no this isn't a Magnum wine caddy but yes, the build is very similar to this point and that might be a good idea instead of drilling through holes in the board I used a 1 inch Forstner bit to drill down about 3/8 of an inch on each mark. I say to the sides and face And then I rounded over the edges with an eighth of an inch roundover bit to finish up the base for the jewelry holder the arms to hold the jewelry will be 5/16 inch dowels mounted into 1-inch dowels that will sit in the holes that we just drilled and this jig is gonna let me drill centered holes through those 1 inch dowels I drilled through this piece of plywood with a 5/16 inch bit making sure I stayed level up and down while the piece of plywood was flat on my bench Now the plywood makes it easy to tell if you've drifted or not by looking at the plies Then I drew a line between the entry and exit holes and after that I just drilled a one inch hole centered on that line to finish the jig now the top hole is a quarter inch from the face of the jig so I could put the 1 inch dowels flush into the Hole and drill through the dowel and have a sinnard hole After making the center hole on each one I made a mark one in 1/8 of an inch down and I cut it to size on my miter saw and Does anybody see my dowel? anyone? After looking around for a little too long I went back to instant replay and I saw that the dowel had got sucked up into the vacuum So for the next one I partially blocked the dust and then cut my other dowels to size and the dowels fit great in the base So I moved on to the arms I cut four pieces at 5 and 3/8 of an inch in two pieces at 7 and 3/8 of an inch You can vary these do your choosing to fit your design.
I made a mark 3/8 of an inch in on each dowel as a visual indicator for how far I want to install it into the 1 inch dowels Said it would have nice port and glue surface To install them. I put glue in the 1 inch dowels and inserted them into that line that had just drawn I Adjusted all the dowels before spray-painting them gold for a brass look and applying stain and finish to the base before assembly While I'm finishing this one up, let's talk about today's sponsor audible. You can get a free 30-day trial by going to audible.com/veritasium But I can pop on a book and I can learn something new or hear great story while I'm sanding or waiting for glue to dry Recently, I've been listening to Sherlock Holmes as narrated by Stephen Fry It's from the original stories by Arthur Conan Doyle in this audio book is almost 63 hours long and that's a lot of sanding and it's only one credit Absolutely love fries narration.
If you enjoy mysteries and crime novels. I think you'll dig this one, too Audible members can choose one audiobook and two audible originals every month And you can get your free trial and make your choices by going to audible.com/fixthisbuildthat For the advanced version of the jewelry holder I cut a blank of walnut to the same size as before Instead of making arcs on the sides. I wanted to clean straight lines I used a tapering jig on my table saw and I referenced the two points for the cut on the edge of the jig I passed through the saw gave me the angle that I wanted and repeating this process gave me a nice angular base.
I Used the offcut of the base to make the holder for the brass arms that I'll be installing It'll have a thin profile going from 3/8 of an inch on the ends to 3/4 of an inch in the middle After the base parts were cut. I cleaned them up with a sanding block and broke all the edges The brass rods I'm using are 1/4 inch. So I laid out in drilled holes through the edge of the small strip to fit them One hole was centered on the strip and the others were 4 inches apart on either side of it. I test fit the brass bars and they went in really nice and snug so I was ready to glue down the strip To get the strip centered on the board I measured in two inches from each end and I placed a strip of tape there as a guide then I marked the center of the base on the tape and I put a small mark on the center of each end of the strip I applied a very thin amount of glue here so that I wouldn't have to deal with any squeeze out which can really be difficult and Mess up your finish.
Then I lined up the parts on the marks that I've made and having the bars installed here Give it a little bit more weight and just made it a little easier to position And before clamping it down I checked this strip for square and then I locked it in place to dry While it was drying I cut two of the brass bars to size the ones I bought come in 14-inch bars Which I'll link to below as well as the other items that I'm using today But I cut the top and bottom bars to ten and a half inches for that diamond look Oh and don't cut these on the miter saw unless you have a metal cutting blade. Just trust me on that one. I Applied two coats of maker brands simple finish to pop the grain and it was looking great. I Finished the holder off with some keyhole slots on the back for mounting this project looked sharp And it makes a great spot to keep her favorite jewelry easily accessible and on display The last gift idea we'll be making is a pair of short cuy boards The first one again will come from one by fours, but I'm upgrading to poplar from pine I had some offcut of poplar without abused before I moved them around until I got the combination that I wanted But you could get this whole project from one six-foot poplar board just by cutting it up into lengths.
I Cut two of the boards to 17 inches and one to 22 inches a poplar can have green purple or dark streaks in it So use those to your advantage in your design I use the green in the handle for this one And actually those greens will turn a nice caramel color over a few months as its exposed to light. I Glued up the three boards using a water resistant glue and just enough to give me a little squeeze out Now after 30 minutes, I came back and I scraped off that squeeze out just to make sanding a little bit quicker When the board was dry took it out the clamps and I sanded it flat using sixty and eighty grit sandpaper on my sander And with a flat surface I could cut the base square with my circular saw and layout for the handle.
I Used two two inch can as a guide and some marks to make the handles somewhat more symmetrical Then I drew the shape by hand and cut it out using my jigsaw. I Clean up all the rough edges and smooth my lines out Then I drilled a 3/4 of an inch hole in the handle for hanging it now finally I finished the shaping by rounding over all the edges with a quarter inch roundover bit for a nice smooth. Look The cheese board got sanded up to 220 grit and then I applied beeswax and an oil blend to seal the board It's a great utility serving board that you can make quickly with just a little bit of material Now for the final project, I wanted to try some new things for an advanced meat and cheese board.
That's right We're going full charcuterie here or as we like to say in the south charcuterie a Fred past me a slim. Jim off that then their fancy charcuterie board. I Started off with a little slab of walnut and I ran it through my planer to reveal some awesome grain But the edges were gonna be a little bit too thin and instead of losing the thickness to get the whole board flat I just cut them off on the bandsaw. I Cut the base square and then I freehand drew an organic shape for the handle which seems to be in style these days Next I went back with a jigsaw and cut out my shape again The jigsaw leaves a finer finish than my bandsaw which means less work and sanding in the end. I say to the rough edges and then I drilled a hole in the handle just like before but this time I tried to elongate the hole a little bit to keep it that organic feel I Round it over the edges with a quarter inch roundover bit And then I gave everything a really good hand sanding to remove any harsh lines.
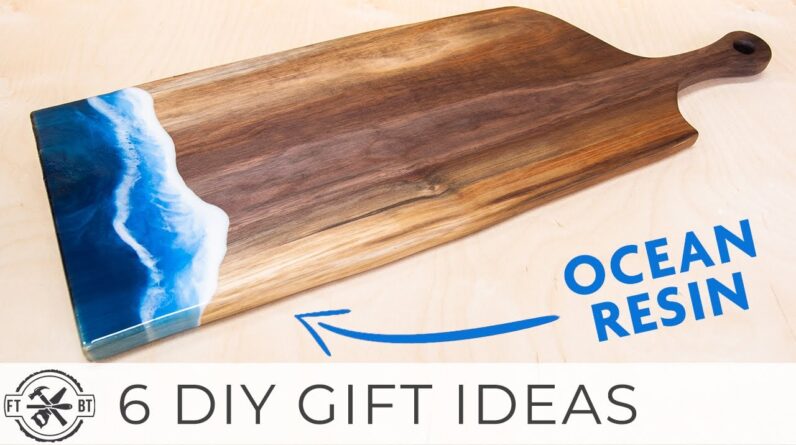
I sanded all the way up to 220 Now you could stop here and you could have a great shortcut reboard, but I wanted to go a step further My wife has been interested in these resin ocean pieces and this board is so long I thought it would be a perfect chance to try it Now, let me just say I'm a total noob at this I didn't have the best hardener on hand for this situation, but I wanted to try it anyway The key for me was doing some test pieces first to get the feel for it and it helps that my friend Jess from Crow Creek Designs is an amazing epoxy resin artist after a half hour on a video chat with her I made some adjustments and I was ready to tackle my pour And Jessa actually has a course that she's launching on how to do these the right way I have a link in the description that you can go check it out.
I Taped off the bottom of the board and then I mixed 5 small cups of resin I'm using this fast hardener here, but a less aggressive hardener will make your life a lot easier To color the epoxy I used acrylic paint and I added some metallic pigment for a cool. Look I Did a navy blue and then to lighter shades of blue and a white I? Poured Lee epoxy on in a gradient and then I mixed it together a bit and moved it around by tilting the board Then I applied some heat to it So it would move a little better and made sure I had coverage over those edges now You'll notice I used 2 cups of navy blue and that's only because I'm using the fast hardener and when I put 2 cups worth In one cup, the exothermic reaction just goes crazy and it literally melted the cup again Don't use fast hardener.
I'd recommend the slow hardener and some patience And when I'd covered the edges I laid down some white for the seafoam wash And I use the heat gun to blow it back into the blue now This is what gives that cool foamy wave look and you're just trying to get some separation there Then I added one more strip of white and I blew that into the shore for the look of a crashing wave from there I just kind of messed around with it until it looked how I wanted But you don't want to admit with it too much because it'll just start getting muddled up If you do it too much I use the heat gun to pop some of the bubbles and I was good to go. I Removed the tape before the epoxy hardened and then I applied oil and wax to the board to seal the wood Now this epoxy is not food safe.
So keep your fine meats and cheeses on the wood and not the epoxy Now for my first time I'm pretty happy with how this turned out. There's some bubbles and things it's nowhere near perfect But with some patience or a course like Jess's you can get some really good results pretty fast Hey Fred, where's that slim? Jim, if you want to check out some other home decor projects and gift ideas You can check them out right there. I got a playlist queued up for you There's also another one down there that YouTube thinks that you might like until next time guys.
Get out there and build something awesome.
As an Amazon Associate I earn from qualifying purchases.


