

As an Amazon Associate I earn from qualifying purchases.

on today's Makers Mmashup part one of our DIY core
XY build series so today is gonna be day one of our DIY core XY build series now this is the lair
fused x 301 printer that was developed by Nick Hogg art and myself and we're going to be going
through the electronics enclosure and the frame today building that from the ground up and then
in future videos we'll be assembling the rest of the printer now down in the description you'll
find a full bill of materials for this project as well as other helpful resources to help you
build this printer and if you are interested in this printer want to learn more there's a card
at the top that will get you to the introduction video that will certainly help you source your
parts and learn about what you're getting into in building this printer so when building the
frame today I want to cover what we're gonna be working on the frame design here goes ahead
and uses a solid metal build plate I picked this up at a local manufacturing place where they
sell called metal supermarkets and they sell metal plates like this but you can get plates
like this at your big-box store as well this is what the foundation of our electronics enclosure
is going to be so we'll be able to drill holes into this plate they'll be stood off here by
these TPU feet that we printed those are all included in the models and then we're gonna use
these at the top it's the only 3d printed part of the bottom base and that's actually at the
top not the bottom and then what we're going to use is the 2080 here to create the bottom and then
we're all gonna have our 2040 extrusion for some uprights near the front and some 2020 extrusion
as part of our base and it will also be in the rear of the printer as well hooking into these
3d prints so if you need help with this you can always check out our discord and don't forget to
subscribe so that way you don't miss any of the upcoming videos of this build series and with
all that said let's get to work today's build really focuses on the frame itself we're gonna
be drilling holes in that metal plate and then we're gonna assemble the electronics enclosure
and after that we'll attach the frame uprights install the bottom plate and feet and that will
add the top framing after that we'll install the pulley towers and then wrap everything up
by installing the stepper mounts if you have everything ready to go this part of the bill
should only take a couple of hours to complete we're gonna start here by using the TPU feet
as a guide for marking the holes that we need to drill in our aluminum extrusion now you can
see here I'm just aligning this with the corner and once I do that I'm using the pencil here to
mark the corners and we're gonna do that on all four corners you're also gonna use this guide to
mark one center hole in the center of the plate on each of the four sides this adds some additional
stability when we screw everything to the base now I'm going to use a punch here so it makes
it easier for the drill bit to grab onto the metal plate for each of the holes now we're
just going to use the drill press to put some holes in you can use a regular hand drill for
this as well I like the drill press because it makes it a little bit easier to do all the
repeat holes now we're just gonna want to use a file to file down any of the rough edges left
by the drill you want to make sure that you get this pretty flush and it should only take a couple
seconds with a hand file and this will allow the base to be pretty solid and it will add to the
overall structural strength of the base itself now we're going to use these inside
corner brackets to assemble the bottom and Electronics enclosure and you'll need
the grub screws that come with it as well those would be used to hold everything
together from the inside corners you'll find everything goes a lot faster if you pre
assemble these corner brackets before you try to install them on the extrusion now we're
just going to insert these into the 20/80 extrusion and then you're going to connect
all three of the 20/80 extrusions together once you have all three pieces of the 20/80
put together you're gonna want to use the 20/20 extrusion and you're gonna put one on the top and
this will fit on the inside of the 2080 extrusion once you have this first one in you're gonna want
to flip everything over and then you're gonna want to repeat the process and install another piece
of 20/20 on the top here as well now the reason we use 20/20 here instead of another piece of
2080 was so that way the electronics and wires and cabling can all feed through there now we're
going to work at attaching the upright pieces in the back this is some 2020 extrusion and you're
gonna want to use one of those inner corner braces as well you may have to reverse the grub screw on
it to make it work for the back of the 2020 going up as you can see here but once you get this on
line you're going to want to tighten this up and secure it and then after that you're gonna put the
2020 on and this is going to add some additional stability to this upright going up the back of
the printer now we're gonna go ahead and attach the bonding plate the upright here and this just
uses the screws that come with the bonding plates and links for all these are in the description
once this is all tightened up then you're gonna want to repeat the same process and install
the upright on the other side of the printer now we're gonna measure 180 millimeters from the
edge of that back upright that we put into place so if you just align the ruler in there and
measure 180 you'll be exactly where we need to install the 20 by 40 uprights once you
have the bonding plate in place you're gonna want to tighten it up and then afterwards
you're gonna want to put another bonding plate attaching this 20 40 in the opposite
direction once this is complete you're gonna want to repeat the process on the other side
for the other 20 by 40 upright once you have all of the uprights attached you're gonna want
to turn the printer on its side and then we're gonna work on attaching the TPU feet to the
bottom of the base plate and we're going to then also attach the base plate to the bottom
of the printer you're gonna want to go ahead and insert all of the screws into the bottom
base plate before trying to attach it to the bottom of the printer once you have everything
lined up and all of the t-nuts are facing the right direction then you're gonna want to attach
the plate to the bottom of the printer and begin tightening everything up it may take a little
bit of wiggling and in some cases I had to tap the end of the base plate with a rubber mallet
to go ahead and adjust the plate so everything would fall into place but everything will fall
into place it just takes a little bit of effort now that we have the printer upright we're gonna
go ahead and prepare the 3d print to go ahead and attach that to the printer now we're punching
out these sacrificial layers and they're designed so that way they do punch out it's not a flaw
in the design it's so that way you don't have to have supports when printing these prints
out once you have the holes all cleared out then we're gonna want to go ahead and drop the
m5 screws into the two pieces that will attach the extrusion from the bottom and then we're
gonna also drop some m5 screws and some tea nuts into this part of the print as well and that's
going to attach to the 20:20 extrusion at the top now we're going to slide the base on to the
2020 extrusion and then you're gonna want to make sure that it is flush on the inside so
that way it's meeting up with the channel itself then you're gonna want to tighten everything
up and repeat the process for the other side now that we have both prints in place
the next step here is that we're going to be attaching the 400 millimeter
long 20 by 20 extrusion these slide into both channels on each side and
then after you've got them slid in and the t-nuts aligned you're gonna drop
that in place and then tighten these up now that the rear one is in place we're gonna go
ahead and attach the side rails now each one of these slides in the channel the same way that the
rear one did so you're gonna may need to make sure that you line up those t-nuts once that side rail
is in place then our next step here is to go ahead and attach the bonding plates here between the
20 40 and the 20 20 extrusion and that will add additional strength and rigidity to the printer
and like the other one we're gonna go ahead and add two bonding plates here to the twenty forty
one facing the other direction once you finish this side you're going to want to repeat the
process for the other side of the printer now we're gonna attach the right and left towers
you're gonna need an m5 by 12 millimeter screw and three regular nuts now these m5 nuts press
into that bottom part of the tower and then what we're gonna do is drop screws in through the holes
in this part and we're gonna attach the right and left parts of the tower just by screwing it in
and those nuts should draw up you want to make sure that your screws at least a 12 millimeter
long screw if it's a little bit short you can use a longer screw in here as well they just stick
out from the bottom last but not least we're gonna insert some m5 screws in here and what we're
gonna do is now attach the stepper mounts these just slide on to the end of the 20 20 extrusion
and once you have those slid on all you're gonna want to do then is tighten them up and then do the
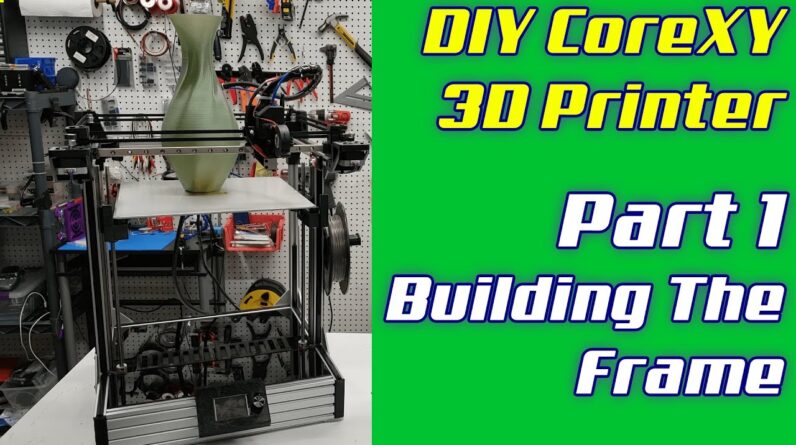
same thing for the other side and that's it for the frame okay so I think we had a really good
build for our first day here we have the frame fully assembled here as you can see here we've
got a very sizable electronics enclosure that's included in here and we owe all that to the 20/80
extrusion that we put in here all of our feet are in place here so our TPU feet have a good solid
base for the printer it feels very solid we've got the rear towers are now installed that's what
these are called here are the rear towers for the idler bearings and we'll install those when we get
to the carriage and then we also put the stepper mounts in today the nice thing about that is this
looks like a 3d printer so we've made a lot of really good progress on it and I'm very excited
so one thing you're gonna want to do once you do finish the Assembly of the frame is go back
and make sure that all of the screws are tight a lot of times what happens is as you're moving
the printer around as you're turning it over to get all these pieces in place some of the screws
do get tight or there's always a chance that you might not have tightened one so go back now before
the printer is fully assembled and make sure that everything is square and everything's tight this
is really a critical stage of the printer as this frame is the foundation for everything else that
we're gonna do with this printer going forward so down in the description you should find a bill of
materials for this and there will be links to the 3d printed parts that are going to be available
on Thingiverse now one thing to note that as the series is still progressing you may not find all
of the materials in the Bill of Materials or the models that will go on as the series progresses
I'm using the video series as kind of the final QA of the parts and the links to all of the
different parts in the bill of materials to different vendors that have this so if you don't
see a part in there I know those are coming so just want to let you know they will be coming
as the video series progresses but you should have everything in the description and the bill of
materials to follow along this far so if you need help building this at all there are links down in
the description to our discord and that is just an open makerspace where we talk about all sorts of
different things it's community based so you'll get help from any of the people that are online
at the time it's not really technical support but more of a community and that community can help
you get this printer or any other project that you're working on put together and worked out
if you'd like to help support this project or the channel as a whole please consider becoming
a patreon member patrons have exclusive access to resources and content that can help you with
this project or other projects so it's a good way for you to get a little bit more assistance
on a project like this and help support the channel as a whole so if you enjoyed the video
today please make sure you mash that like button and don't forget to share and subscribe so you
don't miss any of the upcoming videos of the ex 301 series so with that I'm gonna say thanks
again for watching and we'll see you next time you

As an Amazon Associate I earn from qualifying purchases.


