

As an Amazon Associate I earn from qualifying purchases.

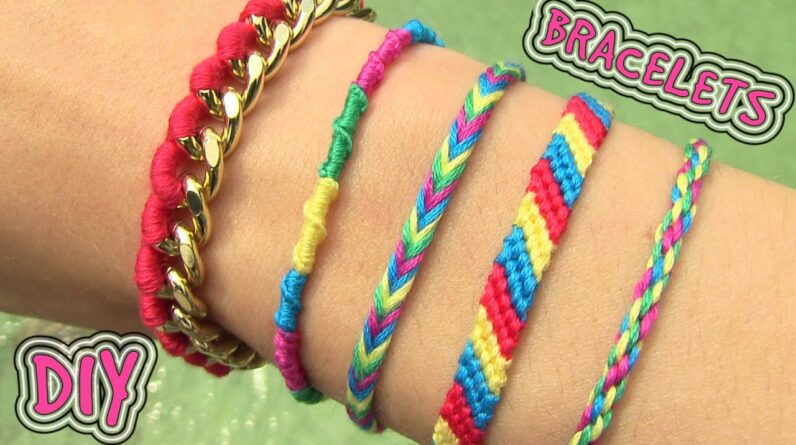
In this video you will learn how to make 5 types of cute and beautiful friendship bracelets Absolutely Hello guys ! You already know that I love Bracelets, I love making them, giving them, and most of all wearing them! So In this video I will teach you how to make 5 beautiful bracelets using thread, this is convenient For beginners, very easy and quick to make. You can make it for yourself or your friends. I will show you how. At first we will make this beautiful and colorful thread bracelet And you will need a small piece of cardboard, anything round, a pencil, Button closure, 4 colors of embroidery chain and scissors. start by taking Circle shaped bracelet. Take your circular shape, I use a goblet, and place it on a piece of cardboard And select it from the sides of the mug to get a circle. We cut it with scissors. Determine the center of the circle and draw eight small lines on the outer edge and divide the circle into eight equal sections. Take scissors and cut short cuts along the lines. cuts should Be about half an inch long or shorter.
Take your pencil back and push the tip through In the center of the circle to get a small hole. And here we have the bracelet loom, and we It can be reused to make bracelets for all of our friends. Cut four pieces of embroidery chain, each approximately 25 inches long. folding chains In half and knit together like that. We have 8 strings coming out of the knot, but We only need seven of them. So take one string and cut it very close to the knot. Push Loop and knot through the center of the cardboard loom like this. Next we need To randomly arrange the strings around a circle by placing them in cuts. over there One string must be in one cut Since we have 7 strings and 8 cuts around the loom, And single parts are staying free. Hold the loom so that the blank cut faces toward you. number one, Two, three, take a third string and place it into an empty cut. Rotate the loom, one, Two, three, take the third string and move it to the free cut.
This is all you need to do. Rotate the loom and move the third chain into an empty cut. ok yet Get the hang of it and you won't need to rotate and loom anymore. Reliance only three chains Left the blank and moved the third string into it. After a while you will notice Beautiful rope bracelet on the other side of your loom. You can make your own bracelet as long as you like. I want to wrap it around my wrist only once, but you can also wrap it two or up to three times. Just remember to cut a longer piece of thread to begin with. When the bracelet And long enough, releasing all the strings of the cuts and wearing it loomed. Make Small knot to secure your work like this. To close the single topic selection button, I would go for the color that matches my button, and thread the existing button. move Button as close to the bracelet knot as you can and make a few small knots to secure it in the place.
Trim the excess thread away and you're all done with this lovely bracelet. It only takes about 20 minutes to complete one, which is just awesome. I'm in love With a button closure because it is super practical and very cute at the same time Once. Next we are making this color blocking swirl bracelet. We need embroidery floss, scissors and a button. I decided to use four colors From a theme, you can use more or less different colors, whatever you prefer. put all four Thread colors together and cut about 50 inches. Now fold this large series of topics in half and make a little knot under the folded end to get a small loop for the button Close. Finally, it's time to start spinning! Of the eight strings, chose one, and the beginning Make regular forward knots around the remaining seven threads. To make a knot clip forward String your work, make the shape of more than four seven remaining strings like that then Simply go under strings seven and up through loop of number four.
Pull work String so that the knot slides and tightens. To keep the vortex running smoothly, I love To go under the seven strings with my thread work when the knot reaches my right side. Then just continue spinning forward as usual. After several knots you will notice that Automatically Forming Knots This spiral formation is knotted around the bracelet. If you do not Have this cool branch to hang your bracelet while spinning, you can totally tape on a flat surface or attach to a blanket or pillow if you want to make your own bracelets the bed. To switch the color of the action, simply pick up another color from the bouquet and continue Make the exact same knot forward. me spiral now reached the right side, thus I need to go under the seven chains to the left side with my work chain before I Spinning can continue. Time to switch color, bye green and blue hello. Definitely You can use any color you like for the bracelet. I'm using four different colors here, but If you like you can use two, three or more.
This time we used four pieces of floss to start With. If you would like your bracelet to be thinner, use only three pieces of floss, and If you want it to be thicker, use five. That's the beauty of making a bracelet. you reach Decide the details! When your bracelet is long enough, make a final knot to secure it. This time I'm using a cute flower button to close. Thread starter button on one From the strings, make two knots to secure them and cut the excess thread away. This is a bracelet Seriously very clear and easy. On top, it will only take you about 20 – 30 minutes to finish it. I love to curl up in bed on cold fall or winter days, run Some music or TV and making bracelets at the same time.
Ta-daaaa! bracelet done all And look how beautiful it is! Yaaaay! Now let's make this beautiful fishtail bracelet. We need four color chain going, scissors, a button and a needle. Thread cut 40 inches long of every color. Fold the threads in half and make a knot. I decided to make this bracelet on a pillow. Pin the threads in place using a needle, by going through the pillow and loop like that. Separate the threads into two groups, one of each color on each side. Arrange the threads in a mirror image style. When deciding a fishtail bracelet all you have to do To do is take the string from the outside on the left and make it on the inside to the right. then take The outer string is on the right and the probe is from the inside to the left. To make a nice braid It is tight for you to take the strings in your hands while braiding.
Concept The fishtail braiding bracelet is the same as the fishtail braiding your hair, so if you They know that the fishtail bracelet will be a piece of cake for you. even If you've never done a cue in your life it is just super simple to learn. So take outside String from the left and making it over to the right. Then take the external string on right and make it more to the left. This bracelet will take upper 10 minutes to complete So frankly I think it looks pretty cool! Finish with a knot to secure the fishtail cue. Take the button, I have this beautiful yellow flower and thread from the chosen thread. Slide a button near the finish bracelet and secure it in place by making two knots. Trim the excess chain and voila our fishtail bracelet is all done. If you want to have Thicker bracelet you can use more than four pieces of chain, if you prefer to have The thinnest go-to bracelet for only three chain pieces. Let's add more cuteness to our hands with this beautiful outline friendship always bracelet. You will need some embroidery floss, scissors and a button.

I'm gonna make The bracelet use three string colors: yellow, corally blue and red. button i Choose this red heart. Cut about 80 inches from each string color. Fold the strings in Half and make a knot like that. Finally we are ready to start spinning. bracelet set In place using a piece of tape. Arrange strings by color. I have red strings on Left and yellow in the middle and blue strings on the right. Take a string from the outside on Left and red in my case, knot it on all the other five strings on the right up to The working chain reaches the end on the right side. Make a forward knot by creating four Form over the second chain, loop the chain under and again through the opening. Pull the working string to tighten the knot. Moving on to the yellow and blue threads at the end. Make two knots forward by the shape of four, the infrared working chain loop and back through open.
Pull string to tighten. Make sure to always knot twice! And we have for the first time full row. Let's continue with the second row! Take a string from the outside on Left, which is red again and make two forward knots over the yellow string next to it. Then Continue spinning over the remaining four chains until the chain reaches work the right side. It is super important that you always make two forward knots on each string.
I repeat: take the left chain, which is now yellow and knot twice on each other chains. You just need to keep making these knots forward and add your rows and rows bracelet so it's long enough to fit your wrist. I have already made heart and friendship chevron Bracelet tutorials, which you can find on my channel. This is a diagonal striped bracelet It is easier and perfect if you are a beginner in bracelet making. Likewise as with the other Bracelets In this tutorial, using more than one piece of string will give you a wider bracelet.
Even if you use four chains at first, you can get eight times when between them and a bracelet The width of two knots would be wider than this. Let's see the knot slowly forward one more time. Take the string from the outside on the left and make a knot forward by creating Four shape on the second string. Driving the tip of the chain are employed under the second String and return via unlock. Pull the working string to tighten the knot. Manufacture One more knot before moving on to the next string. This bracelet takes a little longer than others The bracelets are in this tutorial, but I think it's totally worth spending an hour for something beautiful like this. Continue spinning until your bracelet is long enough for your wrap wrist. When you reach that length, make a final knot to secure your work. take a button, Thread off the chosen chain and make two knots as close to the end of the bracelet as possible.
Cut off the excess thread and there you go, the bracelet is finished! Wear this classic friendship bracelet as an angel or combine it with other jewelry pieces. It's very neat and simple but nice ads pop of color to any look. The last bracelet we are making today is this lovely thread winding chain bracelet. we will You need a string, a lock thread, embroidery, a needle, scissors and two pliers. First we need to shorten the chain so it fits our wrist perfectly. Note that you need Leave some space for the lock. So I'm taking about an inch less than the size of my wrist. to me Split the chain into two pieces simply open the chain loop. To a thick chain of mine You will need some strong pliers. So thanks dad, these work perfectly! Then we come to Add a lock. Open a small loop on one side of the clasp and attach it to one end from the series. Do the same with the other lock ring and attach it to the end of another chain. Try the bracelet on to see if it looks good. I'm happy with mine so I can move on to part series.
We'll need quite a long piece of thread to dress up the chain length The entire side of the bracelet. It depends on how thick you want to wrap it but I'm used around 130 inches of thread for this bracelet. Hold one thread ends to a large needle. other The end of the thread needs to be tied on the end of the string. Make the two knots to ascertain the truth of the topic Won't unlock, because that would be frustrating. Start wrapping a thread around a string Through the needle operations trough the chain loop down chain and then again like that. You can also We see we wrap the thread only along one side of the string, while the other side remains golden.
You can even switch the color of your favorite color theme or The color that matches some particular outfit. How I love the coral color looks paired Go. If you run out of thread in the middle of the bracelet, just knot the thread a new piece So and follow up. This way you can also switch theme colors along the chain and You will end up with a cool color blocking bracelet. When you reach the end, make a couple of knots to secure your business. Cut off the excess string and you are ready to rock this wonderful string Threaded bracelet. Even with bracelets made entirely of thread I would like to pile on some Metal jewelry pieces. So this is the perfect bracelet because it has both by default.
two In one you know ya. Friendship bracelets are meant to be hand To your friends as a token of love and connection. But I don't blame you if you make bracelets Just rock it on your own. I do everything for once! These were my five easy friendship bracelets. I hope the tutorial was useful to you Try to make them too. If you do, don't forget to share your photos with me on Twitter, Facebook and Instagram. I love you, sending you big hugs and a bunch of kisses. Good-bye!.
As an Amazon Associate I earn from qualifying purchases.


