hey guys welcome back to the channel for those
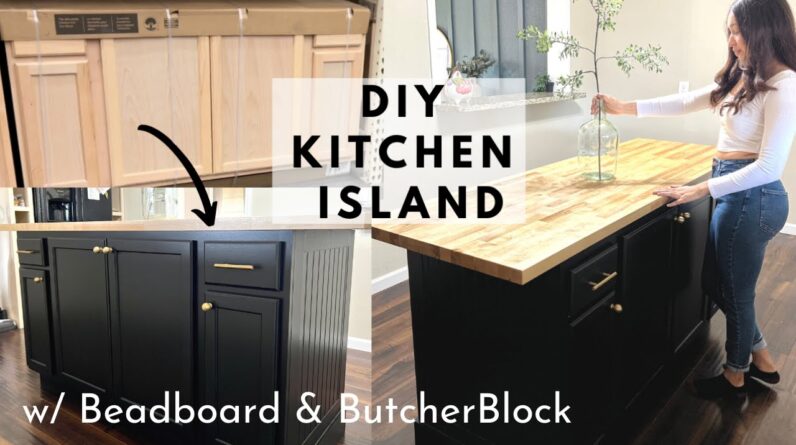
of you who don't know me i'm glenda chavez and i am standing in the soon to be diy kitchen
island now i wanted to build a kitchen island that was both functional and cost effective to
the space this is actually video one of a two part video series where i'm going to be making
over this kitchen so if you want to learn how to add a kitchen island to your space on a budget
let's go ahead and get started i started by removing the touch out of the way to try and get
a better visual of the space i'm not keeping this cabinet but it just hasn't sold if you missed
that furniture makeover i'll have a link for you down in the description but let me know if i
should try to redo it once more to see if it sells once the space was cleared i moved
on to measuring and taping off what i believe to be a good size island for my kitchen now there are so many options when it comes to
prefabricated unfinished cabinets so you could customize this to fit your kitchen and needs
you can also use wall cabinets not just base cabinets as well i will actually be using
wall cabinets for a built-in entertainment center i have planned for the upcoming
new year so be sure to stay tuned for that i chose to go with a basic base cabinet
that came with four doors and two drawers thank you i measured and cut 1 by 4 primed pine
boards for the bottom baseboards and secured them to the cabinet with some brad nails i used 1×3 quarter inch poplar boards to
trim the rest of the cabinet out and attach them with liquid nails before
securing them with brad nails i then measured and ripped down some beadboard
paneling to go right in the center of each side now you can have this pre-cut at your
local hardware stores some places will usually do it for you if you come with your
measurements and let them know what size you need to make sure that the paint
finish would be as flawless as possible i went in and caulked all of the seams for the nail holes i used dab premium wood filler i removed the doors and drawer fronts
to prepare for the painting process i first primed with kills 2 formula with a foam roller on all of the raw wood
including the beadboard paneling i wanted to make sure that the doors
had as smooth of a finish as possible so i set them all outside and spray
them instead of using a foam roller if you don't have a sprayer using a foam roller
in combination with a good synthetic brush should be good enough but the finish won't
be as smooth as compared to being sprayed if i was doing a lighter color i would have
definitely added two coats but because i am using a black color for this island i
felt one coat of primer was good enough the color and paint i am using
is limousine leather by bear in their cabinet and trim collection it is a
water-based enamel that acts as an oil-based paint i ended up having to do three coats on the
base cabinet and two coats on the doors it was time to tackle the butcher block countertop
after placing it on the cabinets i couldn't decide on whether to cut back some of the overhang or not
i asked you guys over on instagram and 86 percent of y'all said for me to cut it back however
there was a couple of y'all who suggested i leave it as is to as not regret it later on
and if down the line i still didn't love it then i should go ahead and cut it back then so i
decided to leave the butcher block as is for now after my manager helped me clean up we would have
filled a small imperfection on the countertops as we waited on that to dry i went
ahead and drilled my hardware hose and installed the new hardware for
a nice contrast i went with gold as you can see i tested several stains
outside on the underside before bringing the countertop inside i asked you guys to
help me decide on which one looked best as i was torn between two colors in the end your
votes came in super close but 52 percent of y'all voted for the natural color
so that's what i went with i sealed the countertop with very thin
oil based polyurethane in a satin finish there are several options for finishing
and sealing butcher block countertops including food safe options i decided on
the oil-based poly for the best durability after applying two coats and
sanding in between i was done let's remember what we started with and what we created don't forget to stay tuned as i tackle
the rest of this kitchen makeover get subscribed so you don't miss out and
turn on your post notification bell i hope you found this video helpful and realize
that if i can create something beautiful from something ordinary then you can too i love you
all be kind and i'll see y'all next week bye

As an Amazon Associate I earn from qualifying purchases.


