

As an Amazon Associate I earn from qualifying purchases.

Hi everyone. I’m Alejandra from Alejandra.TV. And in this video, I’m going to show you
how to make your own organizing products with stuff you have already around the house or
things that you might throw away, you might want to keep. I’m going to show you all the things that
I made and just really how to get organized on a budget. So if you feel like you have to spend a lot
of money to get organized, I’m going to show you that that’s not the case.
So if this is your first time watching any
of my videos, you can check out my free organizing video series on my website, Alejandra.TV. There is a link below. OK. So I’ve spent probably like two months making
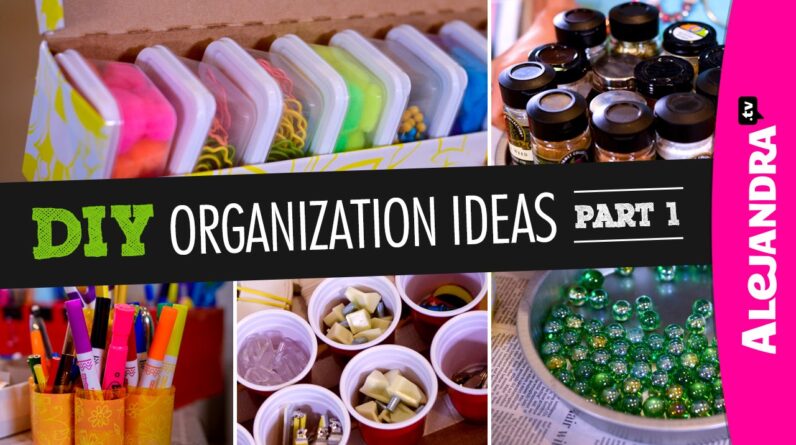
my own organizing products and I’m excited to share with you everything that I’ve created. All right. So the first thing is I’ve grabbed a shoe
box just like this. This is kind of a large one. But I wrapped it in duct tape, red duct tape
to make it really strong. And I’ve created my own homework caddy for
students. So a homework caddy is like all the supplies
they might need to get all their homework done. So when they come home from school, they grab
their homework caddy, they sit at the kitchen table or wherever they do their homework and
they have everything in front of them like everything they might need.
So, what I did on the ends was I took the
ends of like toilet paper rolls and I wrapped them in duct tape to create this little pen
and pencil caddies just like that and they’re hot glue gunned to the bottom. Over here, I took an empty toothpaste box. I glued it to the bottom and then now, I can
put like crayons, a calculator. And then down here is a pencil case. There is binder clips along the edge. And then right here, I took clam shell container
that came with Command Strips. I saved it. And now, I just out sticky notes in there. It’s like a sticky note organizer. So I just found whatever I had around the
house and created something cool. So, total cost was zero dollars. All right. The second thing I created was I took prescription
bottles from around the house. I covered them in pretty contact paper that
matched the bottles.
I hot glue gunned them together. And now, I have a pen and pencil caddy for
the top of my desk. And it’s so cool. It’s round. You can store a lot of things and it is – the
cost of just the contact paper. All right. The next thing I created was I went to the
beer and wine store and I asked if they had extra wine boxes. And they gave me a couple. And so, I took one of them and I cut the bottom
off. I cut the dividers. I covered the bottom in white duct tape to
make it nice and strong and then I hot glue gunned the dividers to the bottom to create
a tea organizer. And now, you can just take this and put this
in a kitchen drawer and all your teas are nice and visible. They’re easy to access and when you have
guests over, you can pull this out and ask them what they want and they’re just nice
and organized.
So that was fun to make. The next thing and this is not my idea. I got this from Robert Mahar from Kin Community. He has a video on exactly how to make this,
which I’ll put a link below. But he made this perler bead cord wrap just
like this. So perler beads are these little beads that
you iron together just like this and he made it into a cookie which I thought was really
fun. So then I just took my earbuds, wrap them
around and now, it just keeps them tangle-free just like that.
In his video, he walks you through exactly
how to make it. OK. The next thing I made which I was really excited
about this, so one of my favorite organizing products is a Lazy Susan because they spin
nicely and makes everything easy to find and they’re just great in pantries and cabinets. So they’re hard to find. They’re expensive to buy. And if you live somewhere where you don’t
have access to organizing products, you might not have access to this.
So I decided to make own and I’m really
excited about this. I found two baking pans. They’re 8-inch baking pans from the Dollar
Store. They were a dollar each. I found a pack of marbles from the Dollar
Store, put the marbles in between the pans. And now, I have a $3 Lazy Susan made all by
myself. It took like, once I have the supplies, it
literally took 10 seconds to put together and it’s just so fun.
It spins really nicely and smoothly and it’s
just really simple to make. As you can see, the marbles are just like
thrown in there just like that and it’s seriously the simplest thing to make. OK. The next thing was my own jewelry organizer. So I took a piece of wood. I sanded it. I painted it pretty color. I sanded it again to make it look a little
bit distressed. I hammered nails and change in there to give
it more of a distressed feel. I don’t know if that was accomplished or
not but then I took hardware and I put nails here for rings, for earrings. Then I put bigger nails here for bulkier bracelets
and stuff. And then there are hooks at the bottom like
these – they’re called i-loop hooks or something, i-hooks, for all of the necklaces. And now, I can just mount this inside of my
closet to detangle and store all of my jewelry in a cost-effective jewelry organizer.
All right. So that was fun to make. The next thing, I like this. This is a plastic wrap box from the kitchen. I just saved it. I took the blade off, the blade just like
peels right off. I covered it in pretty contact paper. And then I found these little containers from
the Dollar Store. They come ten for a dollar and they fit perfectly
in here. They fit nine to a box and it’s like they
were just made to go inside this organizer. But it’s great for craft supplies, offices,
supplies, beads or anything small around the house like you can put hardware in here in
the garage. So, just a cool little organizer for the cost
of a dollar, and you can put a rubber band around it if you want to keep it shut. Then the next thing was this little mail center
for the top of my desk. So all I did was take three cereal boxes. I cut them in half.
I’ve wrapped them in duct tape to make it
strong. I stapled them together and then I added labels
so there’s – you put bills here, things to process here, and then things to call,
ask, or cancel go here. And an easier way to do this because I spent
a lot of time cutting it is to just use granola bar boxes because they’re all the same size
if you buy the same brand. And just do it that way. So, that was a cheap project. And then the last thing I made was I took
a pizza box and you could totally do this with a smaller box. But I took a pizza box and I made my own tackle
box. So if you open it, you can see I found all
of these mini red cups from the Dollar Store.
They’re so cute. They come 20 for a dollar, and I just Velcro-ed
them down to the bottom of the box to create little sections. So, this is like my label – this is all
my labeling supplies. So, I put all my labeling supplies in here. But the reason why I Velcro-ed them down was
– so you can make your tackle box flexible. So if you’re storing a bunch of small things
one year, the next year, you might use this to store bigger the bigger things so you can
always take the cups out and create like bigger sections just like this.
Then you can always put them back. So if I take some out then I have a bigger
section right here for bigger things like these guys. So, that was fun to make. And really, the cost was just the cups and
then the Velcro. And now, you have a tackle box. And this is kind of like a big version so
you could do it with a tiny box. It’s just the concept is what I wanted to
show.
So anyways, so this is part 1 of my do it
yourself organizing products video. In the second part, I’m going to show you
nine or ten other things that I created out of stuff I just have around the house. But it just goes to show that you don’t
have to spend a lot of money on organizing products. You can just get creative, think outside the
box and you can still get organized. So I hope you enjoyed this video. And if this is your first time watching any
of my videos, you can check out my website, Alejandra.TV or subscribe to my channel for
more videos. Thanks for watching and I’ll see you soon. Bye!.
As an Amazon Associate I earn from qualifying purchases.


