

As an Amazon Associate I earn from qualifying purchases.

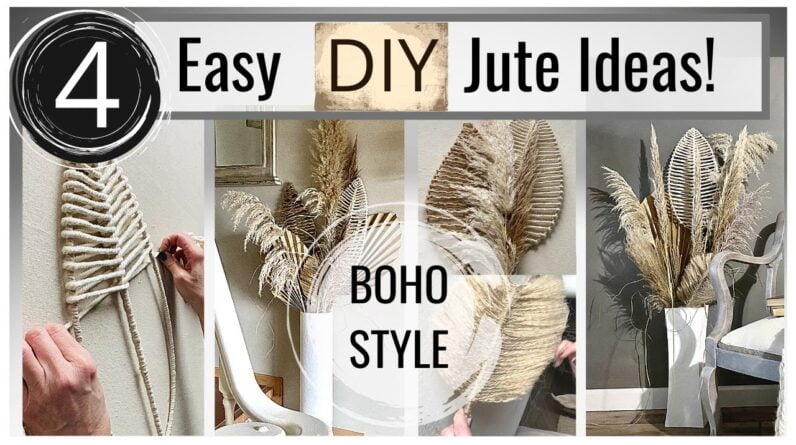
[Music] welcome to my channel if you're new my name's christina and in today's video i want to show you how you can do some simple diy decor items that are a true statement piece so i'm really looking forward to showing you all the details and the decorative finish i did to achieve these looks so let's get busy [Music] i'm going to walk you through all the supplies and the details in which i did to create a very simple natural zen-like decor in which i wanted to try for my own home so to make a broad leaf what i decided to do was use macrame cord but what i did is unravel it so to make the skeleton of the broad leaf what i did is i used a wooden dowel and they come in many different sizes this was a medium size and with one section of my macrame cord i would just all i did was spin the one section of the macrame cord down the dowel as well as the teardrop of the skeleton of this broad leaf i used two floral wires and attached them together and did the exact same thing i did with the wooden dowel now i've taken about 20 feet of macrame cord and i'm going to attach it at the top of the broad leaf just using a hot glue gun creating the skeleton of this was really easy and you could use any kind of wire i just want to give you a good idea of the shape that you're going to need but the floral wire was really inexpensive and easy to find now you'll have to gauge how much actual macrame cord you're going to need depending on the size that you decide to go with but this was the trick to this was to cross over so as you can see here what i'm doing is crossing over and crossing under the trick was was to take one side cross over and under take the other side cross over and under then swap each side underneath so you're making an x on the top as well as the bottom it looks really easy but it took me a second to kind of understand the pattern to it so again you're swapping each side going over and under but the trick was was to also swap it underneath because this way you can have a nice rhythmic pattern all the way down on both sides i wanted to give you a couple of angles so you could see exactly how i'm doing this so it's up over under once you make your x at the top swap both sides of your macrame rope and you can do this in jute you could probably even do this in a textured yarn as well but you can make some beautiful beautiful broad leafs just by doing this method [Music] one thing i quickly learned as i was practicing to do this i made a few in jute and i made a couple in the macrame cord was to glue the sides every so often this really helped to balance and keep everything nice and tight and in place and then as i got to the bottom just for the architecture was to actually glue the center and again this was just to help keep its shape and its form again you can make any size that you wish and using the floral wire or even gardening wire was the best way to maintain the shape that you would want for this broad leaf and the dowels again also come in different sizes the one that i'm using for this one was probably about two and a half feet the spacing that i gauged to go down with the macrame cord was probably about one finger length width apart once i got all the way to the end i just glued the ends and then i just cut the cord and tucked it into the back i do recommend to gauge more macrame or jute rope that you need in order to do your crossovers you're better to have too much and cut a little bit off than not have enough [Music] i found this old boss and it's you can't really see it on camera very well but it's pretty badly scratched i wasn't sure because of the shape if that would look right if that makes any sense so i found this which is a more cylinder style and it too has seen better days so again i'm just i'm thinking to make a couple of vases [Music] so i'm going to go and paint up some glass vases that i have and using pure white chalk paint a boar brush and i like to put down some parchment paper because i'm going to be painting the bottom of the glass this will prevent it from sticking as it's drying so i wanted to paint these up as a nice complement to the other diy projects i'm going to show you in this tutorial so all i'm going to do is apply the paint just in random and i actually allowed my paint to breathe a little bit and this is going to help thicken the paint a little bit because it's evaporated i am definitely going to need at least two possibly three coats to complete and i'm going to be doing the stippling method for all the coats and this is going to create some amazing texture [Music] so when i get to the top like that i'll normally just paint in [Music] you know a few inches down onto the inside because if you want to use this or you want to actually put say fresh flowers in it for other decorative purposes you definitely don't want anything in or tampering with the glass on the inside and it will make washing easier as well so as i say i just paint to the inside so that way no matter where you're standing you can't towel that it's glass so i hope that makes sense really important that your glass surface is cleaned really well and make sure that in between your coats they're a hundred percent dry so it could take a few hours and sometimes even overnight is best it will depend on the room temperature the texture of this has turned out beautifully and i'm super happy so again just chalk paint i did do two coats just with the chalk paint and the stippling and i have this cylinder one here that's all textured [Music] so i'm going to go ahead and i'm going to attempt the palm leaf and see how this goes so a couple things you're going to need is some craft paper so you'll need some kind of craft paper or recycled paper scissors some jute and glue got my hot glue gun and you're gonna need a ruler let's give it a go and see how it turns out i wanted to try a couple of complementary palm leaves and i'm just using craft paper and a ruler and i measured out 20 inches by 20 inches if you'd like to make it taller or bigger or perhaps even wider you're just going to add more inches to this project so all i'm going to do here is just fold it directly in half now i'm making an indication mark about six inches up of the paper and from the far left corner with my pencil i'm going to make a half circle that's going to take me down to that six inch mark and this is an indicator of where i'm going to be cutting [Music] now all i want to do is make indication marks where my folds are going to be and it's going to be exactly one inch across so there's going to be 20 inches and i'm also going to make the same indication marks above it so this way i can make my folds extremely straight the first time i did this it did not turn out as nice but when i made the second indication line and kept them exactly an inch this kept the fold from the top to the bottom exact and this way it's just going to look a lot more well presented once you've completed all your folds [Music] now to make a stem for this i'm just going to use a shorter dowel and it's probably about maybe 12 inches and i'm just going to find the indication fold that gives me the center and the hot glue gun to stabilize it and then i'm going to use a little bit of some jute rope and i'm going to basically tie it just so it's a little more cohesive together as well as tie the folds in together [Music] now i went back with my fingernails but you could use a small ruler to do this is just make sure that those folds are really really sharp and this will also help stabilize the actual fan leaf especially when you put it into your mixed arrangements [Music] my husband's so cute he's like i made coasters i'm like for what little kids he's like i didn't have enough burlap for the back so i had to make them a little bit smaller than i wanted anyway i'm just excited that he wants to get into some little crafty things i think he really enjoyed it [Music] i have been seeing so many amazing videos on pinterest as well as youtube on how to make your own pompous grass so i decided i wanted to give it a try and i thought it would again add a really nice element to adding it to natural pompous grass as well as all of the other pieces that i'm creating on this tutorial today for an arrangement so i'm just taking two pieces of jute rope cut to the same size and i'm making a box knot you can cut all the jute string the exact same length and tie them individually but i found by doing this way i could do two at a time and it went a little bit quicker to add a little security i decided to add in just in random a little tiny drop of some other hot glue in between and pull them nice and tight you can use an old comb or a brush that you have i'm actually using one of my dog brushes here it acts a lot like a very fine comb and i'm just going to brush it out so it's nice and smooth and jute actually forms quite nicely so i was able to brush it up but i'm going to show you a little trick to keep it in that position i'm going to leave some amazing tutorials that i've seen doing very similar techniques in my description box below so definitely if you get a chance check that out [Music] since this was my first time making this i decided to just cut a little bit at a time i kept brushing it cut a little bit more and then i just put a little extra jute there at the bottom just so it kind of tied in a little bit nicer [Music] i've had natural pompous grass in my home for many many years and i was told a long time ago because of its shedding factor to use a little bit of hair spray so i decided to go ahead and apply the same to my jute pompous grass and this also held its shape a lot better so just a little tip and creating and again if you're just trying to shape it into a certain form [Music] thank you so much for watching today's video and if you've enjoyed please give me a thumbs up for this video and don't forget to hit that subscribe button if you haven't already and the notification bell and that's going to tell you exactly when i upload my next video please if you have any comments or questions i love reading your comments so leave me a comment in the comment box below and i'm really looking forward to seeing you next week for another decorative finish till then take care [Music] so

As an Amazon Associate I earn from qualifying purchases.


