

As an Amazon Associate I earn from qualifying purchases.

I'm Brad Rodriguez from Fix This Build That and today I'm going to show you how to make easy DIY drawers with pocket screws and these go together super quick. I have two different methods for attaching the bottom the first one You don't even need a table saw for and the second one for a larger drawer I'm gonna use more of a traditional table saw cut with a suspended bottom, but it's also replaceable stay tuned I'll show you exactly how I did it. Alright for this video. I'm gonna show you how to make two drawers. Like I said and different sizes, so I have this dresser It's gonna have two drawers on the top and four drawers on the bottom The first thing you want to know when you're making drawers is what height to make them, so I'm gonna take a measurement For this top one.
It's a little over seven inches tall so I'm gonna make the inner drawers six inches tall for this top I'm gonna go over there and cut those to size, and then show you what comes next Alright for the bottom drawers I have large opening here I'm gonna have four drawers in there and Obviously, there's no framing in between so each of these drawers is going to be about eight inches Tall a little over eight inches some of them make the height for these drawers seven inches each With the height of your drawers established now you want to look at the total size of the drawer box My drawer boxes are going to be 15 and 3/4 of an inch long and that is because I'm using 16 inch drawer slides which are 15 and 3/4 of an inch for this particular model But for the first thing I'm gonna do is get the 15 in 3/4 inch side so the sides are gonna be full-length go cut those on the miter saw I set the stop track on my miter saw to 15 and 3/4 of an inch and cut the sides for my top drawers I went ahead and cut the sides for the bottom drawers as well since they're gonna be the same length But the sides cut to length now we need the total width of the drawer box, that'll help us get our front and back So looking at the opening here It's 15 and 7/8 of an inch So now what we want to do is subtract an inch because the drawer slides are 1/2 inch thick each We'll subtract an inch off That's where told drawer will be 14 and 7/8 of an inch But if you're using plywood for the sides like I am you want to make sure you take into account The thickness of the plywood because it's not 3/4 of an inch it's something a little bit smaller than that so I'll show you just how to take that into account First I set the stop block to 14 and 7/8 of an inch the full width of the drawer box Then I put two small off cuts of the plywood I'm using next to the stop as a spacer now These are exactly the same width as the size of my drawers so I can butt up the pieces against them and cut the drawer fronts and backs to the exact size with no measuring and no math For a larger drawer.
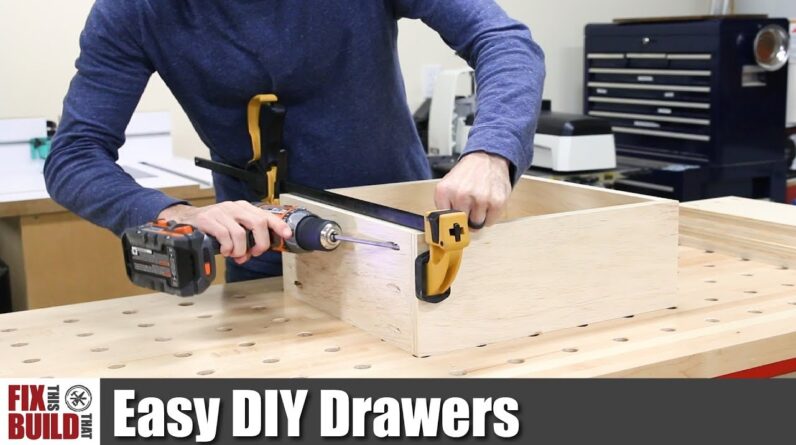
I'm going to use the same method to cut my front and backs to size my total opening here is 32 and a half inches so that total drawer with needs to be 31 and 1/2 inches and I can cut that to size again on the miter saw Use the same technique as before here Moving the fence out to 31 and a half inches and using the plywood spacers to get the perfect fit These large drawer fronts and backs With the signs in the front in the back cut to size now I can start putting together the top drawers I'm gonna take two sides and a front to back and show you how this goes together So the front of the back are gonna be held in place with pocket hole screws That go and connect to the sides So this is how our drawer is gonna be and then we're going to attach the bottom straight to it We can see here the front is at 14 and 7/8 just where we need it I'm using my K4 pocket hole jig from Kreg Tool the sponsor of today's video I highly recommend this jig and using the dust collection attachment makes drilling the pocket holes quick and clean I drill three holes on the end of each front and back for the one in a quarter inch pocket screws I'll be using to join the boxes My pocket holes in place I can just put the sides on to the front in the back clamp them in place Check for square, and I'm ready to go And as fast as that You've got your drawer all we need now is a Bottom for this and I'm gonna cut that to size over on the table saw after I grab the exact Measurements which I should already have I just want to make sure I double-check the drawer For a small drawer like this there's not a lot of chance that you're gonna need to replace the bottom So we're just gonna glue it down and Brad nail around the sides So there you go That's about as fast and as easy as you can do it nail and loan the only thing that we want to think about here Is the bottom if you want to get rid of this little plywood edge? That's revealed that shows that it has a nailed on bottom We can put a bevel on that and make that completely disappear when you're looking at it from the side You can do that in two different ways let me show you both of them real quick So I'm just gonna put a bevel on here And that's why I made sure the nails were set back the first way is just to use a simple block plane If you want to go the power-tool route you can grab a trim router with a chamfer bit it do the same thing much faster So now that the bottom is chamfered you can not see it at all as you're looking at it from this angle and The front pocket holes will be covered up by the drawer front the back is obviously not seen as well So it's a great-looking drawer You can also edge band the top to get rid of this plywood on the top, and you got a great-looking drawer That's gonna hold up to a lot of weight But if I do a bigger drawer that might need the bottom replaced at some point I'm gonna do a little bit different method, so let's go over I'm going to show you what I do with the large drawers that I cut earlier Besides for the larger drawers will get grooves cut in them a quarter inch up from the bottom to cut the grooves I set my blade to half the thickness of the plywood then I move the fence in to a quarter inch from the blade I'll be using a test block here to hone in the fit, and I started by running it through at this setting With everything looking good I went ahead and ran through all the sides for my drawers leaving an eighth of an inch groove from the blade curve or 4/32" now the plywood is 7/32 thick so I move my fence over to the right three thirty Seconds to hit that mark I ran the test board through again and amazingly.

I nailed it on the first try the fit is perfect This is just what you're looking for the plywood slides in easily, but is snug enough to hold the test piece in place I ran all the sides through one more time at the second pass To give them that same sized groove that I just cut on the test piece Now all I have to do is raise up the blade to get a full height cut and run the fronts and the backs through This allows a space for the bottom to be installed after the drawer is assembled.
You'll see that in a minute After drilling pocket holes in the fronts and the backs I was ready for assembly Similarly for the large drawers, it's pretty much like the small ones I have the tops down so that the bottoms are up You can see the groove here That I cut and how it is aligned with the front and the back And that's gonna leave space for the bottom slide in and I can secure it to the front in the back for this larger box I'm going to use a clamp up top as well as a right angle clamp on the bottom to help me keep everything aligned The bottom gets cut to the full 15 and three-quarter inch depth of the drawer and the width of the drawer is gonna be 1/16 inch narrower than the full width that would fit between the grooves Now I'm gonna flip the drawer over and insert the back so that I can screw it in I can check the drawer for square with my right angle square Or I can use a tape measure and measure the diagonals And you want those to be the same measurement side to side then you'll know that it's square They look good, so I'm going to secure it with 5/8 of an inch pan head screws And that's quick and easy attachment method as well this drawer bottom is very solid It's not floating in there, so it's not gonna rattle around and If you ever need to replace it for whatever reason all you need to do is undo the screws pull it out and put another Sheet in I want to give a big Thank you to Kreg Tool for sponsoring today's project the pocket hole jig makes this drawer assembly so easy so fast I use my K4 for a lot of different projects in the shop and for drawers.
It really comes in handy There's a link down below in the description you can check out all the Kreg Tool products and that K4 that I used If you want to check out more of my videos youtube says that's the best one for you right there If you're not subscribed to the channel already I'd love to have you as part of the team you can use that button right there Or subscribe down below and make sure you turn on notifications If you want to support me on patreon you can use that button right there Until next time guys get out there and build something awesome!.
As an Amazon Associate I earn from qualifying purchases.


