

As an Amazon Associate I earn from qualifying purchases.

Hey guys! It's time to get all crafty because
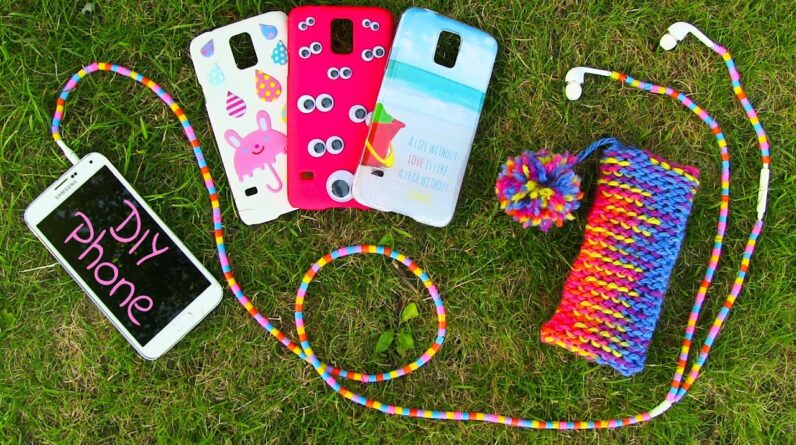
today I'm going to show you how to make your phone girly and cool. We're going to glam
up a bunch of phone cases, headphones and we're even making a protective pouch. So are
you ready for some awesome phone DIYs, which for sure you haven't seen before. If your
answer is "yes" then just keep watching. Let's start off by making a protective pouch
for our cell phone. First you need to get any hollow rounded object, with the dimensions
big enough to fit your phone. This paper cup works perfectly for my Samsung Galaxy S5.
Besides you will also need a glue gun, bobby pins, yarn, scissors, embroidery hook and
a needle.
Before we start knitting we need to make a simple knitting loom. Take a cup
and a bunch of bobby pins. Start placing pairs of pins on the edge of the cup like so, leaving
about half an inch space between each pair. Now it's time to get the glue gun and put
some glue over and around each pin to assure they will stay in place while knitting. If
you don't have a glue gun you can just use a tape and wrap it around the cup and the
pins. When all the pins are glued in place, wait for the glue to dry and then we can proceed
to the fun part, knitting! Take your yarn and this is optional — a straw. Straw makes
it much easier to wrap the yarn around the pins. Cut a piece of a straw and thread the
yarn through it. Leave about five inches of yarn loose like so and then start wrapping
the yarn around each pin and make sure that you have loops on the outer side and the connecting
line of yarn on the inner side.
See how the straw helps me to quickly wrap the yarn around
the pins. When you reach the first pin again, just continue with one more row above the
first one. Now take your hook and pull the bottom loops over the top ones. Grab the bottom
loop, go over the top one and over the pin like so. If you don't have a hook you can
make one from a piece of wire. Go all around the loom until our first row is finished!
Now I need to again wrap the yarn around the pins, but from now on I only need to wrap
them once. When all the pins are wrapped take the hook again and pull the bottom loops over
the top ones. These are the two steps that you need to keep repeating until your pouch
is long enough: wrap the yarn around the pins, pull the bottom loops over the top ones and
again wrap the yarn around the pins so that you can again pull the bottom loops over the
top ones.
It's so simple! Ok, one final row and my pouch will be long enough for my phone.
Here I am showing you that you can also wrap the yarn without a straw. Takes a bit more
time but works totally fine too. I need to pull the bottom loops over the top ones for
the last time now and here we go! Cut your working yarn, leaving about ten inches
and thread on a needle. Go under and through the loop that has a working yarn hanging out
and pull the yarn all the way through the loop. Then go under the loop next to it on
the right, pull the yarn through and proceed to the left. As you do that you can take the
loops off the pins. Just work your way zig-zag, go through the right loop, then left one,
then right again and so on until all the loops come off from pins.
Now the pouch should easily
come off the loom. Pull the working yarn so that the pouch tightens on one side in a straight
line like so. Thread the working yarn on a needle and make a couple of stitches and knots
to secure the work. You can flip the pouch inside out, or you can have it on this side
if you prefer. The pattern is slightly different and I decided to flip it around, because I
like it better that way. As you can see we still have a piece of yarn hanging out from
the side with the opening. We will attach the pom pom on it. Just thread the yarn on
the needle and make a couple of stitches through the pom pom. Cut away the extra yarn and we
are all done with this beautiful pouch.
If you don't know how to make a pom pom, check
my DIY beanie tutorial. It's so easy to make but adds a little extra cuteness to the pouch.
I can now throw my new Galaxy S5 in the bag together with keys and other pointy objects
and my phone will stay protected and without scratches.
Let's continue with beautifying your headphones. You'll need some plastic beads and scissors.
Using scissors cut the beads along like so.
Beads need to be from a softer plastic, which
is easy to cut and can be opened like this. Just continue cutting the beads until you
have them enough to cover the length of your earphones cable. Then open the bead along
the cut and place it on your earphones like that. Continue doing this until your headphones
are entirely covered with colorful beads. Beads also prevent headphones from getting
tangled, which is really useful for me particularly. I usually start using them by spending several
minutes untangling them first.
Colorful beaded headphones are also super cool to look at.
And voila, now you have the coolest and most unique headphones.
Now that our headphones look awesome and we have a cute little pouch for our phone, it's
time to show you some quick and easy ways to decorate a phone case. You will need some
plastic cases, which are very cheap. I got some transparent, some white and pink ones.
First I'll show you how to dress up a plain phone case using a water marbling technique!
We're going to make cute water marble stickers. Take a little cup and fill it with room temperature
water. You'll also need a phone case, needle and nail polish of your choice.

Drip drops
of the polish onto the water surface like so. Always aim in the center of the previous
circle. You can use two or more favorite colors of polish. I used four bright and happy ones.
Pretty cool, don't you think!? Then draw in a design with a needle. I am making a flower.
Well half of it because I'll only need half of the design. Here I am making colorful circles
and I decided not to draw anything in, so I'm just leaving it like this.
Instead of
dipping your finger in the water, as we do with water marble nails, leave the polish
on the water surface until it's completely dry. I left it for couple of hours just to
be sure. Then take the polish off the water and if you want you can cut the edge away
like me to make it neater. And you're left with a beautiful sticker that you can stick
on any flat surface. We will use them on our white phone case and we don't need any glue
for this. The polish tends to stick firmly on the case especially if it's still a bit
wet. And this is how my case looks when all the marble stickers are on. To protect your
work you can cover it with a layer of decoupage glue so that the case stays as new for a long
time.
You can also decorate your cases using washi
tape! I'll show you two quick and lovely designs. For the first one I'll be using this white
tape with pinky flowers. So take a case, washi tape of your choice and scissors. Cut a piece
of tape and stick it a bit diagonally across the case like so and cut away the excess tape
on the sides. Cut another piece and stick it above the first washi stripe, leaving some
space between the stripes. And there you have it. You can totally go crazy with washi tape
and stick it all over the case or just add a simple detail to the plain case like I did.
Either way, just have fun with it. Here, for example, I chose this green patterned
tape. I placed one piece horizontally across the case and the other piece vertically on
the side.
Now my phone case looks like a birthday present. When you get bored of your phone
case, you can easily peal the tape away and make a new design. You can basically have
a new phone case every day! Another way to jazz up a plain phone case
is using a scotch tape. Again you can stick it all over or just make something simple,
like this wide leopard print stripe that I made. I think it looks so elegant and the
thing I like the most is that it took me five seconds to achieve it.
A super fun case decorating method is using a bunch of stickers. You can get cheap stickers
everywhere! Probably a lot of them already laying around your house.
I have these thick
puffy stickers with colorful rain drops, umbrellas and cats. Just stick them on your phone case
and look how adorable this looks in the end. A great thing about these stickers is that
you can simply switch them up so your phone case can be brand new in a minute. I can't
get over how flipping cute this case looks now. Kind of want to have that bunny umbrella
with ears. Now I'll show you how to decorate a phone
case with googly eyes. Sorry if I scared you. You need a plain case, googly eyes and super
glue. First place the eyes on the case just to see where exactly you want to have them.
I placed bigger eyes on the bottom and then smaller and smaller pairs moving up. Take
your super glue, drip a tiny drop on the back of the googly eye and stick it on the case.
This case works perfectly for boys too, except you would probably want to choose a different
case color. A dark blue or a black would look awesome — as if there were some creepy eyes
in the darkness. It's so funny how the eyes move together with the case.
For the last DIY phone case idea you need some picture printouts or magazine cutouts,
transparent phone cases, scissors and a pencil.
Place your phone on the picture and outline
the shape with a pencil. Cut it out with scissors. Try to put it inside the transparent case
to see if it fits well. Now you also need to outline any holes in the case, like the
one for the camera. Carefully cut the holes out with scissors, I am just using these little
scissors for nails, which give me the most control. Next place the picture inside the
case and you have a beautiful customized phone case! I am in love with this one — it's perfect
for summer and I also wrote a little quote on it.
You can have a picture of your pets,
favorite animals, your boyfriend, family and friends or your favorite band. Here I have
this adorable kitten. And here I made a collage of beautiful summer pictures. You can make
a collage of you and your friends to always remind you of happy adventures you have together.
I love how this technique allows me to have a phone case full of pictures close to my
heart and I can change them up whenever I want! I hope you got some great ideas on how
to dress up your phone. I'll be having more awesome DIYs coming up so keep an eye on that!
But before I say goodbye, I have an exciting news to share.
Samsung is having a campaign
called Galaxy Stories and they are looking for a new YouTube star. To become one you
need to tell your story so if you're from one of the Nordic countries, go to galaxystories.com
and submit your entry as a video, picture or a text. If you decide to participate post
a link to your entry in the comments below with the #galaxystories because I get to choose
one who will receive a brand new Galaxy S5! How cool is that!? You can read everything
about the campaign and how to participate on galaxystories.com. Good luck, I love you
and I'll see you soon! Bye! And another surprise! The winner of the Samsung
Galaxy S5 will also receive the pouch and a bunch of cases that I created in this video.
So go ahead – tell us your stories!.
As an Amazon Associate I earn from qualifying purchases.


