The bathroom is the place where you spend a few minutes to do your business or invigorate yourself. Unfortunately, many homeowners have overlooked and decided not to do anything with it. Well, the truth is your bathroom deserves some semblance of style – something that can please your eyes and steal your focus when you have to stay in it for a while. If you are a big fan of the warmth and timeless charm of a rustic look, prepare yourself for being awed by one of these 10 DIY rustic furniture projects for a bathroom.
So, let’s get started! And as always, this list is compiled for you by Simphome.com 10. Transform a Bed Frame into a Multipurpose Shelf Mounting a shelf above your bath tub is necessary as you need a place that can host your bathing essentials and towel so that they can be within your reach when you are still overwhelmed with bubbles. Actually, you can find many tutorials on how to make a wall-mounted shelf from scratch. But this wall-mounted shelf will do more than just storage space. And the good news is anybody can make it with ease, even if you are a novice carpenter. To make this shelf, you need to get an old bed-frame from your storage room or flea market near you. Then, add a board supported by wooden brackets as the mounted shelf that will hold your soap, shampoo, and even planter. Next, drill holes on both brackets so that you can slide a one-inch round dowel through them. Paint all of the surface white, and you’re done! You can also sand the paint down a little bit to create a well-worn look. 9. Make Bathroom Shelf from Wooden Pallet If you happen to have a petite bathroom, a piece of furniture that serves a double duty will be your best bet, just like this shelf.
This shelf is made out of an old wooden pallet, which is renowned for its versatility when it comes to home décor ideas. It provides an ample storage space right above your bath tub, so you can hang planters, towel, or even some bathing essentials there. The good thing is you can also make it as a divider that separates the bath tub from the closet. Since the wooden pallet has some slats that form pockets on the other side, you can store toilet papers and magazines in them. All you need to do is just finding a wooden pallet, sand it down to remove any splinters, and screw it to the bath tub. 8. A Wooden Bath Tub Tray project idea It is always great to linger in a bath tub that full of foam especially if you have done a pile of work. If you are going to do it this weekend, make sure you make this rustic tray to set down your soap, drink, and anything that can support your me-time.
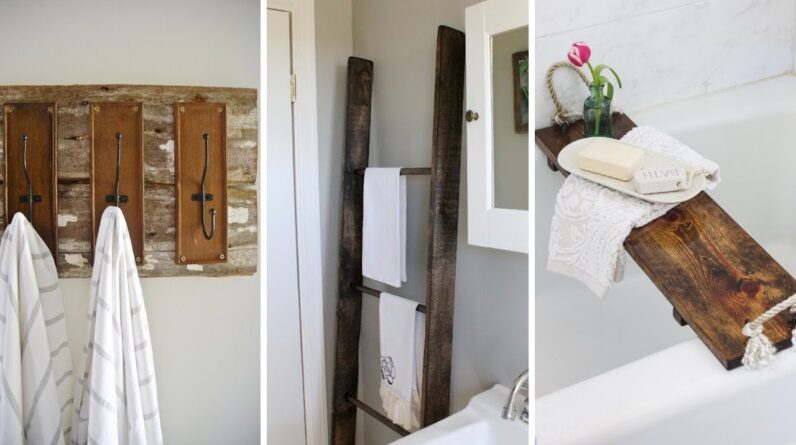
Making this tray is merely a breeze. The first thing you need to do is cutting two 1-inch-wide pieces from a 1″x6″ x 3′ board. After that, cut the remaining board to the width of your tub. Attach the 1” strips underside of the board. Make sure they fit inside the tub but against the wall so that the tray won’t slide. Next, drill two holes on each edge of the tray to install two knobs. Stain the tray. Insert a rope through the knobs and tie a knot on each end. 7. A Simple Floating Shelves project idea Apparently, sufficient storage space is the issue in almost any tiny space area, including a tiny bathroom. To overcome your problem without compromising the valuable space, this DIY floating shelving idea will come in handy. To make this faux shelving unit, first, you only need to get two boards and cut them to the size that you expect. Sand it down, then apply a couple coat of gel stain. You can also apply two coats of polyurethane. Next, hang the shelves by screwing them to the L-brackets that have been screwed to the wall.
6. A Ladder Towel Holder project idea Repurposing an unused thing like a ladder that you get from your storage room can be a great way to cut down on waste while furnishing your bathroom on the cheap. You can just sand an old wooden ladder down, then stain it thoroughly. However, if you don’t have one, yet you want this towel holder so badly, you can make the ladder from scratch. It may take more time, but I am sure it’s worth trying. The first thing you need to do is getting 2-6’ boards and 1-6’ ¾” dowel rod. Cut the dowel rod into 4 pieces to make rungs. Then, drill a shallow round in the board using a ¾” paddle bit to set in each rung. Insert each dowel rod to the shallow round and secure it with long screw.
Once the rods have been attached to the boards, get another board and screw it to the other side of the rods. For the finishing set up, apply dark walnut stain and a coat of paste finishing wax. 5. Double Vanity project idea Having a spacious bathroom is a blessing. It allows you to invest in any furniture you like, including this double vanity. It allows multiple users to occupy this grooming area at once. Besides, it also provides a more spacious countertop to set down grooming essentials that you use on a regular basis. To make this vanity, you will need: • 4 x 8-foot long 1x4s • 8 x 8-foot long 1x3s • 2’ x 4’ sheet of 3⁄4” plywood • 2’ x 4’ sheet of 1⁄4” plywood For the instruction, first, cut the boards into 1 center-face frame, 4 door frames, 4 door frame sides, 8 door panels, 4 front/back frames, 8 legs, 4 side frames, and 8 side panels.

Next, assemble the legs by attaching two pieces of legs to form a 90-degree. Then, assemble the side assemblies and face frame. After that, assemble the vanity carcass and the door frame. After all those steps were done, next, it’s time to attach the door panel to the door frame. First, Install the door hardware, and attach the side panel to the carcass. Next, install the plywood bottom after cutting it to size. Then, cut the back panels and attach it to the vanity. Finally, apply the finish you want. 4. A Rustic Mirror Frame project idea A mirror frame can change the style of your bathroom immensely.
A frameless mirror would offer a modern flair while a mirror with a wooden frame would bring the rustic charm into the space. Making this mirror frame is not as complicated as many people predicted. First, you need some ½” old boards. Rip four boards into 3 ½” to make the face of the mirror. Next, rip other four boards into 2 ½” to make the spacer behind the frame. Next rip the boards into 1 ¼” to make the outer edging. Last, you will also need some glaciers points to install the mirror to the frame easily. Just press them to the frame using a putty knife, and they will hold the mirror well. 3. Mason Jar Organizer project idea You may want the grooming essentials that you use daily are within your reach whenever you need them. Therefore, you tend to store them in some containers, and simply put them on the countertop, which overtakes it.
To free up the space of your countertop, you can make this mason jar organizer which will be a money-mindful décor while holding the clutter at bay. From the image, The DIY is self-explanatory. But if you still need help, you can visit link inside description area. 2. Bathroom Hooks Project idea Don’t overlook the hooks in your bathroom. Because they are not only providing some space to hang your towels and clothes, but they also amp your bathroom up. To take the rustic look to the next level, you can get an old board and install some hooks on it. Wrought-iron hooks would accentuate the farmhouse style in your bathroom for sure. And to complete this idea, check last project after my next short message end. Before we get to number 1, I suggest you press subscribe button if this channel is new to you. Get new updates automatically every time I upload new videos. And let's find out the last idea sitting honor top chart. Lastly, 1. A Wooden Bathroom Cabinet project idea with Mirror Having a full-length mirror in your bathroom is such a great idea as it can help you double check your look before leaving the bathroom.
To make this cabinet, you can begin with making the door. Then, you can make the cabinet frame along with the shelves. Stain all the surface. And when it is dry, attach the mirror to the door. So, these DIY rustic furniture projects will definitely a life savior for your bathroom. They will not only optimize your storage space, but also beef your bathroom up in an affordable price. That's it for now. Before you leave, like this video if you truly enjoy it, comment it, or share it with anyone close to you in your social media account, or email this.
Browse and follow simphome website for more home decor and makeover ideas. Lastly, see you again later with more videos like this in the near future. And until that time, thanks for watching..
As an Amazon Associate I earn from qualifying purchases.


