

As an Amazon Associate I earn from qualifying purchases.

hey there welcome to diy projects with pete
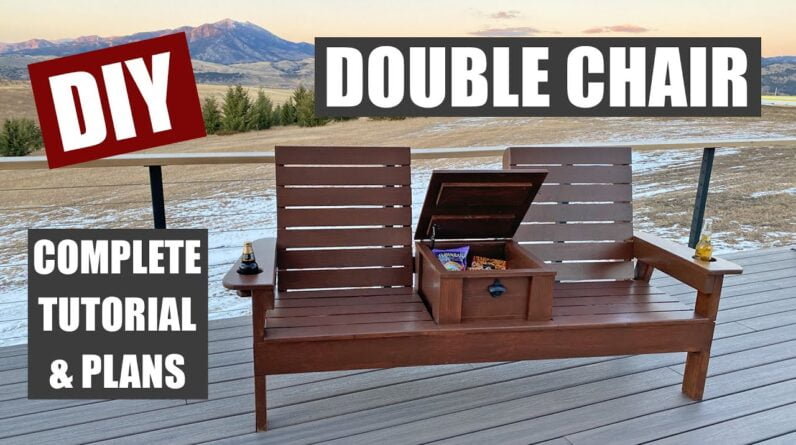
thanks so much for tuning in in today's episode we're going to build a new version of the double
chair we spend a lot of time out on the patio and these chairs have been a great addition to
the space now a lot of fellow diyers have built and customized the first version and it's been
really cool to see what everyone has come up with so if you've built this or something similar
i'd love to hear about it in the comments below the old version i built about six years
ago has been great and we love using it but a few suggestions i've had over the
years have been to make the seats wider the back rest taller and add drink holders and a
storage area i hope this project inspires you to get out in the garage and to try some woodworking
alright let's get started with today's build i started by picking up some lumber at the
hardware store and this project was built mostly out of one by and two by material i used pine to
help keep the costs down but cedar is another good choice or used reclaimed materials if you have
them we'll start by building the front legs for the double chair and the plans are available at
diy pete dot com forward slash diy double chair or they're linked to in the description below if this
is a project you're interested in building i'll use a miter saw to make each of the cuts and i've
built up my tool inventory slowly over the years but remember getting started with a used
miter saw i found on craigslist for 65 dollars which is the one i'm using in the old double chair
video six years ago but don't feel like you have to go buy a bunch of expensive tools if you're
just getting started definitely look for deals or try to pick up used tools to save money the two
front legs are cut straight at a 90 degree angle next we'll cut the two rear legs the rear legs
are cut with a 15 degree angle on each end and the cuts are made parallel to each other
start by making the first 15 degree angle cut then measure down 24 and 5 16 inches and make a
mark and then make another 15 degree angled cut for today's build every cut will be either
straight or cut at a 15 degree angle we'll cut the two armrest supports next one end will be cut
at 90 degrees and the other end will be cut at 15 degrees then move on to cut the front 2×6 support
board at each end for those beginners out there it's kind of confusing but a two by six board is
actually one and a half inches thick by five and a half inches wide the store will say its nominal
size but the actual size is going to be smaller the front support is cut to 70 inches in length
next cut the rear support 2×4 board to 67 inches in length here's a look at the boards we've cut so
far which will start to form the base of the chair for the front legs we'll measure up nine and
a half inches and then create a notch for the front support board now this notch
will be one and a half inches deep by five and a half inches tall draw out the
notch using a straight edge and then cut using a jigsaw take your time with this process
so you can get as straight a cut as possible before assembling i like to sand each board
to remove rough edges to smooth the board and to remove any printed marks on the boards and
i prefer doing this outside but it was pretty cold so i just did it out in the garage we'll
assemble the sides of the frame first using a combination of wood glue and screws now for
demonstration purposes during this video i'm not going to use glue for each connection but i
would recommend using it for some of the joints make sure the front leg is oriented correctly so
the taller nine and a half inch section below the notch is closest to the ground the armrest support
will then be secured flush with the top of the leg at a 90 degree angle and always pre-drill and
then insert the screw i use about three screws for most connections and for this part use two and
a half inch long wood screws the rear leg will be placed 12 and a half inches behind the back of the
notched leg where it connects to the armrest so just measure and mark where to line it up and then
more details are in the plans if you need them make sure the top of the rear leg is flush with
the top of the armrest support and i used a straight edge below the legs to check that they'll
rest flush on the ground once they sit upright next we'll repeat the same process to assemble the
other side of the bench the armrest support piece is placed to the inside of the legs on each end i
like to use a countersinking bit when pre-drilling because it gives the screw head a cleaner and
more professional look once they are countersunk then i'll place each assembled side together
to see that they match up and that the legs are lined up correctly this is going to help ensure
you have a solid foundation for the project and that it's going to rest evenly on the ground the
next step is to install the front support board pre-drill and then lift the board into the notches
on each side i used three inch long screws on each side and if you'd prefer to put the screws in from
the back side or behind each leg to hide them go ahead and do so i'm putting them in from the front
side in this video we'll make the cuts for the four cross supports next one end will be cut at a
90 degree angle and the other at a 15 degree angle pre-drill on each end and then attach to the
front and rear legs the front of the cross support will be flush with the top of the front support
board and you can check to make sure it is level on the rear leg by checking that it is five inches
down from the bottom of the arm support board clamps are going to be helpful to hold
the boards in place during the install and use two and a half inch long
wood screws for each connection then repeat the same process for the other side next we'll install the rear support
board which is made out of a 2×4 and to make this step easier i'd
recommend flipping the frame upside down so you can simply rest the support board on the
cross supports this step was sort of confusing in my last video so building the frame in this
order and using this technique makes the process easier and more straightforward simply rest
the 2×4 flush with the cross support board next pre-drill and then insert three
inch long wood screws on each end once complete go ahead and
flip the frame right side up then measure in for the placement
for the other cross support boards the front of the cross support will again butt
up to the front support board and the top of the cross support will be flush with the top of the
front support board now the other side of the cross support will rest on the rear support board
go ahead and attach the boards using three inch long wood screws and you may notice i accidentally
drilled an extra hole too low so i filled it with some wood filler i used a square to help keep
the screws in a straight line when possible pre-drill and then use three inch long
screws at an angle to connect the cross supports to the rear support board i used
a screw on each side of each cross support this is basically what's referred
to as toenailing the boards together except we're using screws next cut the back rest
support boards the bottom end will be cut at a 15 degree angle and the top end at a 90 degree angle
there are a total of four backrest support boards test fit the board to check that it lines up
correctly then mark where you'll round off the top edge i used an ice cream bucket to get a
nice rounded edge and a roll of tape or basically any bucket would do the trick use a jigsaw
and slowly follow the line to make each cut follow up with a sander to smooth
things out and remove rough edges i used the first board as a template to mark the
rounded corners for the remaining three boards then repeated the cutting and sanding process set the backrest support on the
top of the rear support board and then line it up so it matches the angles
of the armrest support and the cross support pre-drill and use two and a half inch
wood screws to attach it at each location then connect the inner backrest support to the
cross support set it on that lower support board and line it up to match the angle of that cross
support board add about three screws for the connection a clamp is going to help keep things in
place and will make the process a bit easier this board secures just like the last one and here goes
the last backrest support simply attach it to the armrest support and cross support like we did on
the other side now we'll move on to the backrest and chair slats we'll use 1×4 boards for all of
these and cut them all to length on the miter saw each chair is going to use five slats and each
backrest will have seven slots start by adding a slat at the top for each backrest this is going
to help square up the backrest support boards i'm using two inch long wood screws for this
process and the backrest slats are cut to 23 inches long then i'll move on to the chair
slats which are and a half inches in length i'm going to use a round over bit on the front
slat to soften the edges and give it a nice look now this is totally optional and you can use
a sander to sort of round over the edges a bit if you don't have a router i'm cutting a couple
quarter inch spacers from a scrap piece of 2×4 to help evenly space each slat and to give it
a gap of approximately a quarter of an inch the first slot should overhang the front
support board by a quarter of an inch and pre-drill and attach each slat using two
inch long screws if you want to get them lined up perfectly straight use a straight edge to line up
those screw heads and the screws near the armrest support side will need to go in at a slight angle
i used the spacers to help create even gaps as i laid down each slat and this process goes quickly
you'll have a chair to sit on before you know it then you can go ahead and repeat that
same process for the other chair slots next install the backrest slats it's easiest
to work from the bottom side to the top side and shoot for about quarter inch gaps again
work your way up until all slats are secured if the gaps don't work out absolutely
perfect or one is narrower or one is wider you can adjust it a bit but
honestly no one's going to notice next we'll move on to the armrests now the
armrests are going to overlap the front a half inch but then they're going to be flush with
the back of the armrest support since we're adding the cup holders we'll need to use a wider type
of board and so a 1 by 8 board will work perfect i rounded the corners using an ice cream bucket
again and it used a straight edge to connect each of those rounded corners feel free to come
up with your own unique design for the armrests use a jigsaw to cut out the shape of your
armrests and you'll need to have the front of the armrest about the full width of the board to
fit that three-inch cup holder with room to spare use that first armrest as a template for the
second arm rest and then go ahead and cut it out just like you did the first i took a look at where
placement would work for the hole to be drilled and you just want to make sure there isn't a
board beneath where the hole is going to be go ahead and transfer your measurements i used a
three inch hole saw to create the hole that the drinks will be lowered in make sure everything
is clamped and secure for this process since hole saws can kind of have a mind of their own
and be pretty dangerous if not used correctly i used a round over bit around the drink hole and
then around the entire perimeter of each arm rest while i had that router out i did the top slat
of each backrest as well the armrests were then secured in place using two inch screws and
wood glue and you might add some additional blocking under the armrests as well if you feel
it needs a little extra strength to support it to make the part of the cup holder that will hold
up the beverage i cut a scrap piece of 1×4 board to about three and a half inches long and then
rounded the two corners i rounded over the edges and then placed it about two inches down from
the hole i then pre-drilled through the armrest support and into the cup holder part then used two
three inch long wood screws and glue to attach it now if you don't care about the center
storage feature for your double chair and just want a table you can simply
add four 1×4 boards in the center area connect them with some two by four boards and
then secure some 1×6 boards for the tabletop now i thought i'd just show you a quick example
in case you wanted to do this and you can check out that full process more in depth in my other
double chair video linked to in the description for this build we are going to build a storage
area and we'll start by framing it out using 2×4 boards to form the base cut these to length
according to the plans pre-drill and then use two and a half inch screws at each corner to connect
them next we'll use 1×4 boards cut to 14 inches in length and use some wood glue and nails to
tack them together now if you don't have a nailer you could connect them using a smaller diameter
screw or another technique once assembled fasten them to each corner and you can use wood glue and
then two inch screws from the inside then go ahead and place each horizontal slat into the box and
these are all made from 1×4 boards there will be three on each side i used one and one quarter inch
long screws to connect the boards to the corners now it's time to place the box into the center
area and it should fit snug between the front and rear support boards the bottom of the front of the
box will be flush with the bottom of the front 2×6 support board clamp it to the front support board
and then use three inch long wood screws to secure the box to the front support board when securing
the box in place make sure it has an even gap on the left and the right side it's designed narrower
to make sure that the table top lid can open and close without bumping into the backrest secure the
box to the 2×4 rear support board the back of the box will not match up flush with the bottom of the
rear support board it's actually about an inch and a half up as seen in this diagram i cut a strip
of wood down to 1 and 5 8 inches to use as trim for the top of the storage area i then mitered
the corners at 45 degree angles now the trim is going to slightly overlap the outside right left
and front of the storage area but it's going to be flush with the inside of the box secure it
using wood glue and nails or another method i laid out the 1×6 boards for
the lid or for the table top and decided to rip them down on the table
saw so i could use four evenly cut boards i then took measurements to center two
pieces of 1×6 board on the underside of the lid which will hold the slats
together i then tacked them to hold them in place temporarily and then secured with
one and a quarter inch long wood screws again wood glue is recommended for
many of the connections in this project 1×6 boards were cut to length and
used to form the bottom of the box one of the boards was ripped down in width
on the table saw so it would fit perfectly and then they were all
attached with two inch screws i decided to make a little piece to fill the area
in front of the storage area so i ripped a board down in width took some measurements and then
notched the board with a jigsaw so it fit around the compartment area i then rounded the front
with the router to match the other front slats here i'm doing a round over around the left
front and right sides of the lid and this is purely optional i then put a bottle opener
on the front and did a quick round over of the inside of the compartment trim three inch t
hinges were then used to attach the lid to the box to add additional strength to the backrest
area i doubled up a couple two by fours and then secured them to both the box and then
to the left and right backrest supports i used a stainable exterior wood
putty to cover the countersunk screws and it's up to you if you want to take the time
to do this or not i used my fingers to push it into each hole and then wiped off excess a bit
before it dried and then a few hours later i used a sander to remove the rest of the excess
putty and to smooth out all the boards i sanded a few hard to reach spots by hand and then ran
the orbital sander around the bottom of the legs then remove any hardware before applying a finish
now i brushed on a semi-transparent outdoor stain to try and make this wood chair as durable and
maintenance free as possible and staining the chair takes a while if you're going to be brushing
or wiping on a stain but if you have a sprayer it can be done in a matter of minutes
if you want to learn more about spraying outdoor furniture check out my video showing the
process which is linked to in the description i let the stain dry and then reattach the hardware
and put a lid support in for the storage area i also put on an eye hook so the lid won't
get blown open when not in use lifting the double chair is a two person job and the weight
of it does a good job with standing the winds all right thanks so much for tuning in i hope
you enjoyed today's project and found it helpful if you did please give the video a
thumbs up and subscribe and i hope this video inspires you to go out and build
something take care and cheers for montana you

As an Amazon Associate I earn from qualifying purchases.


