

As an Amazon Associate I earn from qualifying purchases.

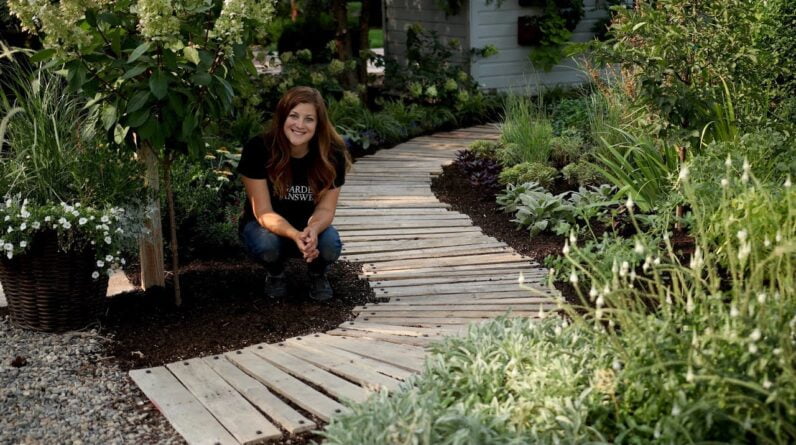
hey guys how's it going in today's video I'm installing a pallet walkway and I want to show you how I'm gonna do it so I think I've got the perfect spot we're right behind our tool shed and potting shed and gazebo Oh kind of back in this area I think it's gonna look really great I actually think pallet walkways look a little bit magical like kind of life-sized fairy garden style so I've got my pallet surrounded up the first thing I need to do is rip them apart so you can usually pick up old pallets for a song I mean visit any grocery store anywhere where somebody's receiving product we received like concrete implants down at the garden centre on pallets and we end up with huge stacks of them so that's what I've got here are just some aged ones that I've kind of chosen I like how thick the boards are to tear them apart it's really easy all you need is a saw a crowbar and a hammer and some serious elbow grease also you need safety equipment in the way of gloves and a pair of protective glasses I can't find my safety glasses in the garage so I'm just gonna use some sunglasses whatever protects your eyes the first tool I'm going to use in this project is a circular saw you certainly don't need to use a power tool you can use a regular hand saw it would just take a little bit more time and a little bit more work on your part Erin use the opportunity to buy another battery-operated tool which I can't really complain about alright we'll put the pallet over here since I don't want to pry up every single nail in this pallet I'm going to go ahead and cut a line along this side and then cut right along this side and that way I don't have to pry any of these side pieces up so I suppose you don't have to use a saw at all if you don't mind the extra work all right so now with a crowbar and a hammer I'm just gonna work on gently prying up each one of these boards from the center so each pallet that you come across will be a little bit different this one is a little bit harder than some others to get apart and some come apart really easy so this is gonna take me a little while [Music] so that was a lot of work even with power tools I worked up a pretty good sweat so halfway through Aaron was like you know what it would be a lot easier to just cut the boards off of that center piece of wood instead of prying up all the nails with the crowbar so we went and got this out of the bar and this has a metal blade on it so I was able just to slide this under every board and just cut them off right at the nails so that saved me so much time again not necessary to use this tool but it does make it easier in fact I think that you could probably use just this one tool to cut all the boards off instead of cutting the sides and messing with that whole business but I'd already started by cutting the side so I made my boards shorter so I kind of had to keep going in that vein but anyway this project can be done multiple ways so this right here is where the pathway is gonna go it's gonna start right here underneath this Arbor and this is kind of like goes into our driveway area back here so it'll start right here by these pavers and it'll just kind of swing around kind of you know buy all these plants and this I just have been working on um so with every area that you're gonna do a walkway you want to make sure it's pretty level this area was fairly leveled down on this side but over there there was a little bit of a dip in the walkway kind of section so I did go ahead and mulch the whole area and I just did really like a lot deeper mulch toward the beginning over there the whole area needed it anyway because I had just kind of messed everything up with all my planting and I ran new drip lines so it's fairly level the more level you have it of course the longer your pathway it's gonna last and we've got pieces of wood that are fairly old anyway so you want to have as much support underneath them as possible so now what I'm gonna do is take all of the pieces I just cut and I'm just gonna lay the whole pathway out alright so as I put these boards down I'm gonna kind of nest them in to the mulch a little bit and I also don't really have a pattern that I'm going with I'm just gonna kind of put them down and eyeball it so they're gonna be slightly different widths apart from each other they're also not all the same length see that I wanted it to look a little bit more whimsy rather than so precise so I just try to make sure if I've got different colors or different widths that it's kind of separated a little bit like not you know five of the same with the board all in the same area so I'm noticing in a couple of these boards that there's a little bit of springiness and so I know that I could come in and either add a little bit more moult's under there I could have spent more time in the prep process of this like tamping the area down properly and all that business but I think I got a pretty level and this is meant to just be a quick fun project and I'm really happy with the way it's going so the next thing I'm going to do is I'm going to come in with my drill and I'm going to drill holes on either end of the board right here and then I'm gonna run my pins down into the ground and that's what will help secure everything in place [Music] I got pretty much the whole thing done except for I did my math really wrong so I've gotta go back to the store and get more landscape pins but this is what I use to anchor all the boards down these are eight inch plastic landscape edging pins now you could use whatever you want to anchor these down I mean if you can figure out something that's really cheap to do this with and you know you could make this pathway for a lot less expensive but all in all after I go back to the store I'll probably be in this project about $75 which is mostly just pins and I think that is really good for how it turned out it looks very whimsical which is like what I wanted back here I didn't want it to look really rigid or like pavers or stones I just wanted something softer back here and once I got em all pinned down I mean they are sturdy they're stable I don't like feel uncertain walking on these at all what I will do though once I have them all pinned down is I'll probably come pour a little bit more mulch on top and sweep it in between each one of the board's so that they're a little bit more nested in so anyway that's it for this video you guys I hope you enjoyed seeing it come together and maybe it sparked something for you like some kind of idea of what you can do out in your garden so thank you guys so much for watching and we will see you in the next video [Music]

As an Amazon Associate I earn from qualifying purchases.


